'DIY PROJECTS PAGE'~
ON THIS PAGE WE PERIODICALLY FEATURE PHOTOS OF JUST A FEW OF OUR MANY PROJECTS.
email~
countryladyantiques@yahoo.com
Thank you for visiting~
___________________________


PLEASE NOTE~ We are not on Facebook.
The Country Lady Antiques on Facebook is an entirely different person and business.
THIS SITE DOES NOT ALLOW PINNING TO PINTEREST.
Unauthorized use and or duplication of any photos/material on this copyrighted site without our permission is strictly prohibited.
____________________________________
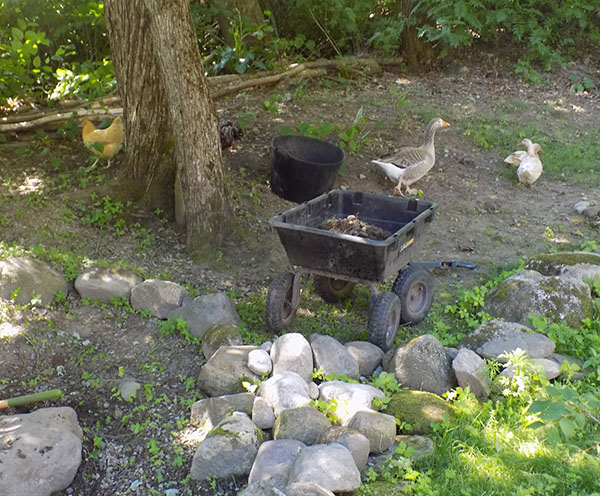
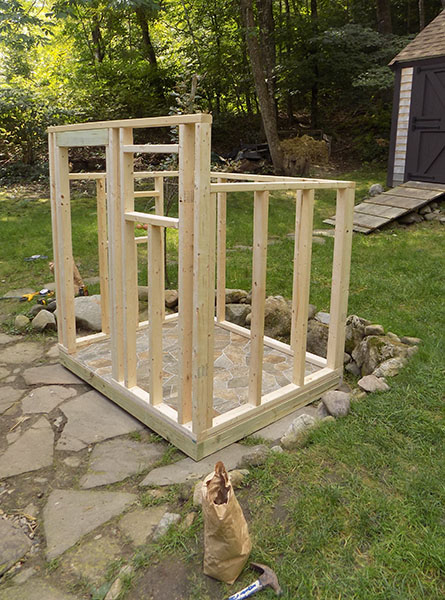
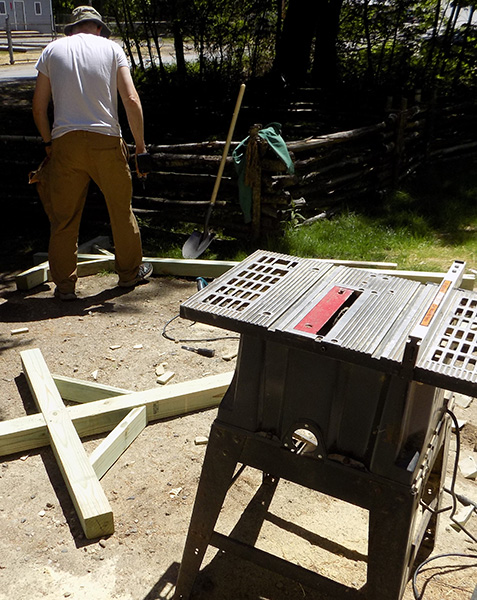
A NEW PROJECT WE'RE PLANNING FOR THIS SPRING/SUMMER...
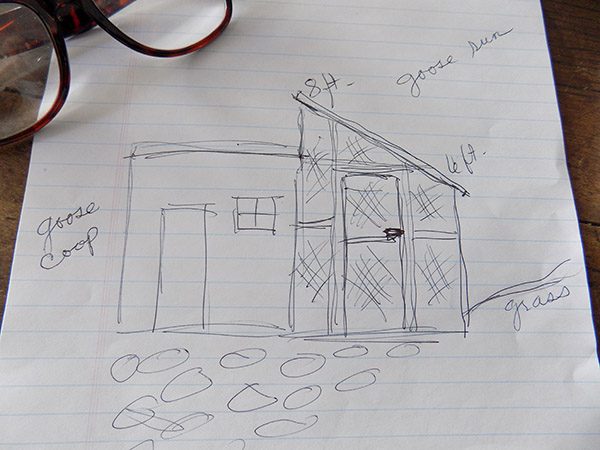
We hope to start this new project later in the spring, or early summer at the latest.
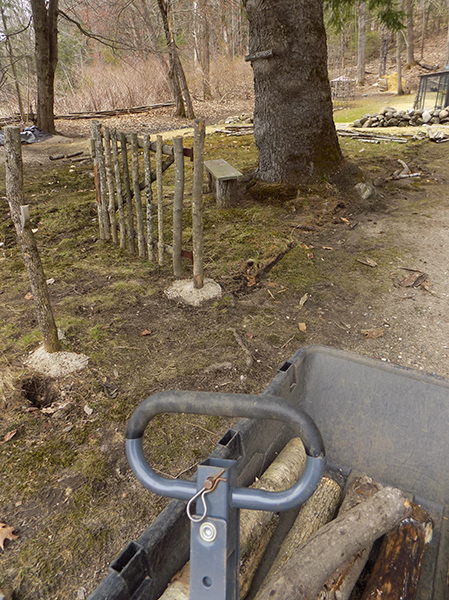
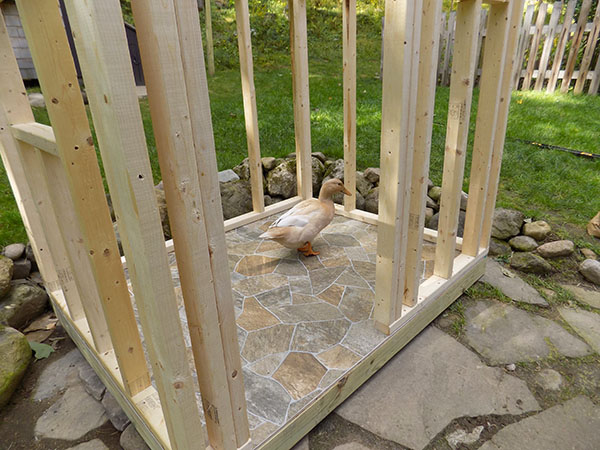
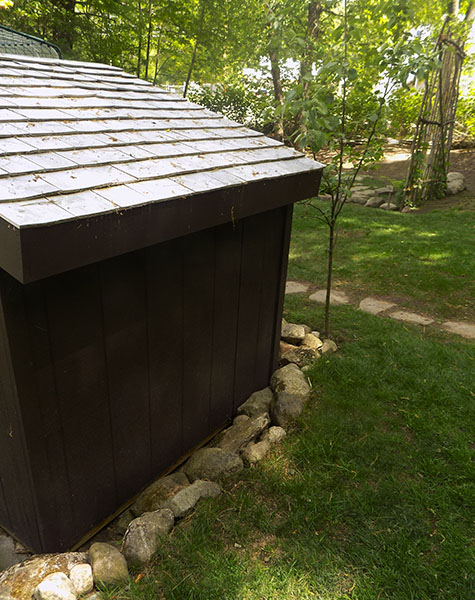
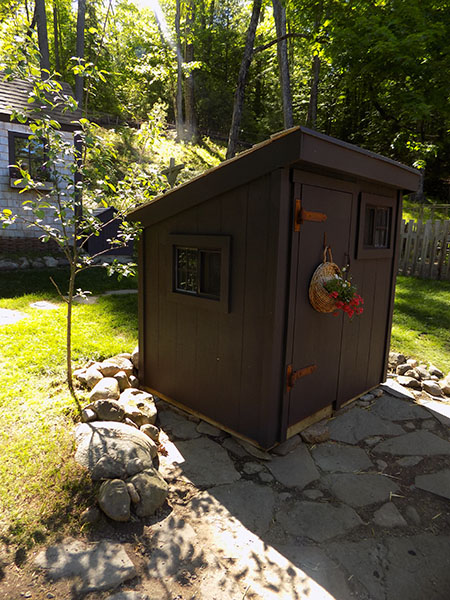
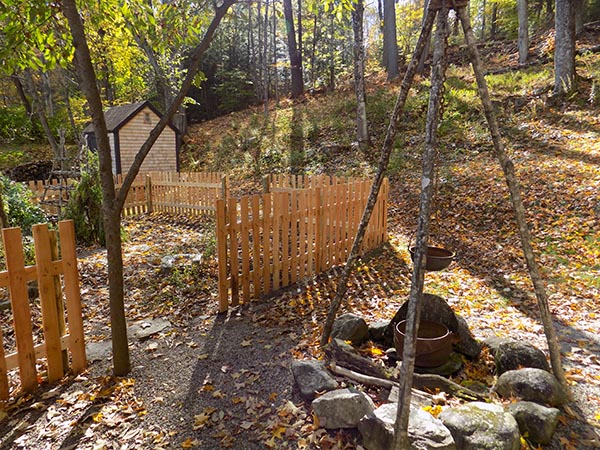
Currently our duck/goose coop does not have an attached run. We bought a free-standing, utility wire run years ago when we got our first ducks an goose and it was fine for the time being. It's a bit too small, not great looking, and it's time for it to go.
We designed and built our goose coop ourselves. The run is currently directly across from the door of the coop and divided by a walkway/access. This is inconvenient because the ducks and Gabby cannot access the run from their coop. We have to heard them in ourselves.
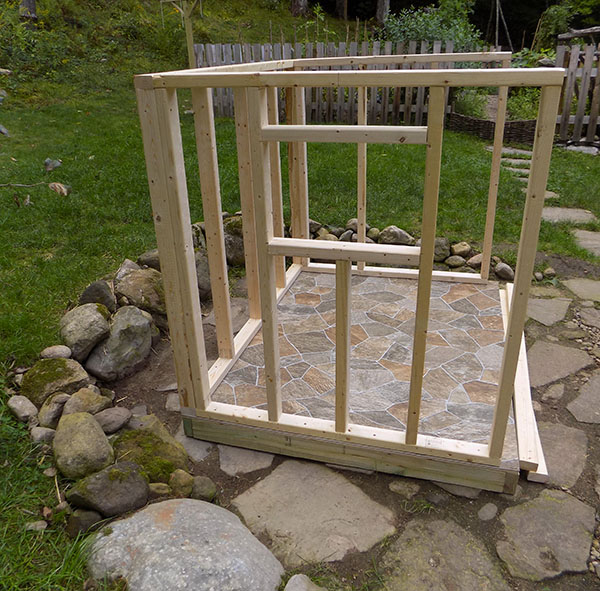
We decided it was time to design and build a wood and wire run ATTACHED TO THE SIDE OF THE GOOSE COOP, with a little door inside their coop so they could go directly into the new run. It would be tall enough for a man to stand so we can easily clean, and would have the human access door at the front, just like their coop.
I did this quick sketch of my idea for Adam and he loved it. The left shows the existing goose coop, and to the right would be the new attached run.

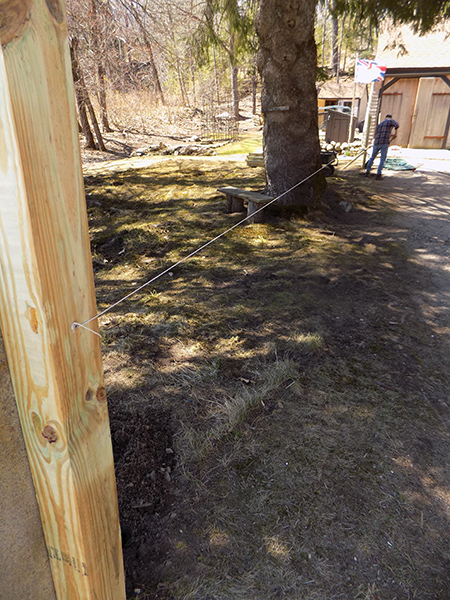
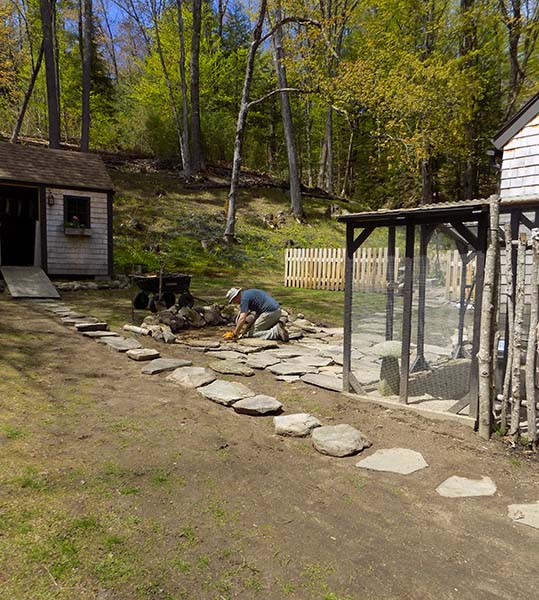
THE NEW, ATTACHED RUN will be in this grass space attached to the side of the brown-painted goose coop here.
This is how we normally do our projects. I can have an idea and make a quick sketch and we then brainstorm and teach ourselves how to build whatever it is.
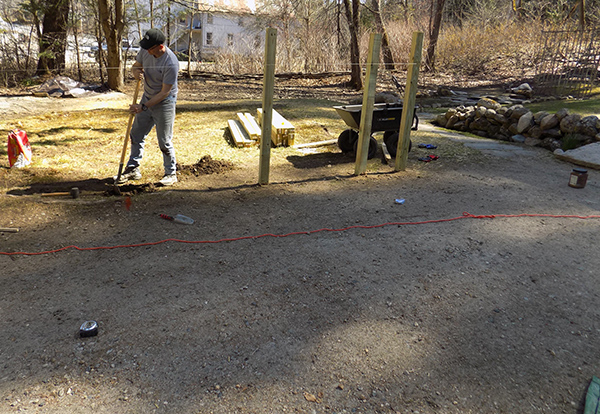
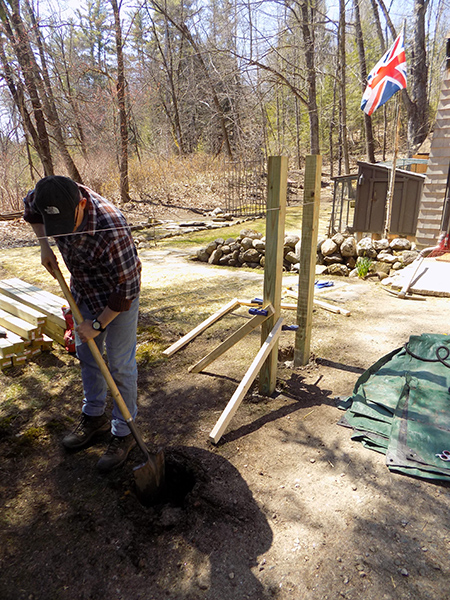
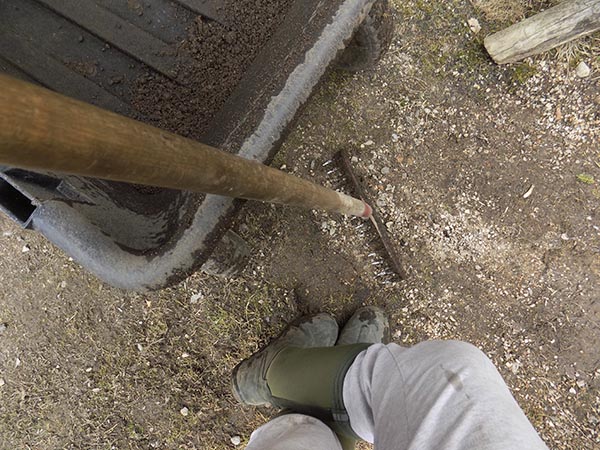
Because our land is not level, we'll have to dig out the space where we're planning the run so that it can be level with the coop and then attached to it. This is the most labor intensive part---Digging out all that dirt and leveling.
We're planning an 8 ft. x 8 ft. run, with shed type roof, 8 ft. tall or so at the back and just over 6 ft. at the lowest point.
The new run will be constructed as we did the chicken run, of 1x4 wood framing, no floor of course, and then the sides and door floor to top of welded-wire fencing. The roof will be plywood base with cedar shingles over it like the coops. The wood framing will be painted with the same brown house paint. We'll of course cut a small goose-size opening in the coop side at floor level, frame it, and put in a little door so our girls can access their run without going outside.
We'll transfer the pea gravel from the old run over to the new one for the 'floor'.
We'll then add dirt to the area where the OLD run was and lay natural stone like the rest of the area. This will make a small patio directly in front of the goose coop that will be much more handy for moving around with cleaning supplies, or even just as a small garden area for clay pots with flowers!
WE'RE REALLY ANXIOUS TO START THIS PROJECT AS SOON AS SNOW MELTS AND WE HAVE THE YARD AND GARDENS CLEANED UP AND PLANTED/SORTED.
WE'LL BE DOCUMENTING THIS BUILD ON
THIS PAGE~
_________________________________________

IN OUR OPINION...
AS REQUESTED, WE'RE OFFERING SOME PERIOD DECORATING ADVICE~
I TAUGHT A CLASS ON ANTIQUES AT A COMMUNITY COLLEGE AT ONE TIME, AND WE HAVE EXTENSIVE HISTORICAL KNOWLEDGE AND EXPERIENCE AS WELL AS HAVING DONE PERIOD DECOR IN OUR OWN HOME, AND OTHERS.
I have received many kind compliments over many years on my home, projects, and antiques. We are longtime history geeks.
Our early cape is the oldest standing house in our little town. I had 17thc. antiques and decor---the 'cringe-y', so-called "pilgrim style", many years before it suddenly seemed to (sadly) became a trendy 'thing'.
SOME 'CRINGEWORTHY' DECORATING FAUX PAS WE WOULD NEVER DO AND NEVER RECOMMEND...
(We'll add to our list)
1.
Most importantly, surround yourself with the things you truly love and have an affinity for. Don't follow the 'trends' or current fads. Don't 'decorate' in 'formula' styles, imitating each other. We see far too much of that out there. Along these lines, don't label your home; "This is my Pilgrim style house", "I love to decorate Pilgrim", etc. It's just---silly.
2.
All my life I have done my own thing and not cared what anyone else thought.
3.
---Don't use old army blankets as bed hangings. (In the book 'New England Begins: The Seventeenth Century, Volume 1' you will see in brilliant color a photo of 17thc. bed hangings with similar colors and motifs to my own.)---The first colonists did not hang tatty 'army green blankets' on beds for hangings!
4.
---Don't hang children's chairs (or any chair) on the wall.
5.
---Don't try to replicate a 'Plimoth Plantation 'hovel look' in your HOME. Conversely, we often see inappropriately 'fancy' antique furniture in simple homes---Don't try to make your house look like those at Plimoth Plantation OR a period English manor house.
We suggest you don't put a heavily, ornately carved Elizabethan table or a too-formal, overly carved, too-tall 'castle' /mansion bed, chair, etc. in your home, for example.
6.
---JUST BECAUSE YOU SEE IT AT PLIMOTH PLANTATION DOES NOT MEAN IT'S ALWAYS 'CORRECT'------Plimoth not long ago had the renowned Stuart Peachey from the UK come and give them help and advice to correct some of the things they were doing wrong and portraying inaccurately.
7.
---Resist the urge to put a lot of hornbeams, sacks of grain , foodstuffs, hanging rags, etc., all over every room of your home instead of in a buttery or the like, where they belong.
---No one back in the day would have owned umpteen hornbeams, or have too many pieces of iron at their hearth. A few well chosen and good pieces speaks far more eloquently.
---Don't put too many 'fake food' "vignettes" all over as if your home were a living history museum.
8.
---REGARDING 'WALL-AGING'~IF you are going to 'age' your walls...
~ I came up with an idea and formula to 'age' my walls/ceilings, and did them initially in 2000. I had not seen anyone do this before. After they were featured in a couple magazines, the idea exploded and it seemed everyone was doing it. The main problem I see is that so many are cringe-ingly overdone.
Overdone 'aging' just looks, messy, unnatural, and not at all attractive. I use only 2 products on my walls, and none is paint or food.
---DON'T use paint or ANY food products to 'age' your walls---(I know one woman who diluted her trim paint with water and smeared it all over her walls, and another who used coffee, which will mold in time), and remember that less is more. Go easy. Be subtle, and you'll achieve a look that is warm, realistic, and believable.
WINTER, 2022~***
I had my walls 'aged' since 2000, and was tired of the look that now, everyone had tried to imitate. For me, it was time for a cleaner, different look, so we recently got rid of the aging and painted all our walls and ceilings a fresh, bright white that we feel looks tremendous with the old beams and antiques.
9.
---Don't 'ding up', break, stain, etc., reproduction pottery pieces that you buy, attempting to make them look 'old'. The fine craftsmen who make the pieces worked hard on them; Don't disrepect their work. Enjoy them as they are and allow them to 'age' on their own and become antiques in time.
10.
---Resist the urge to buy modern lumber---boards from a home center or lumber company, such as 1 by 4's or 1 by 6's ---and put them on your walls in an attempt to create a 'half timber' or 'tudor look'.
If you cannot save for or find original old boards, we highly recommend you try to come up with a different way to bring an 'old' feel or character to your home.
11.
---A big mistake---"Staging" your home instead of trying to blend your 21stc. life with the endearing elements of a past you love---If you have 'decorated' to the extent that you are forced to live in a 'modern' upstairs or basement room, you have gone too far.
12.
---Don't make every room into an 'all purpose room'. Rooms in a home had specific function(s), especially if you are not living in a one-room hovel at Plimoth Plantation. An example is putting your best table and some of your finer accessories/possessions in your 'best', or social rooms. Don't make a bedchamber into a food or goods storage room as well.
13.
---Along those lines, don't pile inappropriate things on every piece of furniture---I see so many piles of baskets on a cupboard, rumpled replica period clothing on chests or blanket chests, wadded blankets or bedding as well. This is some misguided attempt by some who should know better to again replicate a Plimoth Plantation one room hovel. The colonists were quite sophisticated people from England, and then having lived in cosmopolitan Holland for many years before 1620. They were neat, and wanted a nice home just as we all do. They only piled things willy-nilly because they only had one room initially and no choice for several years until they could construct the homes they desired.
---More is not necessarily better.
14.
Resist the urge to put duplicates of one certain piece in a room. A good example is our triangular stool on the main room hearth---No one would have had too many more of those. Don't get a 'set' of what should be a rare and interesting addition to your period room.
15.
AS TO THE 'FAD' OF ARMOUR (BREASTPLATES, HELMETS, ETC.) HANGING AROUND YOUR HOUSE...
All we have to say is LOL---This is just one of the silliest things we constantly see. Most people would not even possess those things and even if they did, as at Plimoth Plantation, they stored them in a common building, not in their houses.
16.
Don't be a sheep and copy/steal other people's ideas!
We see so much of this.
---If you do, at least have the good grace to give them a shout-out by naming THEM as your 'inspiration'.
Be original and do your own thing.
__________________
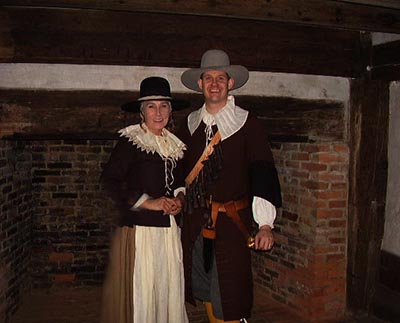
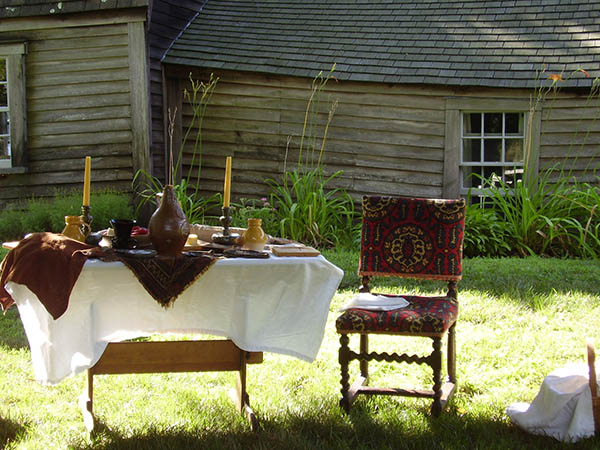
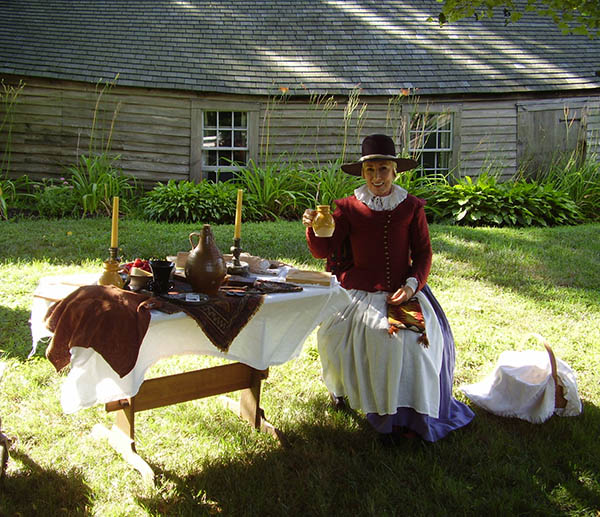
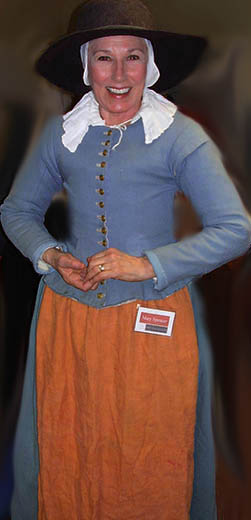
Below, Mary and Adam hired to present 17thc. program at the historic Fairbanks house, Dedham, Mass.
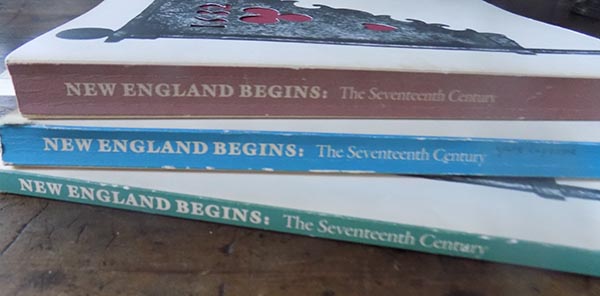
We are fortunate to have a set of 3 books that in our opinion are the best reference books we have in our own collection, and that we highly recommend to anyone interested in the history and antiques of early New England.
'New England Begins: The Seventeenth Century', Volumes 1, 2, and 3 are out of print, but you may be lucky enough to find them out there if you search. We can't stess enough how wonderful these books are.
Contact Adam and Mary at
countryladyantiques@yahoo.com
PHOTOS OF US WITH STUART PEACHEY OF
'TALES FROM THE GREEN VALLEY'~
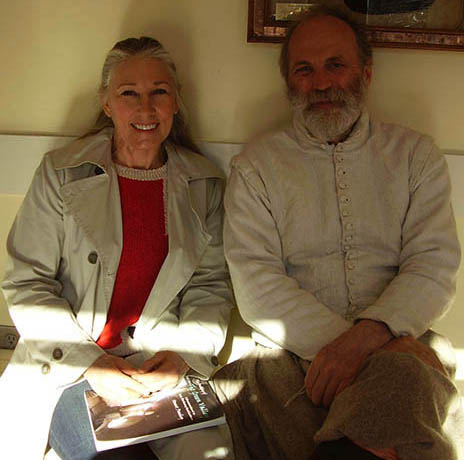
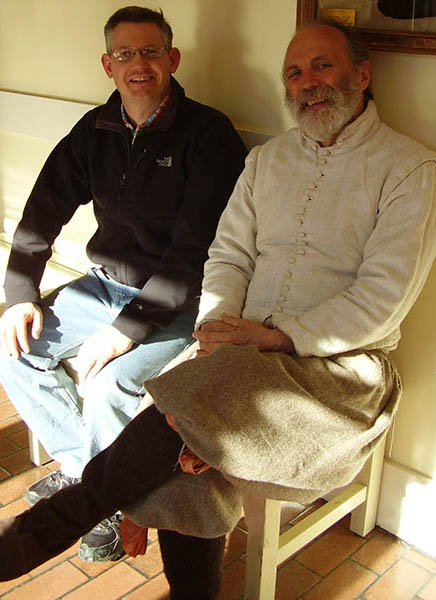


Adam and Stuart Peachey.
'Union jack' shortbread cookies we made as a present for Stuart.

Adam and Stuart Peachey discuss the fine points of 17thc. clothing in England and America~
______________________________
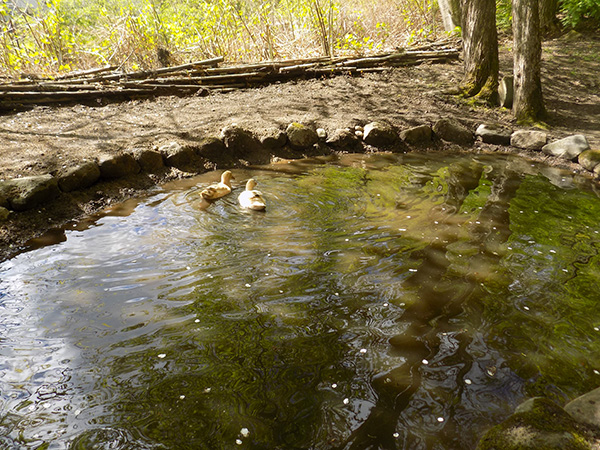
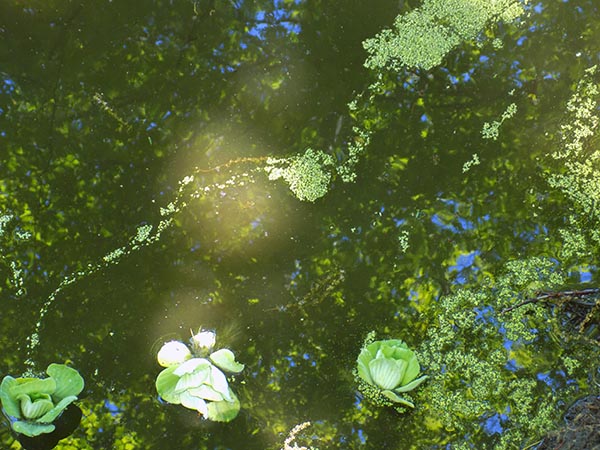
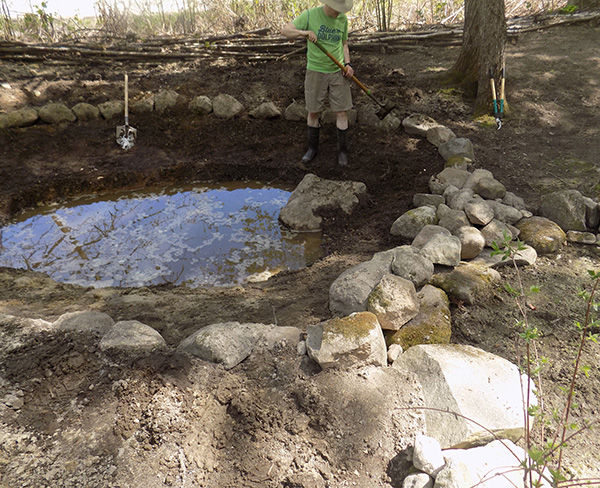
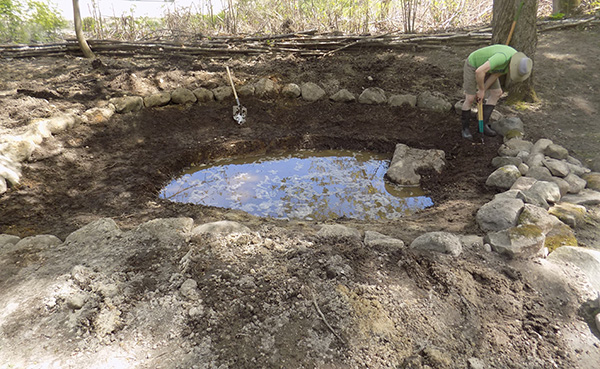
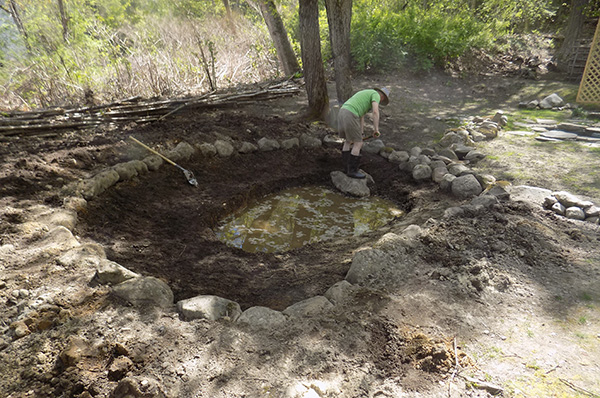
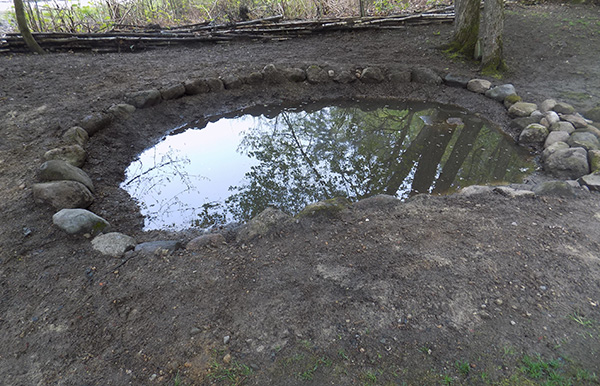
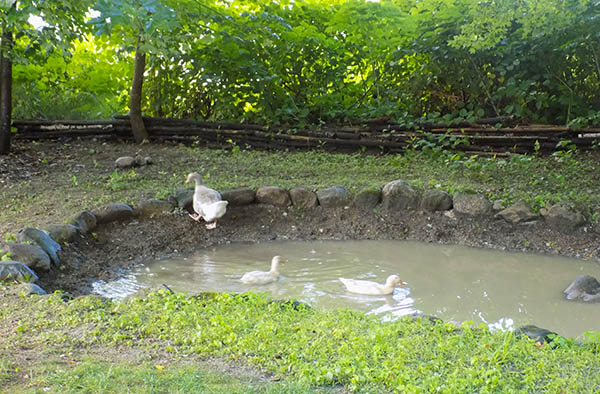
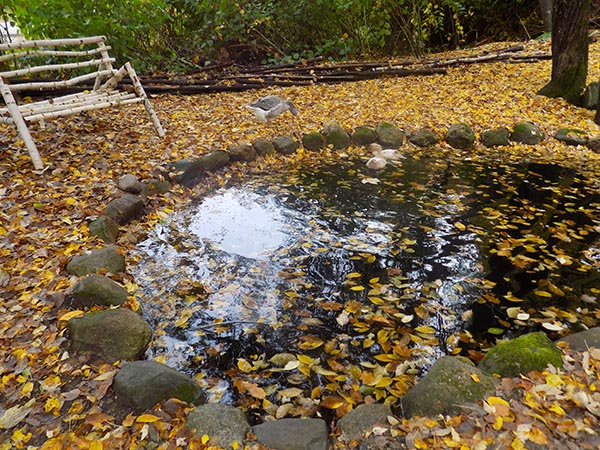
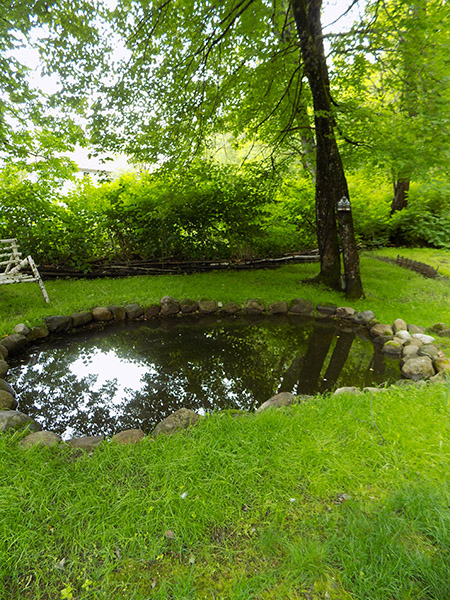
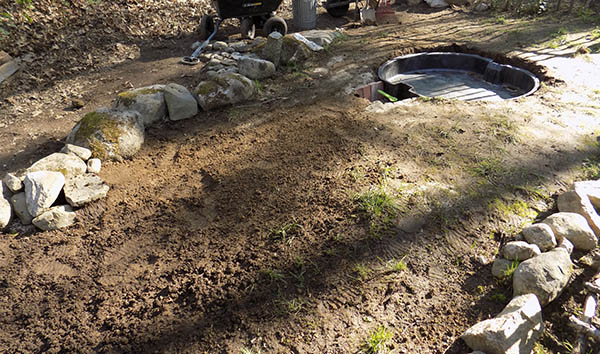
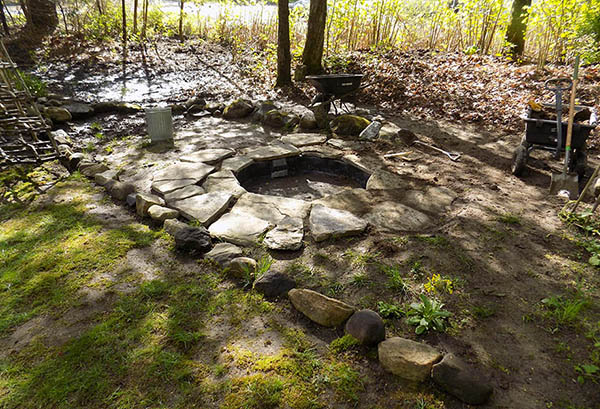
***NOTE: THIS IS THE 'BIG POND' BELOW---SCROLL FARTHER DOWN THIS PAGE TO SEE HOW WE MADE A "MINI POND".
_________
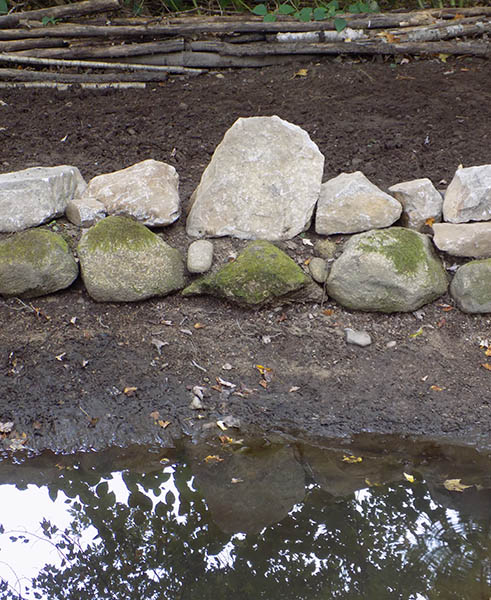
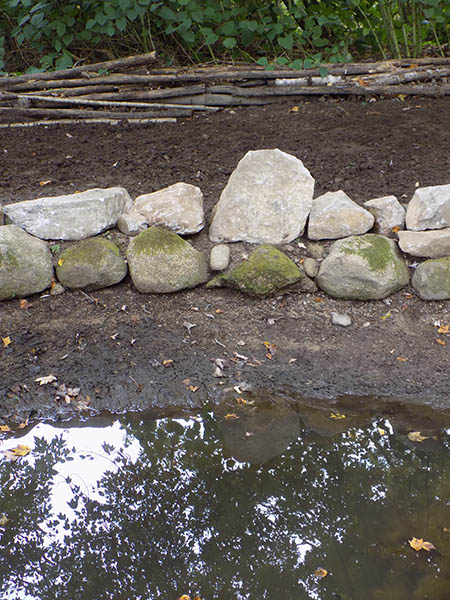
ROCKS!
So grateful...
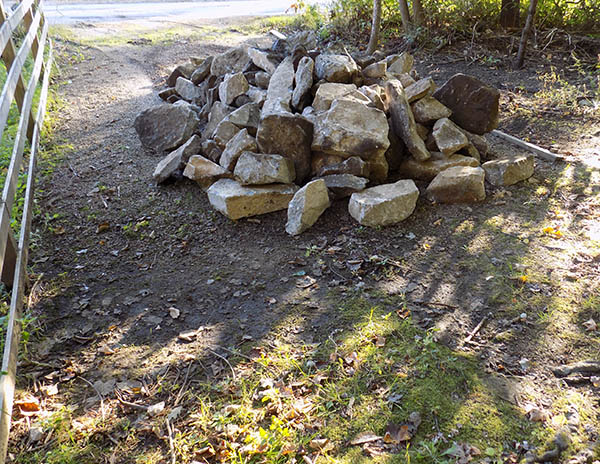
Sept. 26th~
A neighbor had mountains of rocks dug up from a project he did and advertised that he would give them away for free. We went to see him, and this morning he delivered a big dump truck load to us!
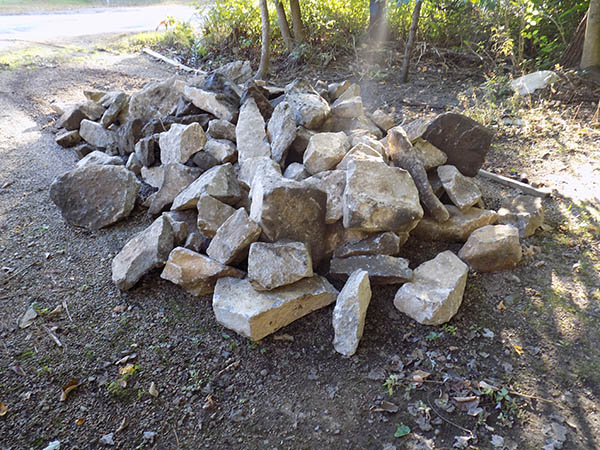
People in our little village are so nice.
HUGE. Some well over 150 pounds.
We moved and placed every single rock ourselves.
We were able to finish the stone wall by the road on our bee yard side that we started years ago.
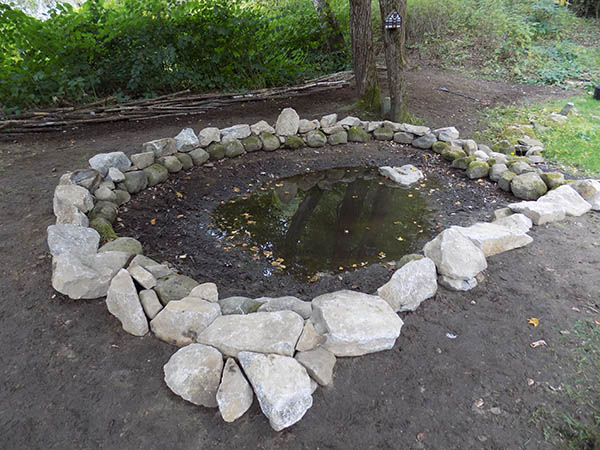
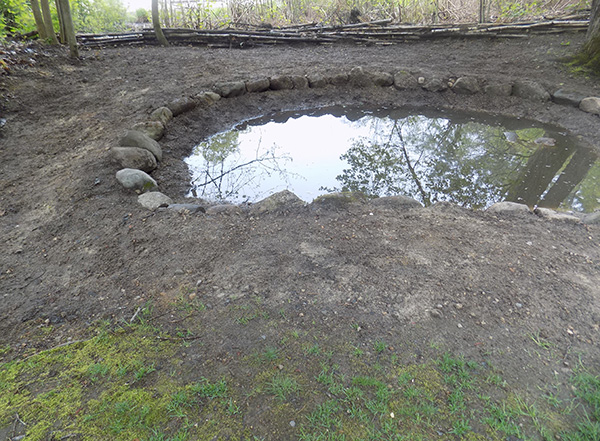
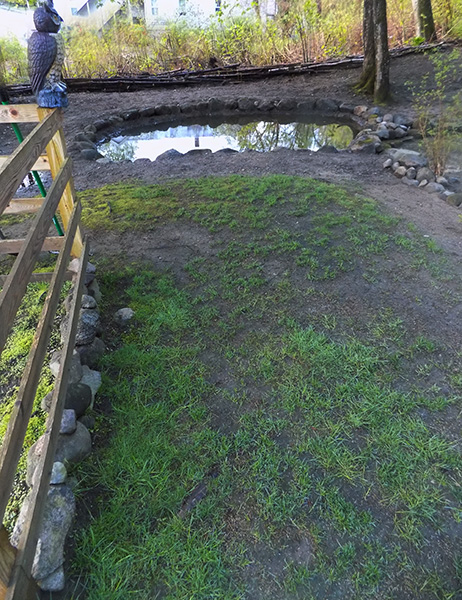
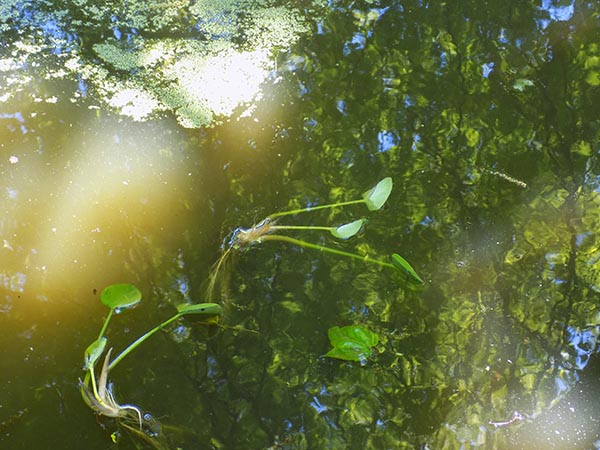
We've also added large ones to the area surrounding the 'big pond' we dug for the ducks and goose.
We're cleaning out the pond before it refills.
Adam re-tilled the pond area...
I sowed more perennial wild meadow tall grass seeds and wildflower seeds and put down some peat moss over them...
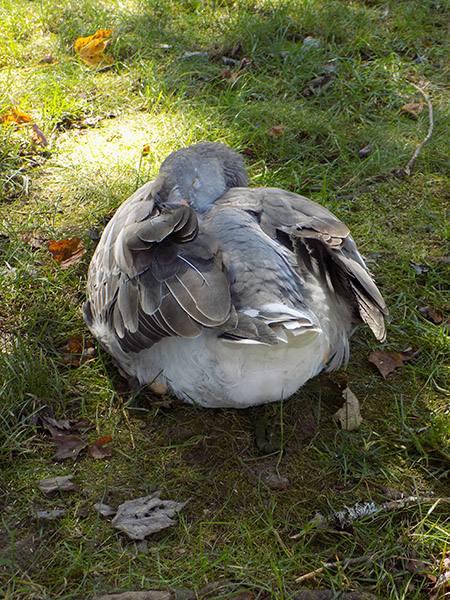
Gabby took a nap while keeping us company!
We found this one very very large nicely shaped 'standing stone'...
We set it at the pond edge.

Adam hand carved our initials in period script and then blackened them.
It's gorgeous and so meaningful. I am so proud of him~
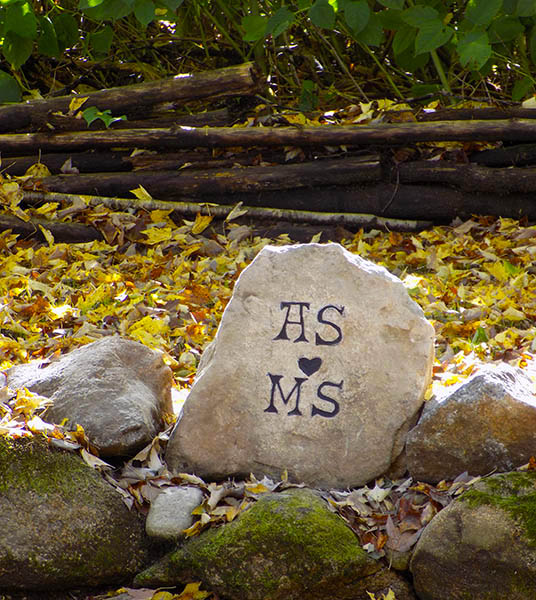
He carved this in an authentic period style script.


We used the rest of the rocks and finished the stone wall.
Visit our TOUR PAGE to see more finished photos soon.
_______________________________
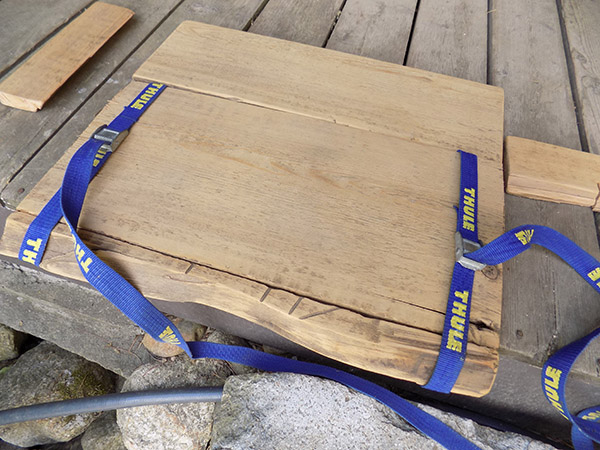
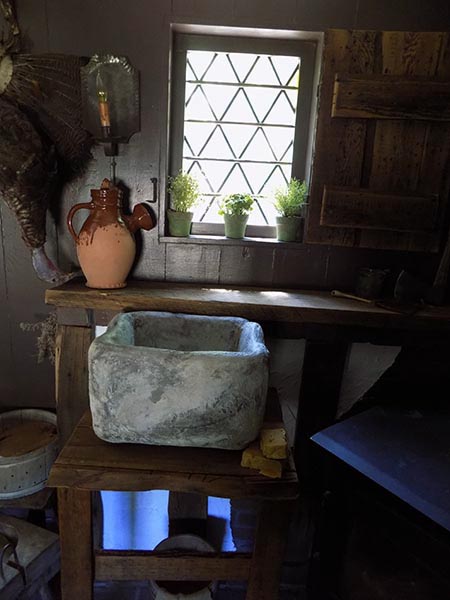
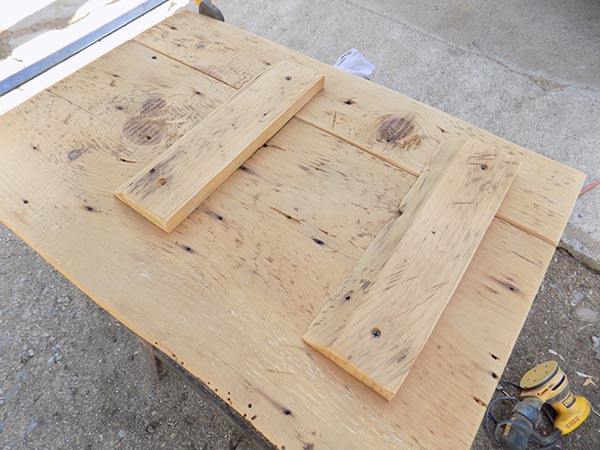
'The taproom stone sink stand project'~

We love the stand we made for this sink. We used 250 year old boards that we actually found in our attic and that were actually part of our house...
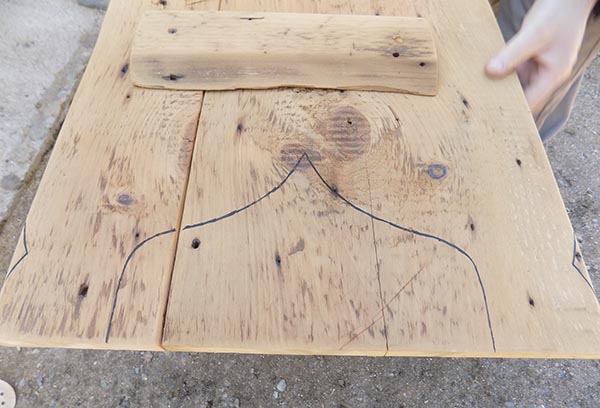
There were just enough scraps to build this little table attached to the wall, and with only front legs...
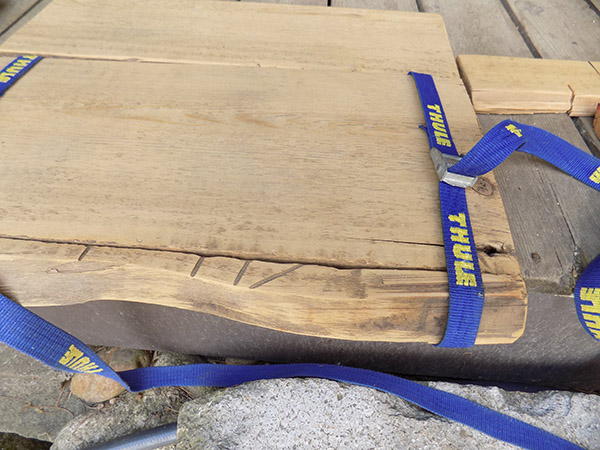
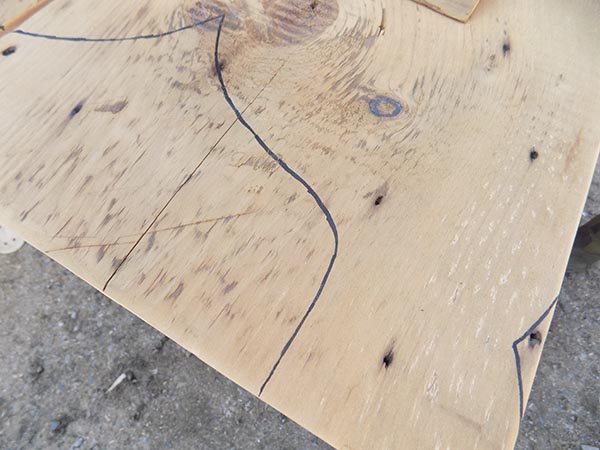
I brought them down, cut them, sanded them a bit to remove the rough surface with the splinters, and then planned the exact size pieces I needed.
One board had a live edge, so I applied it with glue to the front edge of the stand for extra character.
The top was 2 pieces held together with handmade wood battens on the underside.

The back of the stand has a wood apron that is screwed directly to the wall.
The legs have a cross piece for stability.
We left the back apron and legs the shape of the boards themselves instead of cutting them identically. We wanted to preserve their character and rustic look.
The legs, apron, etc. are fastened with wood pins that Adam handcut from the same original boards.
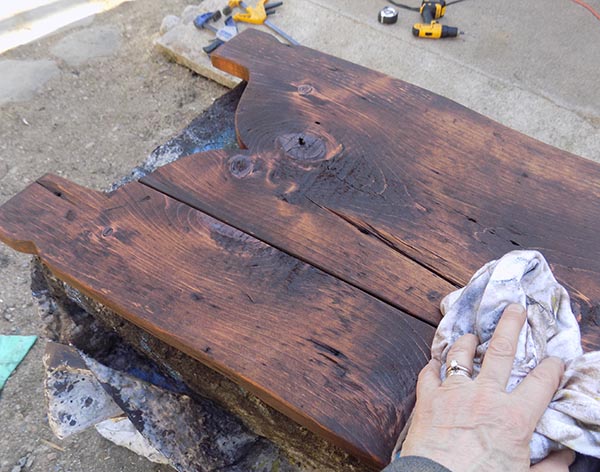
There is NO stain on the wood. All I did was rub them with mineral oil to bring out the original color and patina. It dries with no shine.
Under the stand is an antique wood bucket. Next to the sink are pieces of antique lye soap.
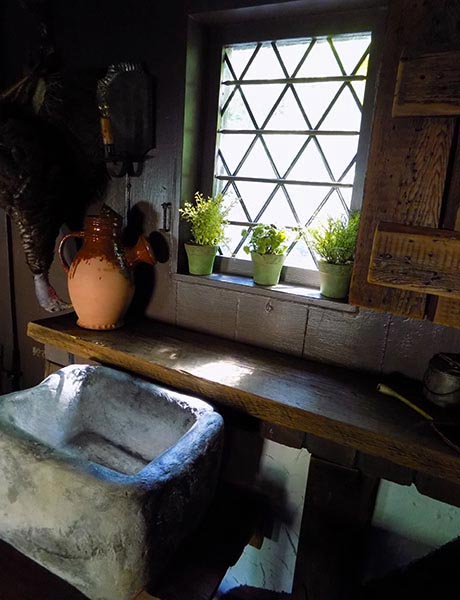
We love our new addition.
_______________________________
May 2023~
A beautiful sunny Sunday morning.
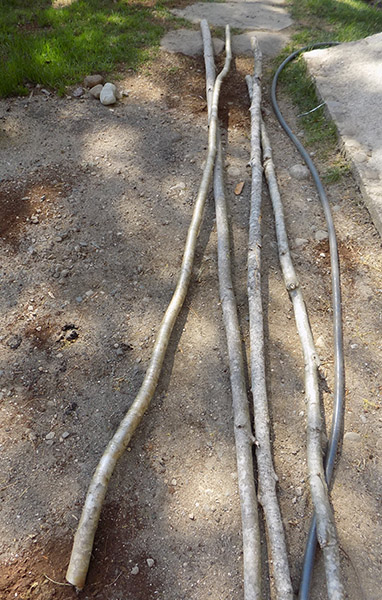
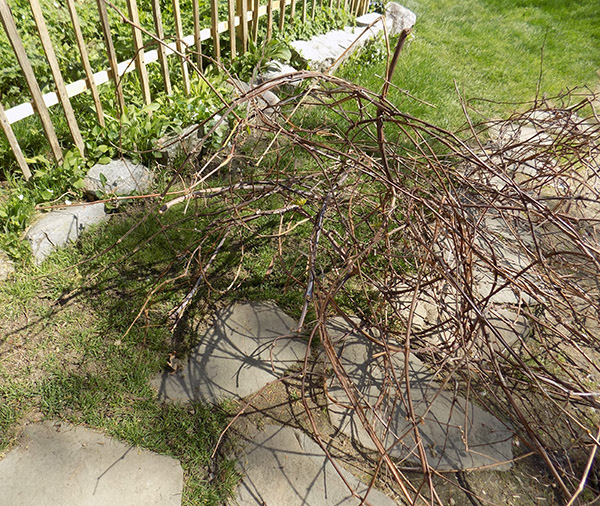
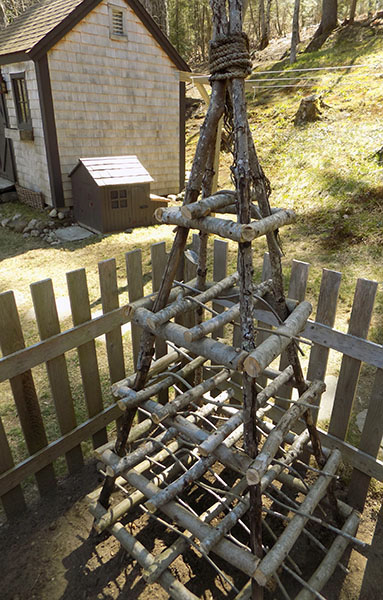
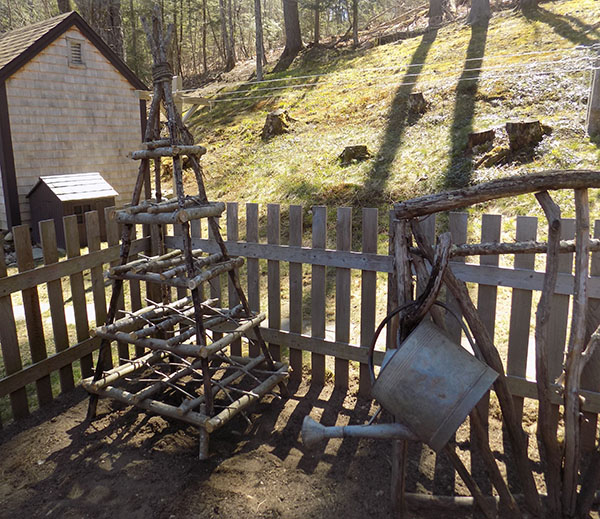
We went up into the woods and cut down 3 small trees and armloads of wild grapevine...
In about an hour we turned these things into this charming and natural trellis for the heritage bean plants in the garden~
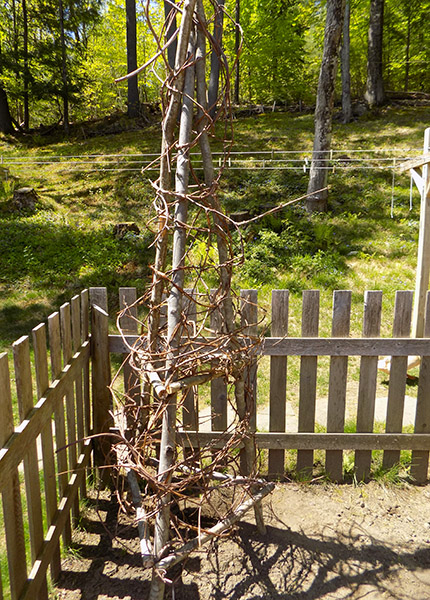
We made a trianular trellis with 3 trees and reinforced it with more branches, forming the triangular supports connecting the legs...
We wove the grapevine all through it for the beans to climb over.
Cost: 0
___________________________
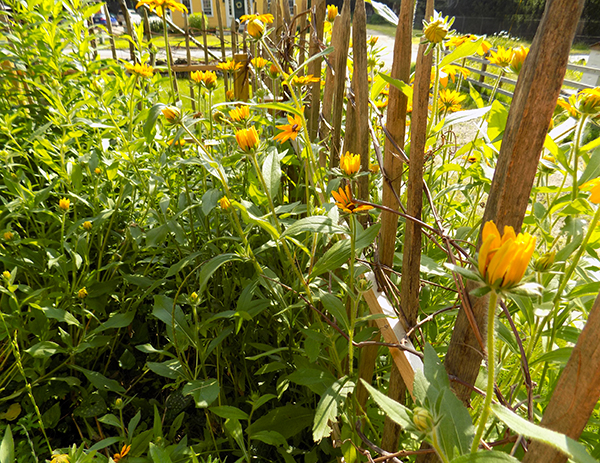
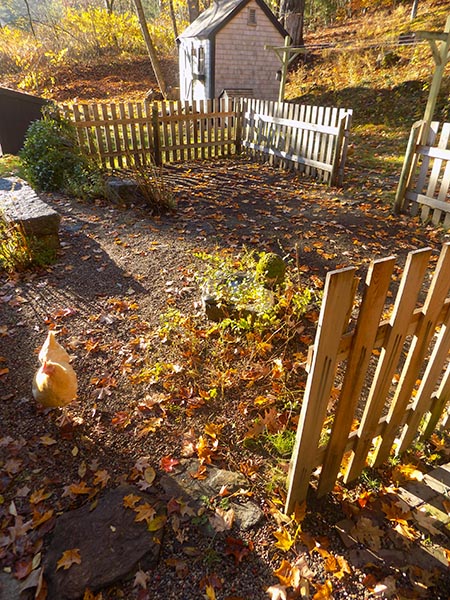
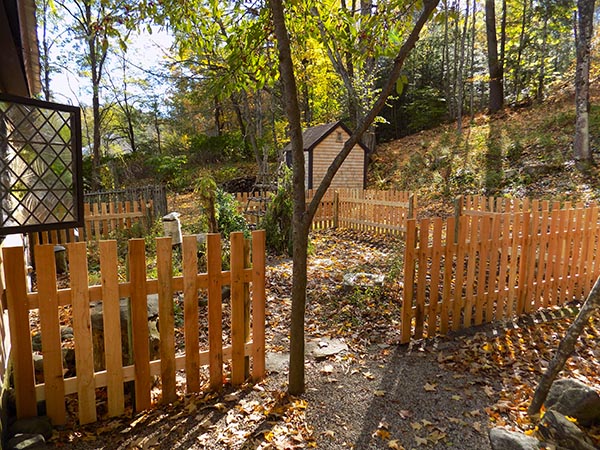
THE DOORYARD GARDEN
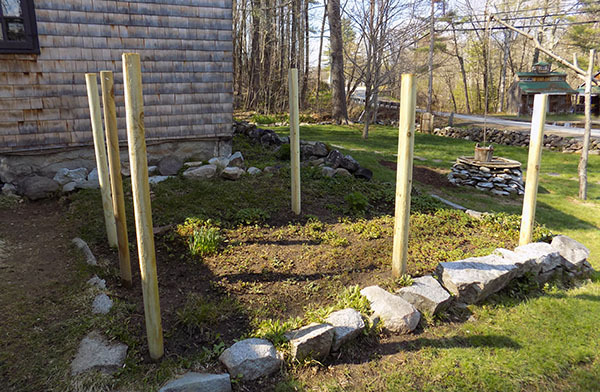
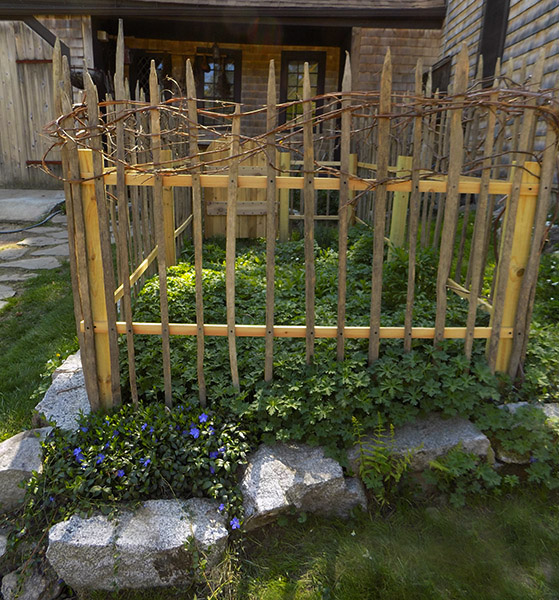
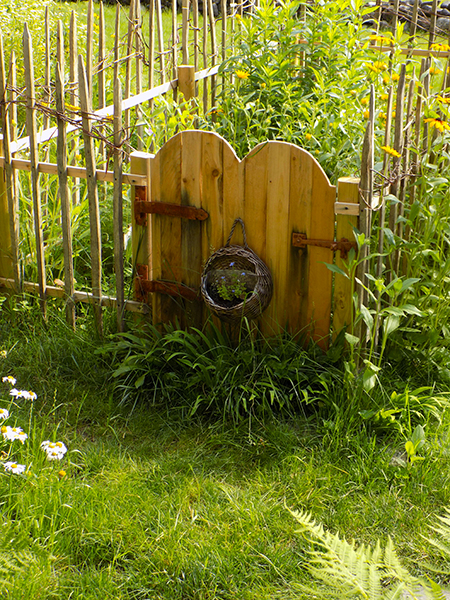
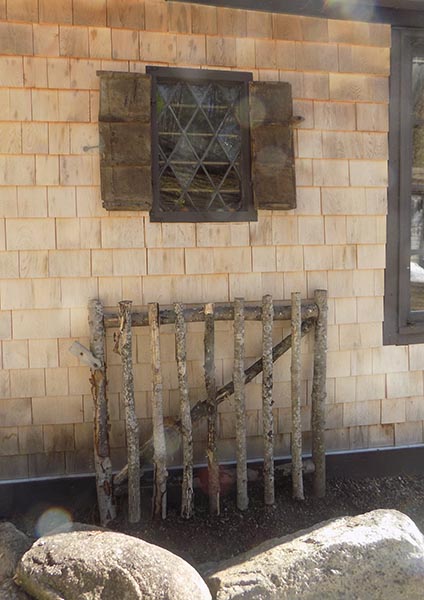
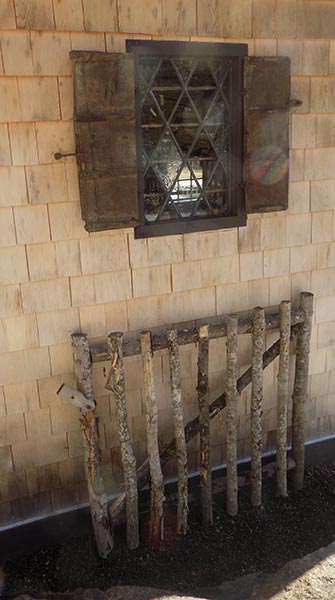
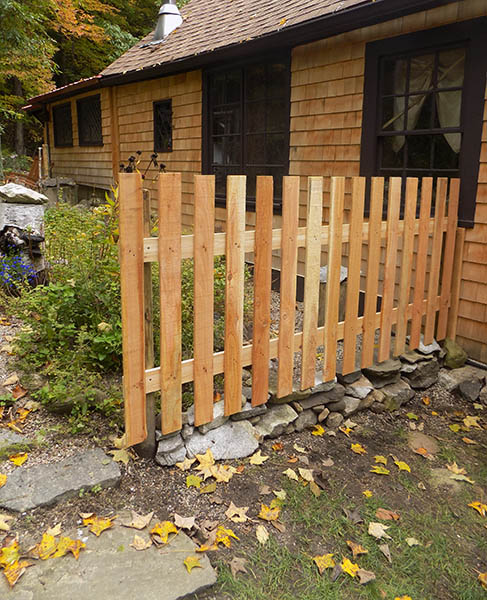
'DIY TOBACCO STICK PRIMITIVE FENCE PROJECT'~
I got a large bundle of old tobacco sticks and we made a very primitive fence around the little front porch dooryard garden...
This is the old cottage perennial flower garden that we enclosed with an old tobacco stick fence and gate.
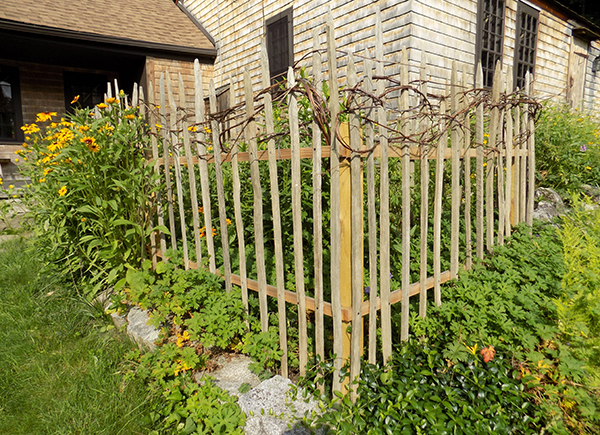
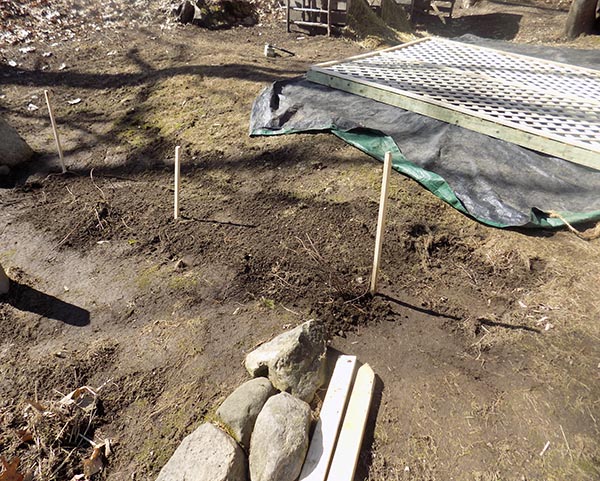
EARLY SPRING
All the posts are set into the ground; Two form the opening for a period correct gate we're designing and making. The posts are cedar wood.
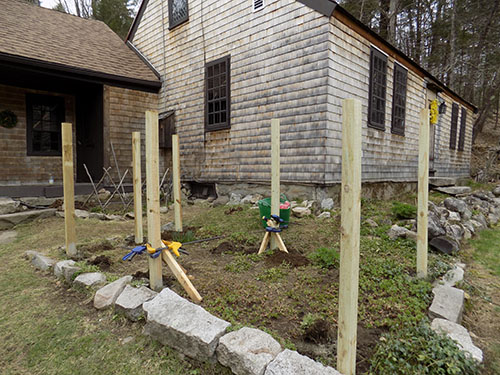
No, the posts are not crooked, they are perfectly straight.
We next marked the post that was at the lowest ground level to be the height we wanted it. We used a long, 8 ft. level to then mark each post with a pencil line to be the correct height. This was necessary because the ground is not level. That pencil line was where each post would be cut off.
After that we measured 3 inches down from the cutting lines. This was where we would attach each 2 inch wide cedar rail for the sticks to be fastened to. The top of the rail would be attached at those second pencil lines.
Our rails are 1 x 2 lovely cedar boards so they won't rot.

Posts were cut off and rails attached and are all perfectly level.
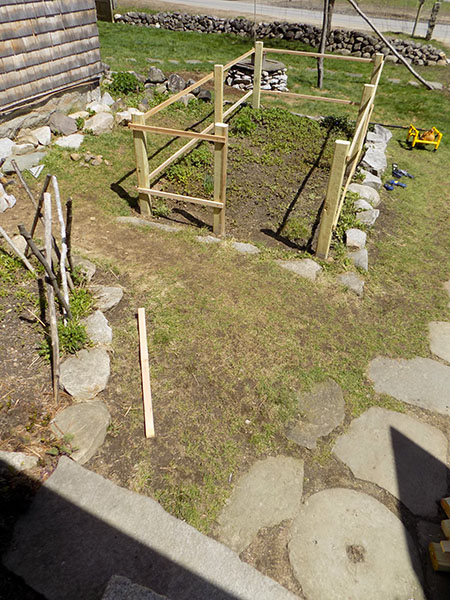
The next step was to cut and attach the top rails all around the fence at the level we marked.
We then did the same thing a couple feet down from the top rail, marking each post at a level line for the bottom rails. We're using the same 1 x 2 cedar for both the top and bottom rails.
The tobacco sticks are pointed at the top and are random heights; We wanted a charming, primitive look, so we left the posts the heights they are.
We didn't want the fence stick tops to be in an even line.
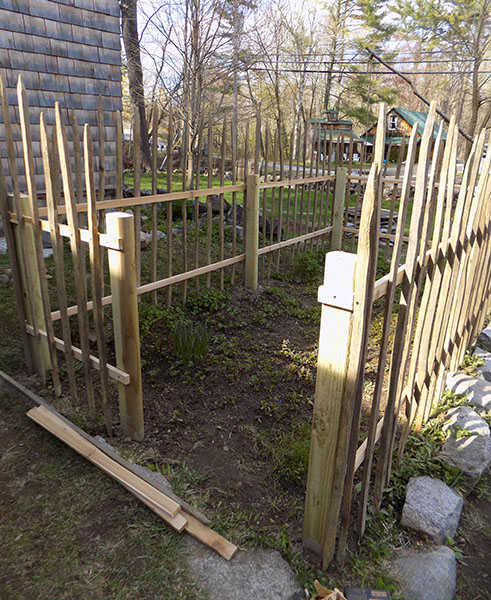
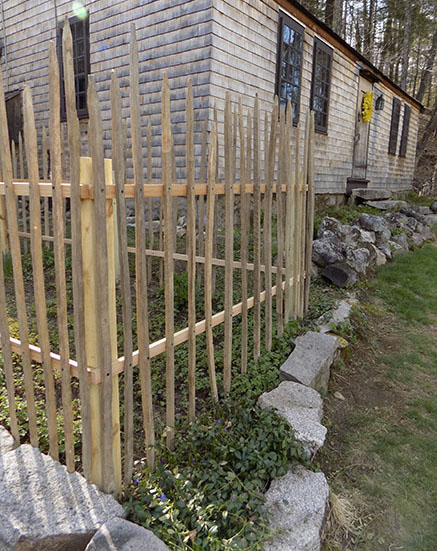
We attached all the tobacco sticks to the top and bottom fence rails. The opening was for a handmade gate.
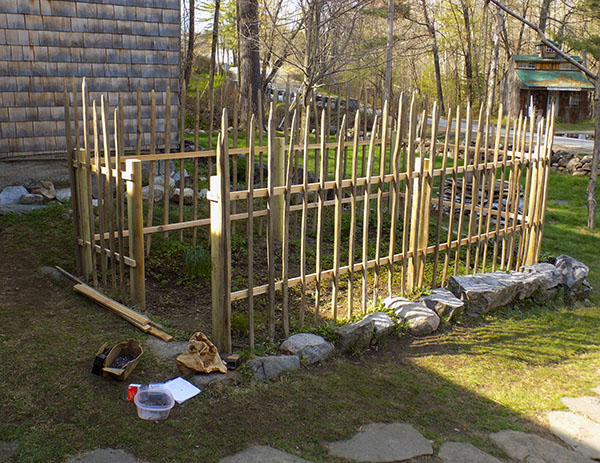
Now the fence was finished and it was time to make a gate...
The gate opening faces the porch.
We didn't want a gate made of the sticks because we didn't want the fenced garden to look too 'cage like'...
WE DESIGNED A 17th CENTURY STYLE GATE...
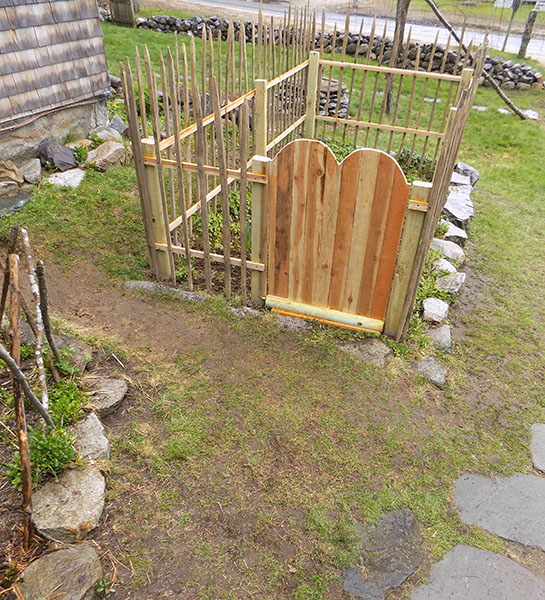
We made the gate from leftover cedar boards we already had.
Test fitting the cedar batten gate...
Perfect.
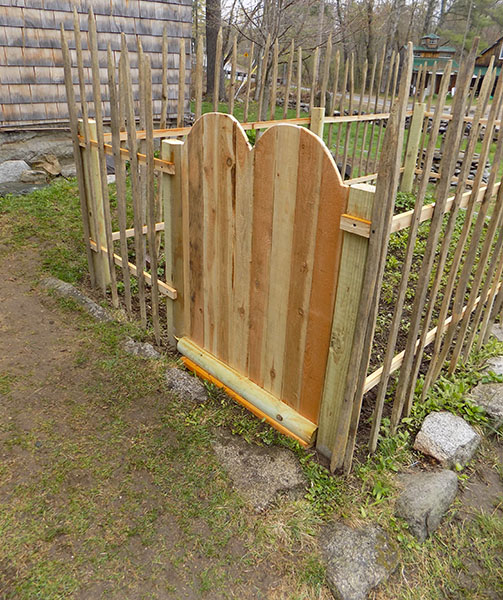
The boards under it were just to raise it to the finished height. Period iron strap hinges and latch were the next step...

Finished!
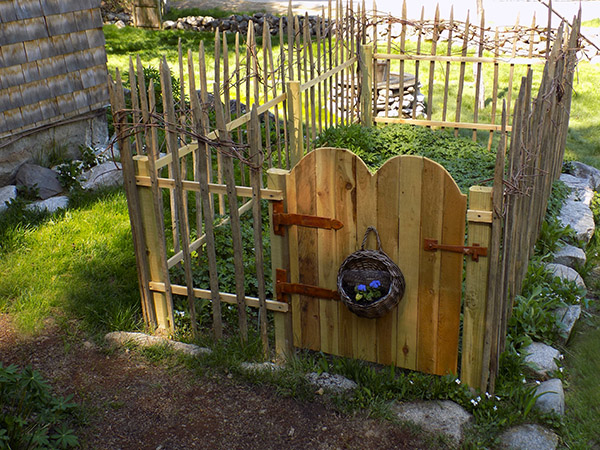
Now we're just sowing the grass seed in front.
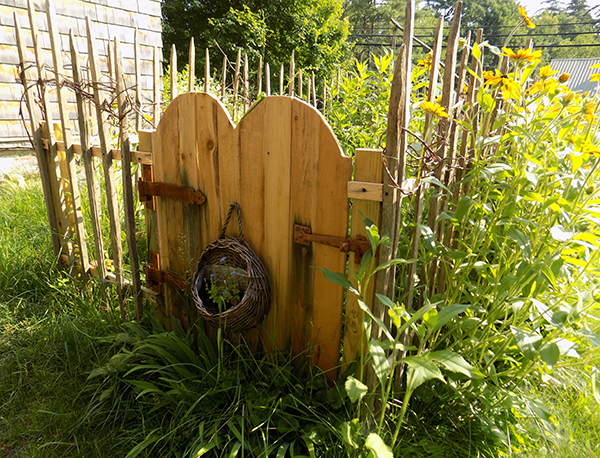
We love our primitive antique fence~It's 'aging' and darkening nicely.
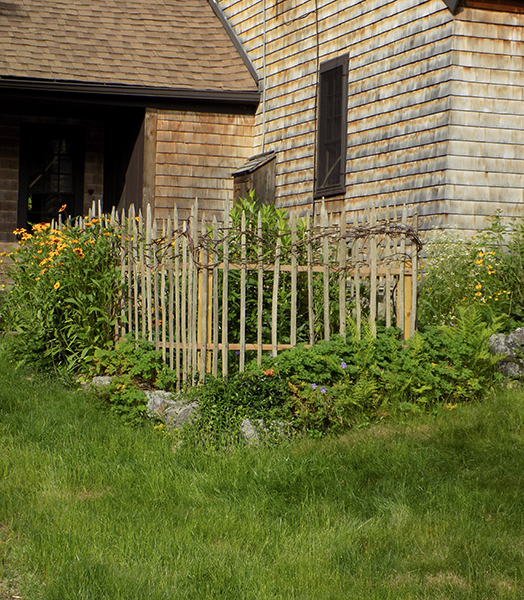
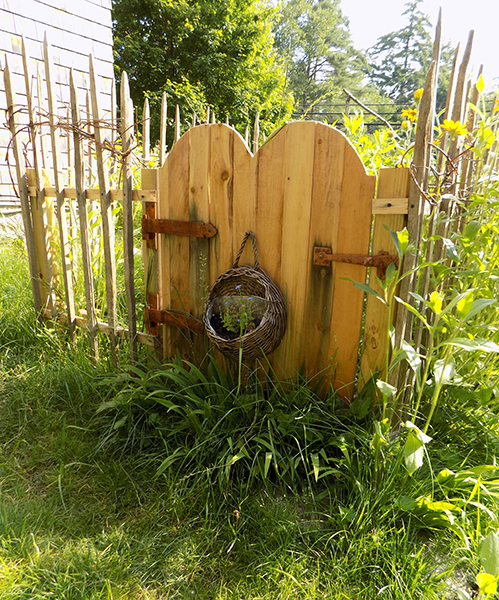

I just planted this climbing rose inside our new front 'tobacco stick fence' garden.
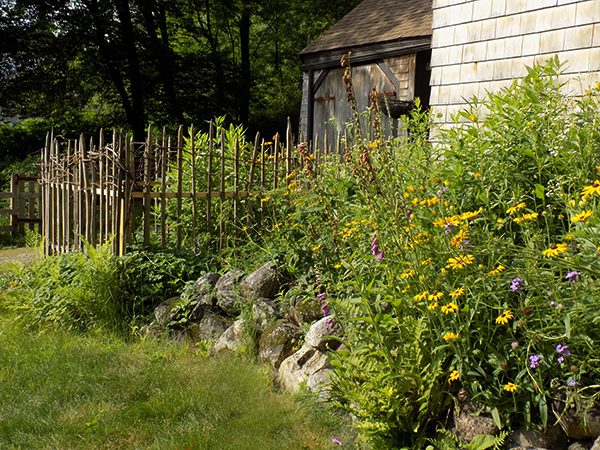
SEE MORE UPDATED PHOTOS OF THE FENCE AND GATE ON THE TOUR PAGE.
_________________________________________
We're moved the birdhouse to a tree overlooking the pond we dug last year. Photos coming to TOUR page soon.
___________________________________
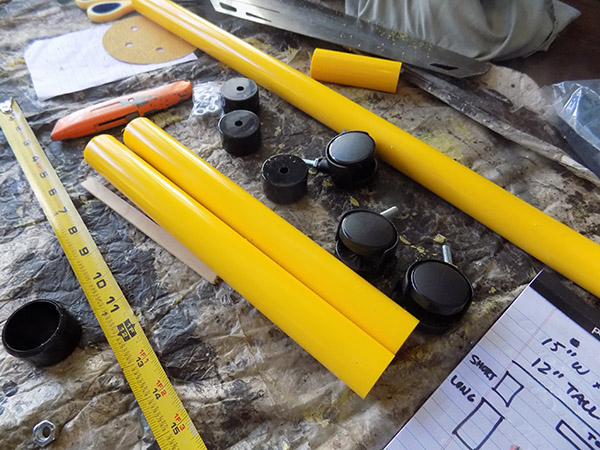
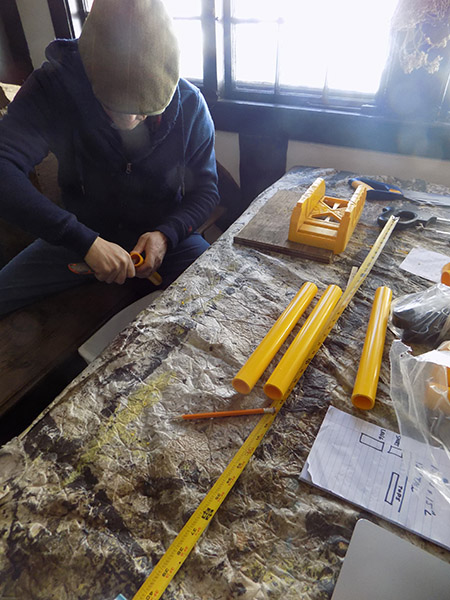
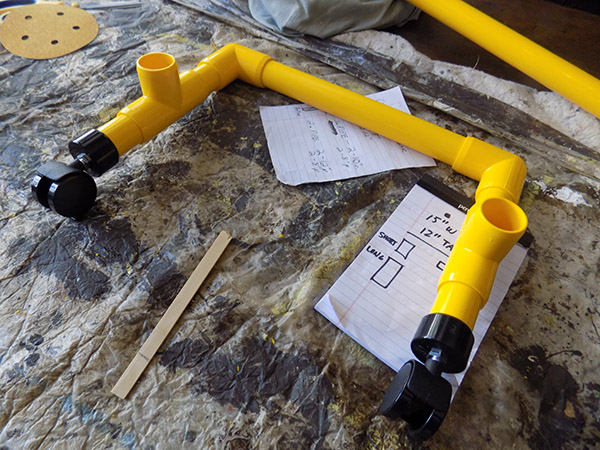
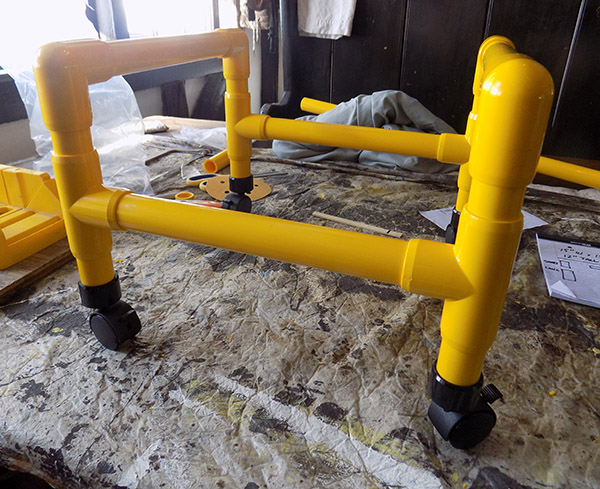
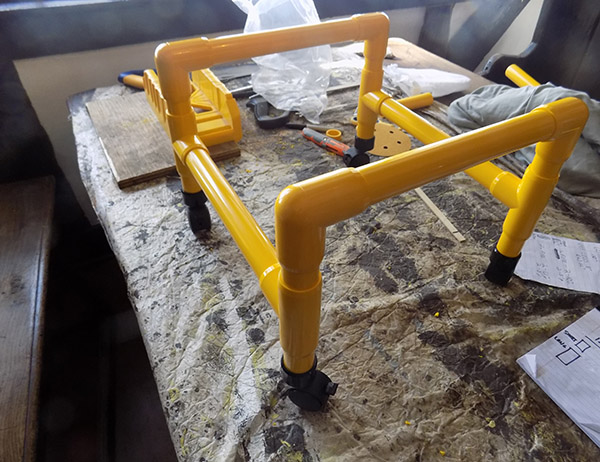
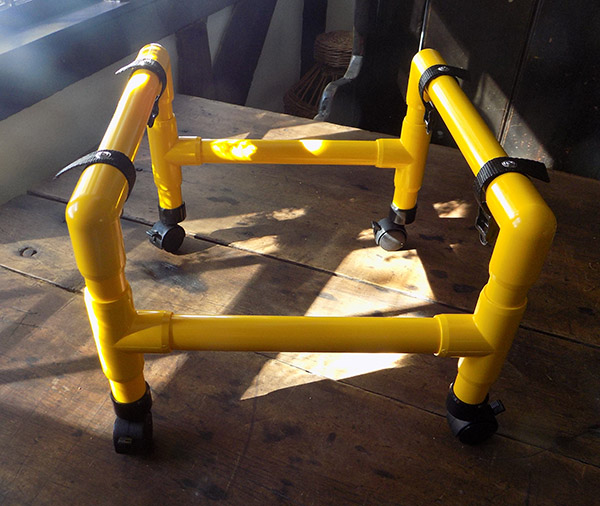
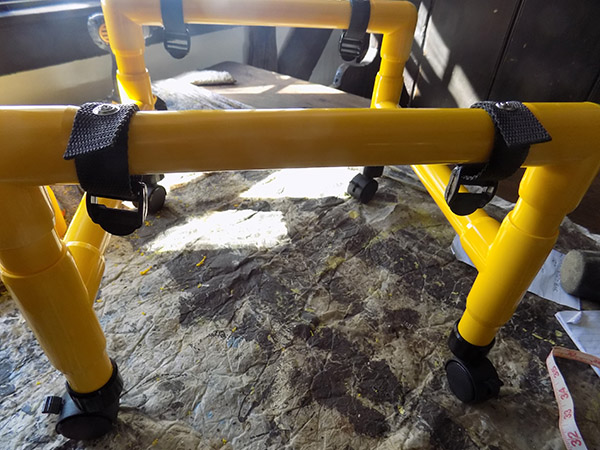
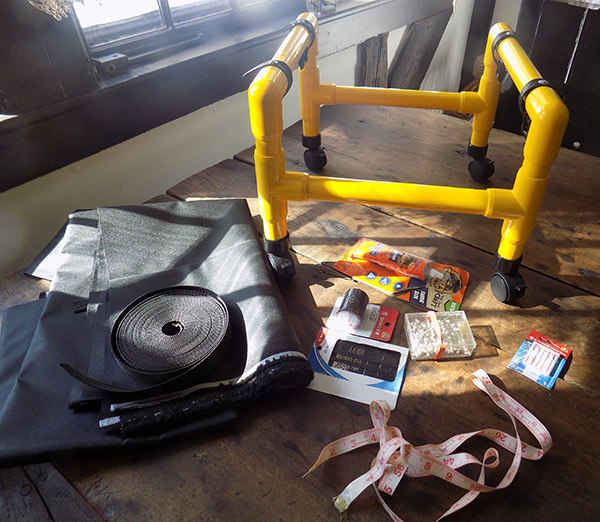
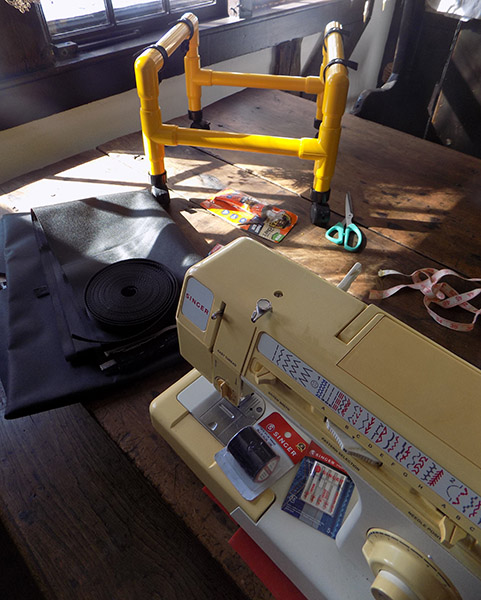
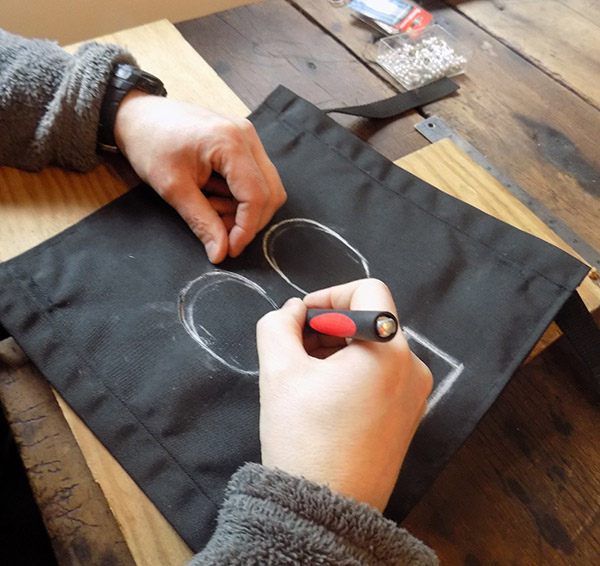
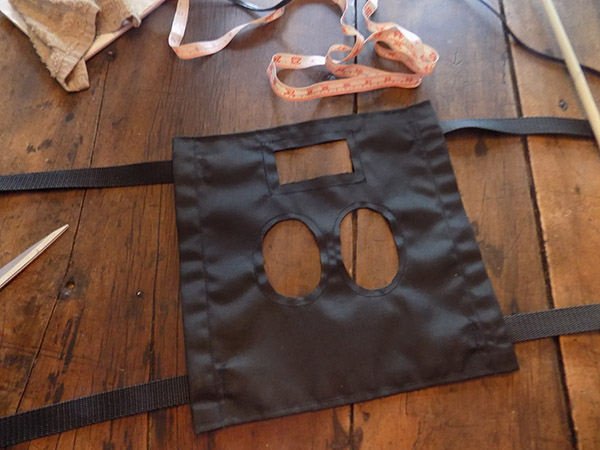
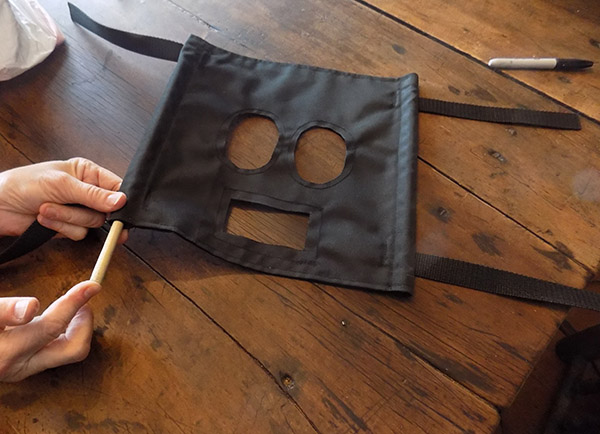
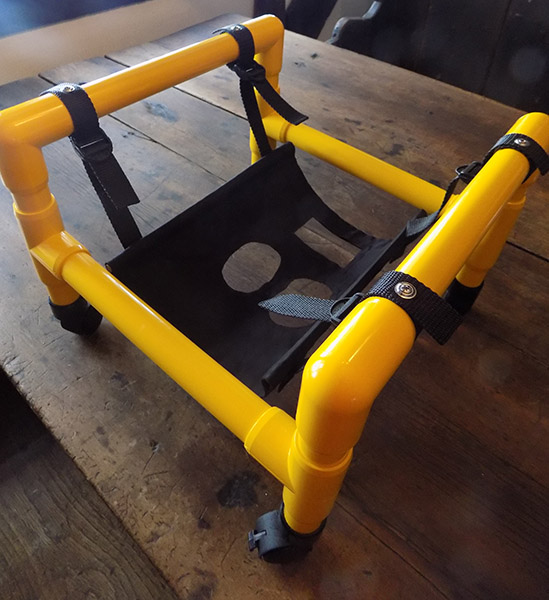
CHICKEN WHEELCHAIR PROJECT~
2/19/23

We have a 7 year old hen, Hannah, who is one of the original 4 hens we got as baby chicks when we started chicken keeping in 2016. She is now a 7 year old sweet girl with some leg issues.
We just built her a wheelchair to help her get around. We have fun making it together and thought we would share some photos of the project.
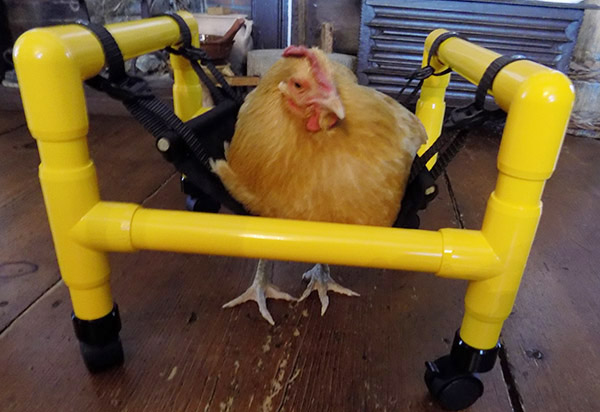
June 2, 2023~
Hannah passed away peacefully in her sleep. She was over 7 years old.
We loved you Hannah. Rest in peace---Best hen ever.
________________________________
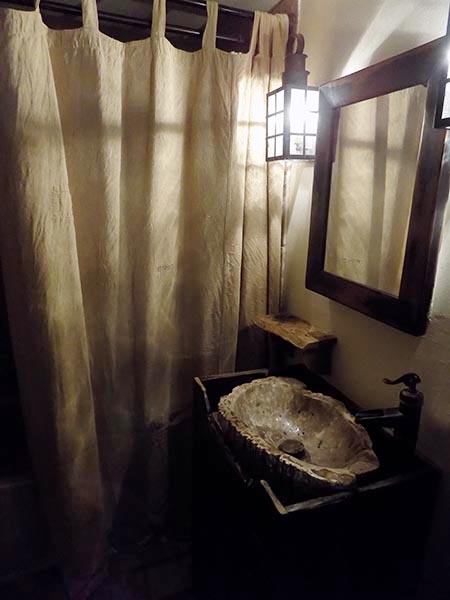
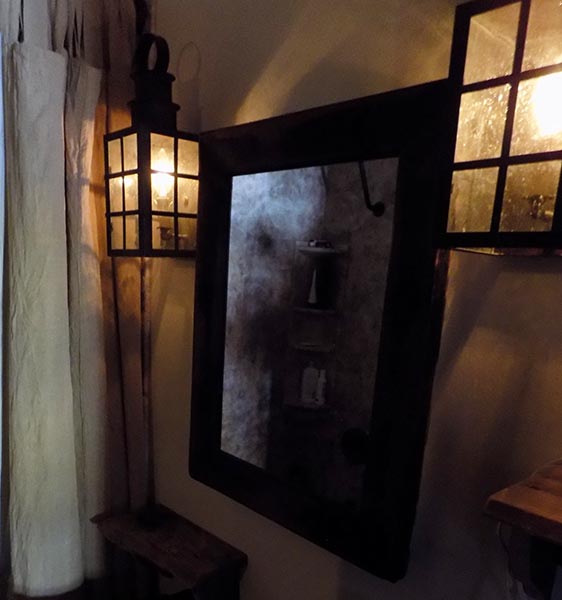
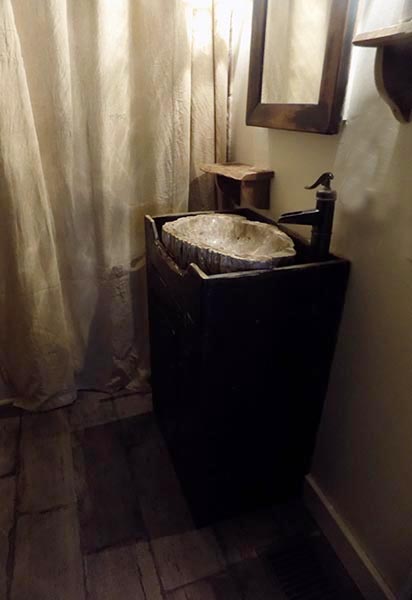
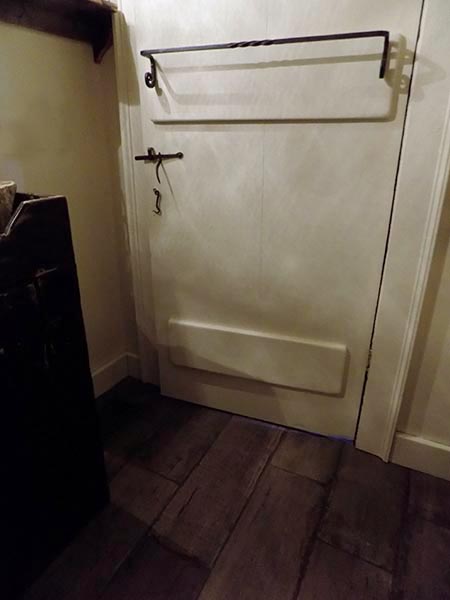
A BATHROOM PEEK~
Quite a few years ago we had re-done our bathroom with new bathtub, walls, lanterns for lights, rain shower, dry sink in old black distressed paint for a vanity, antique mirror frame, a very old antique hanging pine cupboard on one wall, as well as some other 'old touches'...
We had put in a natural stone sink too, which was just the perfect color and size as the tile in the tub area...

We had made shelves for the room from 18thc. boards.
We had a wood floor, but it became damaged over the years from moisture.
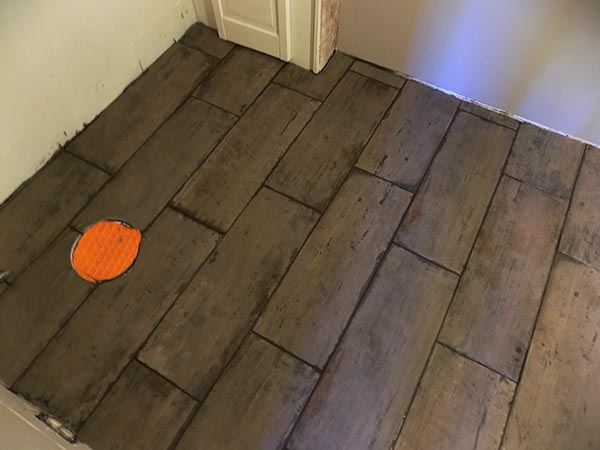
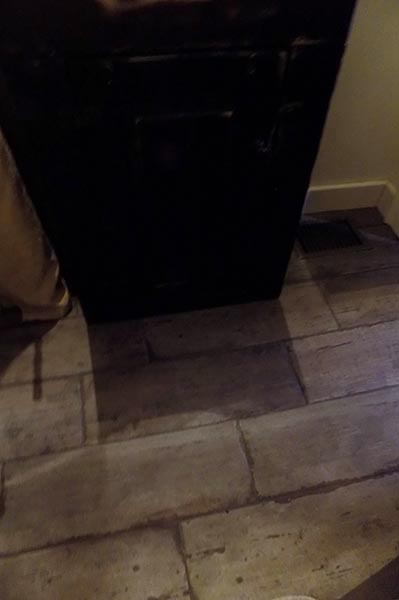
FAST FORWARD TO OCTOBER, 2022~
We put in a new bathroom floor.
We wanted the look of old, grungy wide board wood planks but needed the floor to be waterproof and durable.
We found some gorgeous, large porcelain tiles that were exactly what we wanted. We've now finished the project and are thrilled! Given that the house is 250 years old and nothing is level or straight, it was an epic and grueling morning til night 4 day project, and something we had never done before.
Even up close you cannot tell that the floor is not old wood.

Old patched linen tab curtain for shower in a natural light mustard.
Stone sink. Old drysink vanity in 'worn' black paint.
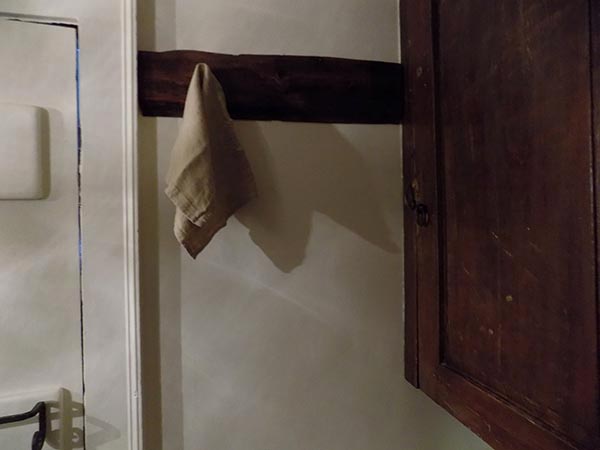
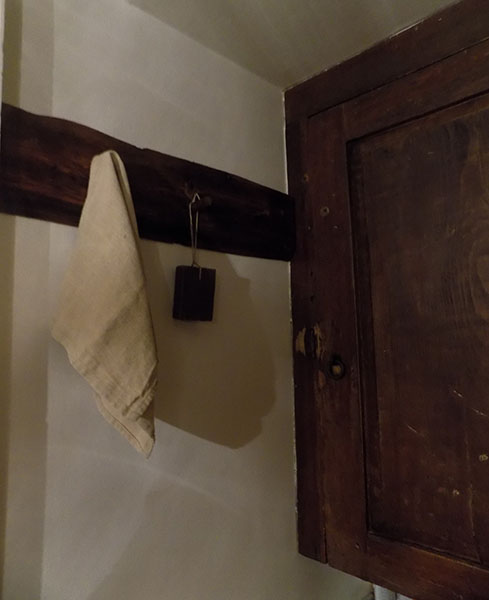
A very early antique hanging pine cupboard holds a lot of things.
We made the hanging rack from a piece of 18th century live-edge board. It has hand carved wooden pins in it for hanging.
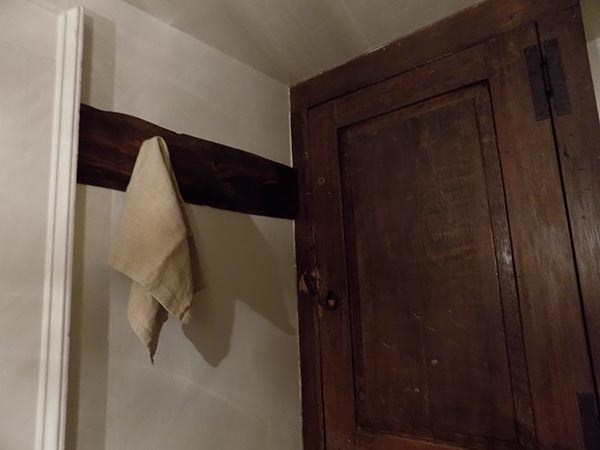
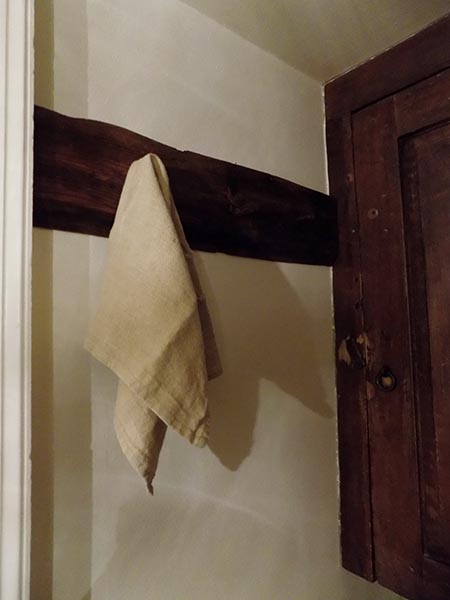
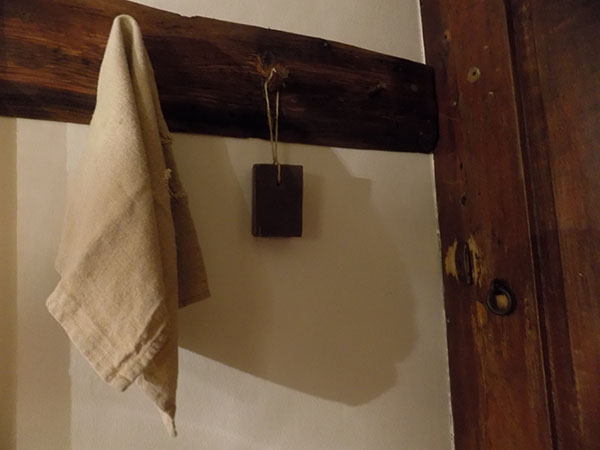
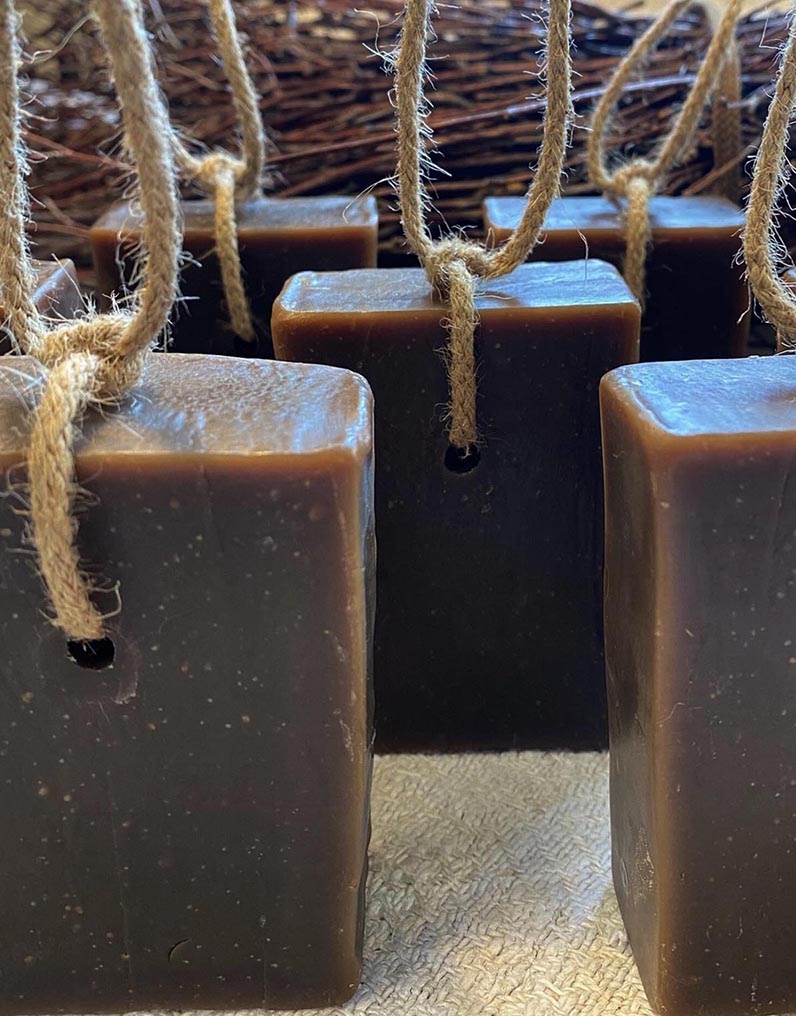
Another thing we have hanging from our DIY crafted hanging rack is this lovely handmade soap on primitive rope.
OCTOBER, 2022...
It was also time for a fun little project to add to the 'early ambiance' of our bathroom...

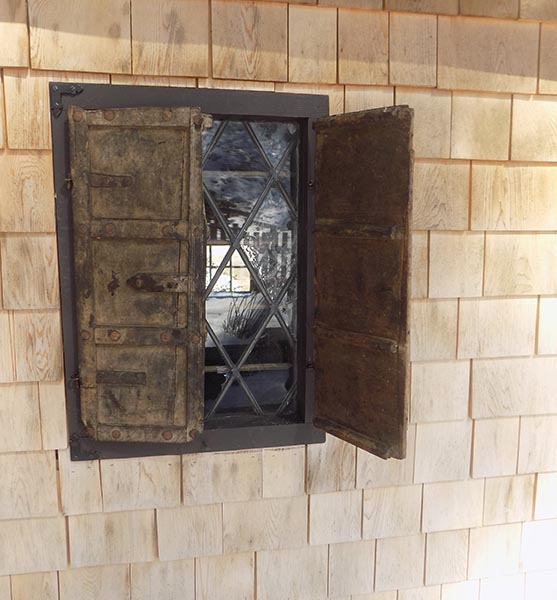
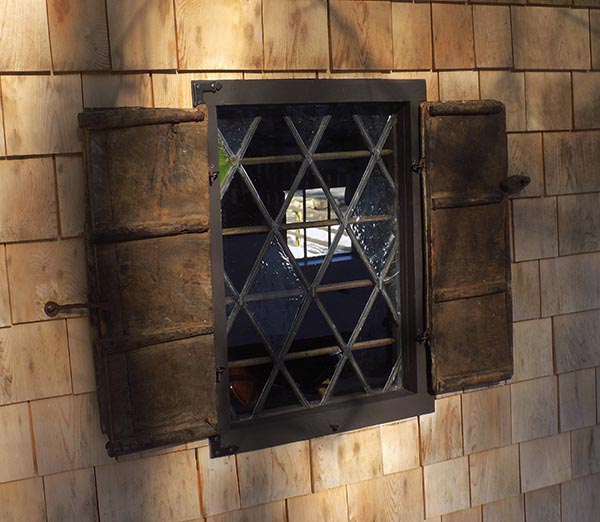
We love this small early antique leaded window we got from England for a bargain...
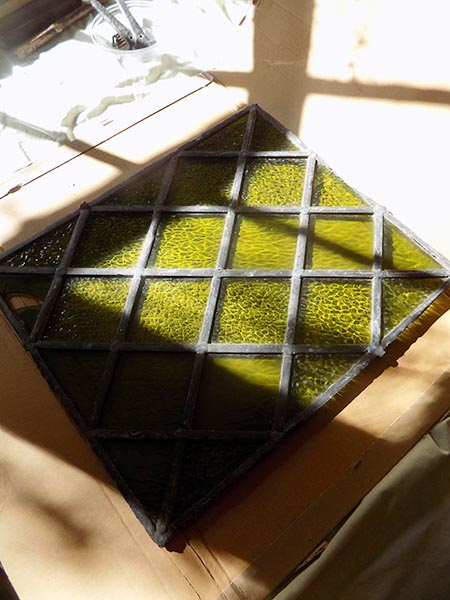
A perfect size...15 1/2 by 13 inches.
I carefully cleaned the original light green panes of glass...
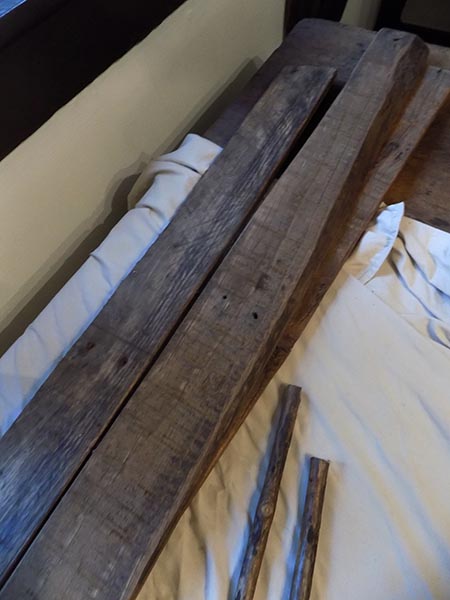
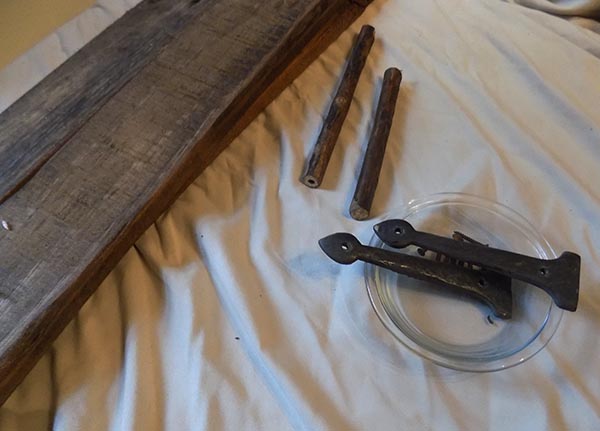
Salvaged 18th century boards from our stash,
and some hinges we saved and had up in the attic...
A nice photo we enlarged and laminated...
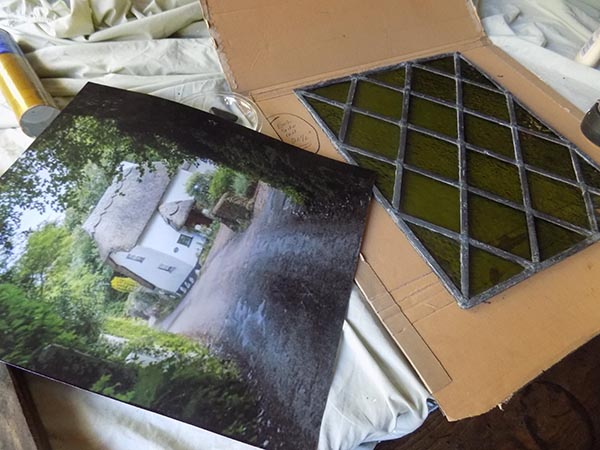
I trimmed the photo to fit the window glass...
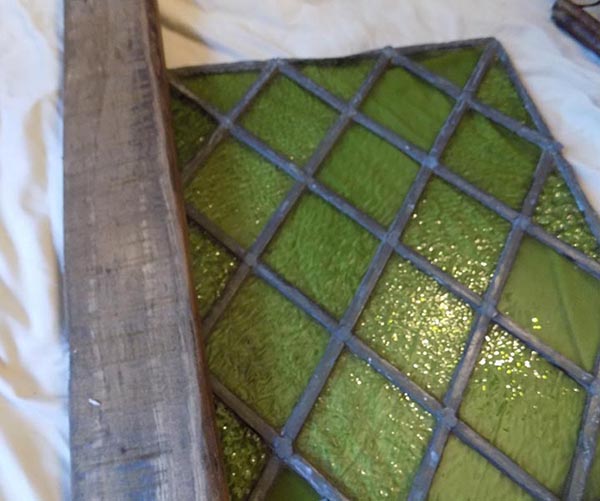
Time to build the frame.
I measured and marked the pieces of old wood.

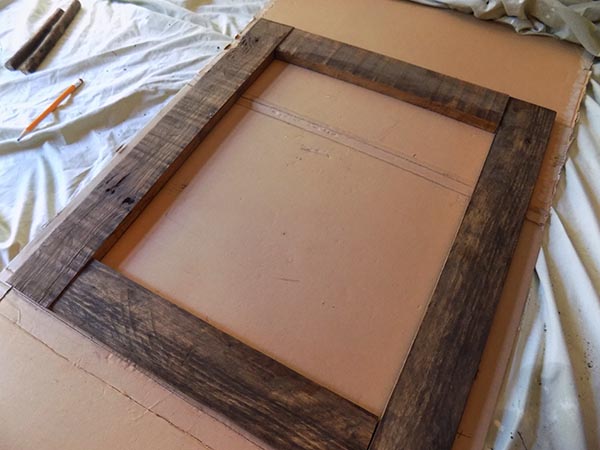
Looking good~
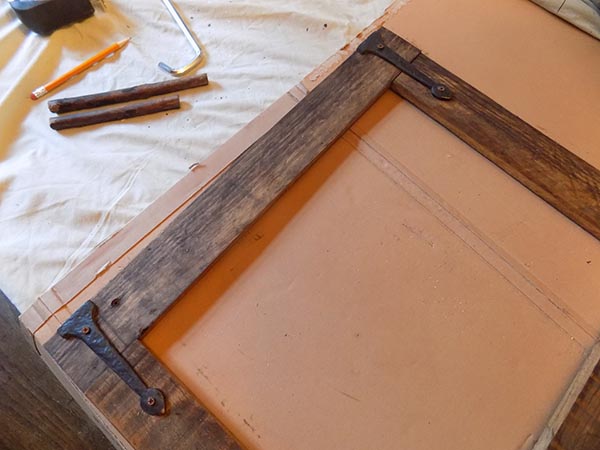
Built by Mary!
Hinges attached.
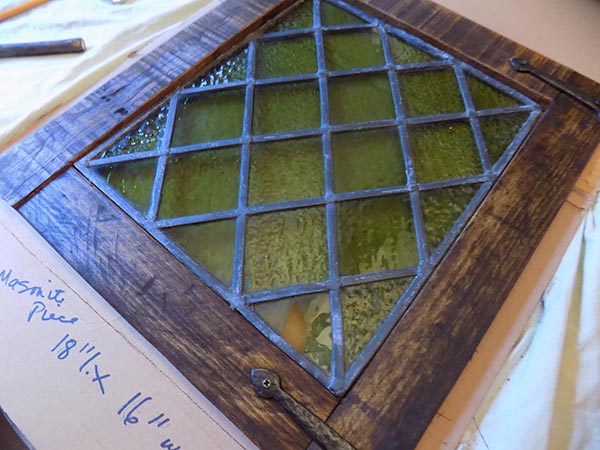
Moment of truth! Oh gosh, IT FITS perfectly!
~Pretty proud that I did it.

A leftover piece of masonite for the back.
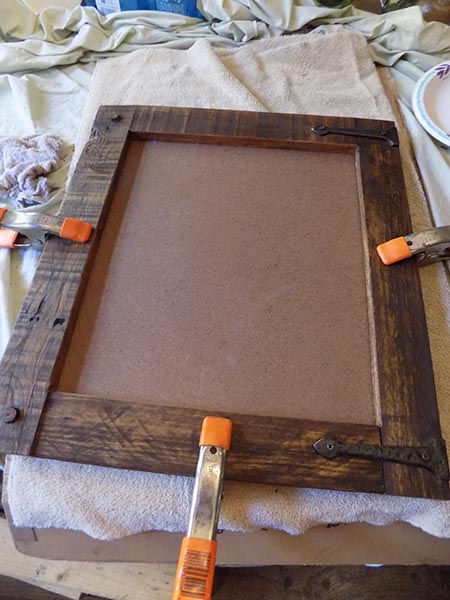
Glued and clamped masonite in place, and put hand carved wood pegs into the frame front...
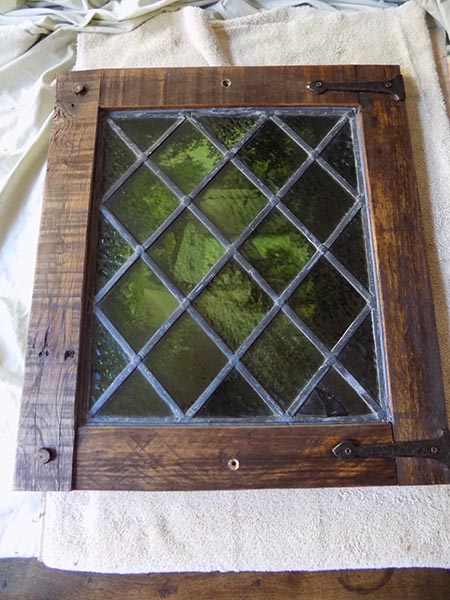
Installed the window using a thin bead of grey caulk inside, and a narrow bead on the outside along frame edge, but not covering the original lead.
Drilled holes for screws to affix it to the wall, and countersunk them.
Made hand carved wood pins and glued them into the screw holes to you don't see the screws!
This bathroom is an interior room with no windows. This was the perfect finishing touch to the room.
Now it was time to make a frame on the wall surrounding the window and using the same old wood~
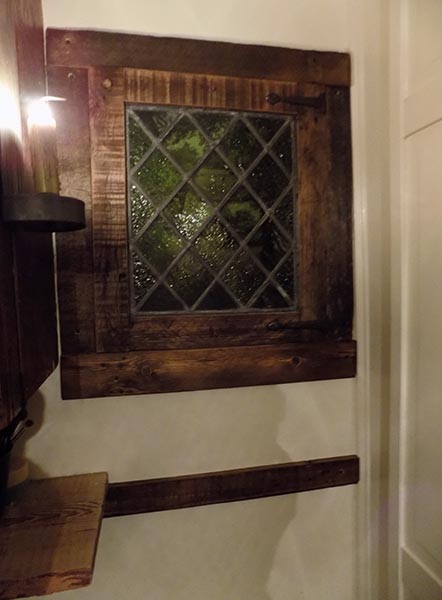
AND HERE IS THE FINISHED PROJECT~
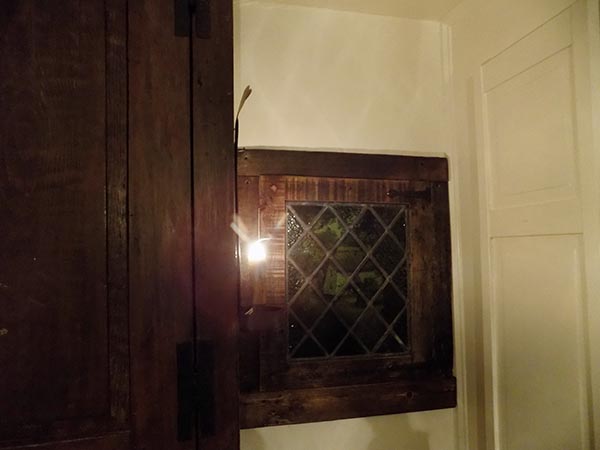
We love how it turned out!


________________________________

MAY, 2022~
THE 'NEW NATURAL POND PROJECT'
SCROLL DOWN THIS PAGE to see how we've made a large, natural pond ourselves, digging it all by hand.
________________________
A FEW PROJECTS~
We have DIY restored our entire 18thc. home ourselves. Periodically we feature just some of our changing projects on this page.
___________________________
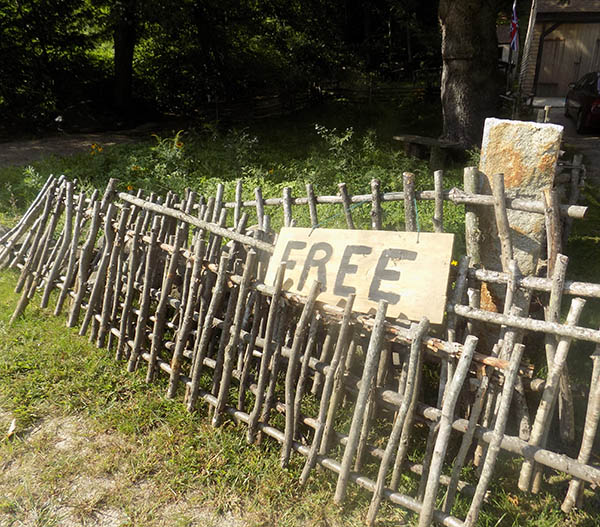
The 'free fence project', July 2, 2022
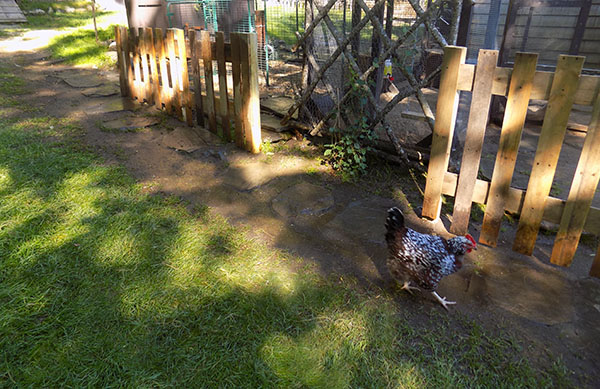
A little fence we built along the chicken and duck runs and the stone path using old pallets we salvaged for free.
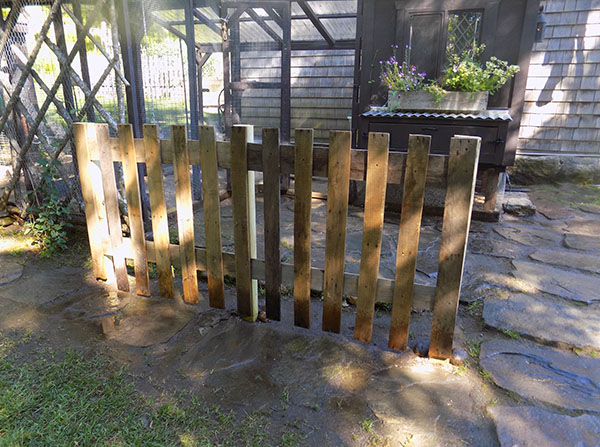
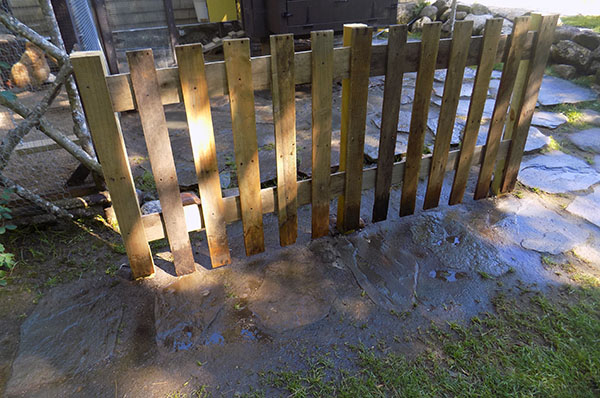
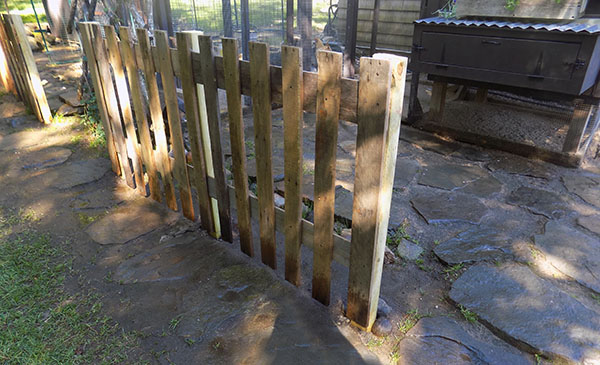
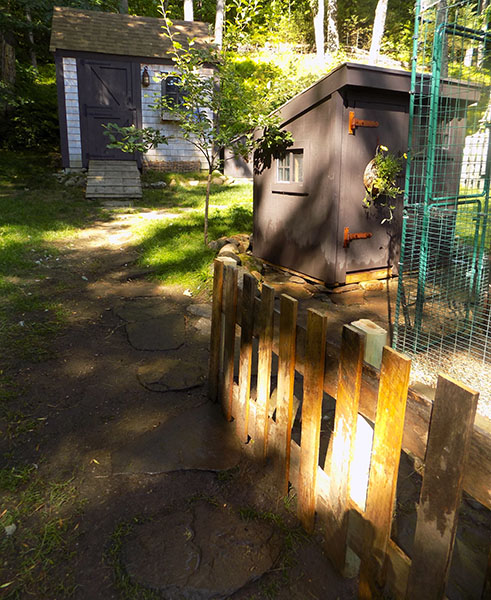

See more photos on TOUR page.
__________________
MAY, 2022~
THE 'NEW NATURAL POND PROJECT'
DAY ONE.
*********THIS IS THE 'BIG POND' PROJECT---
SCROLL FARTHER DOWN THIS PAGE TO SEE THE 'MINI POND' WE BUILT EARLIER.********
We have a large, low area of our property that was always wet/flooded. It was the perfect spot to dig out and turn into a natural pond...
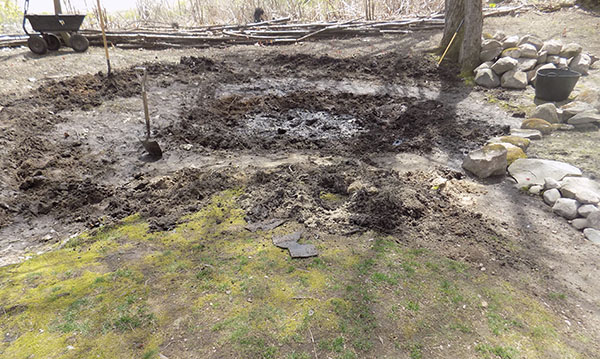
We decided on the size based on the area that was always low and wet.
We first dug a small trench to mark out the area that would become the water's edge of the pond.
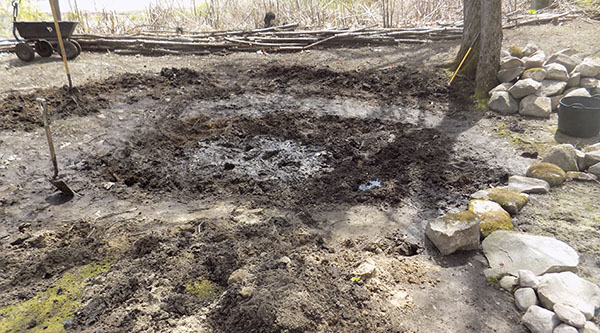
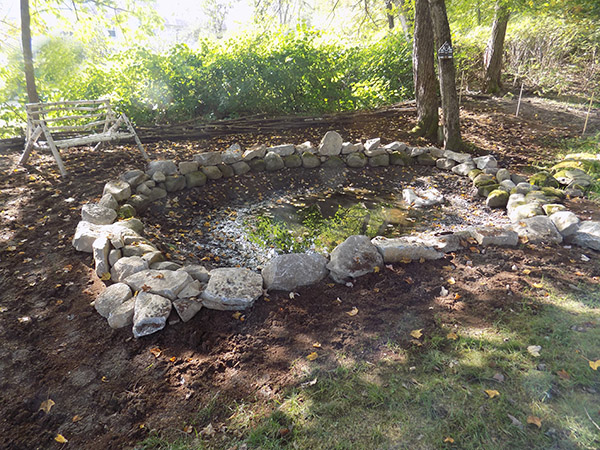
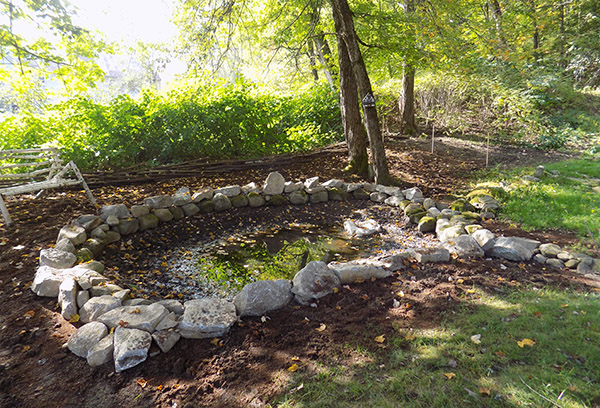
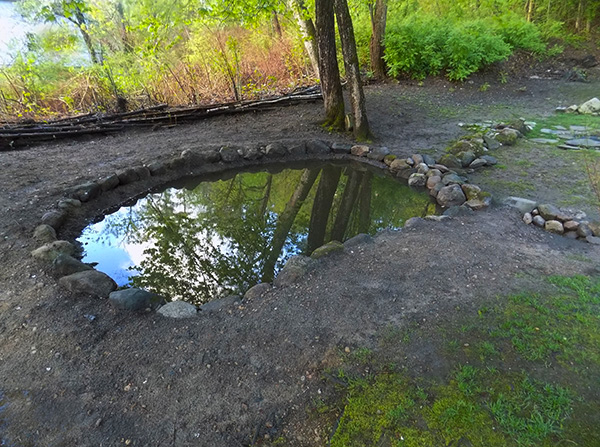
This pond is approximately 20 feet long and 16 feet wide or more...
THE TWO OF US DUG THIS ENTIRELY BY HAND OURSELVES.

A muddy mess.
We threw all the dirt into a pile surrounding the entire pond. This created a raised berm that we then packed down...
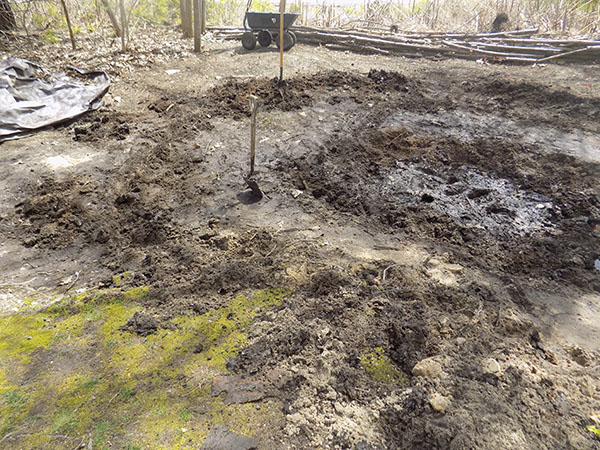
We then started digging at the center of the pond, determining an area that was to be the deepest.
We kept digging, enlarging the deep area, and sloping the sides. The pond is about 3 feet deep.
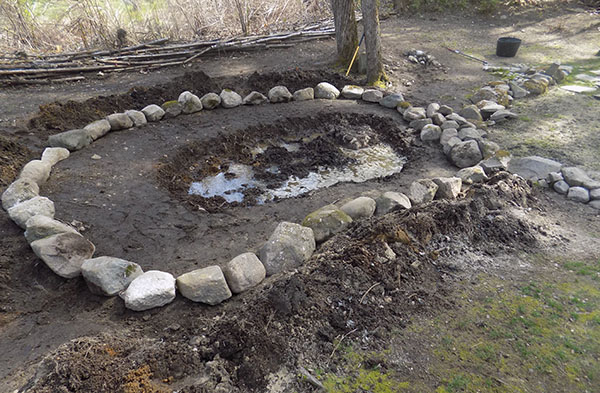
We put large granite boulders all around the pond. These mark the border of where the water stops.
All of these boulders were on our own property and used to be the foundation of a 19th century barn that once stood next to our house.
We accomplished all of this in one day.
After we got a large central area of the pond dug to about 3 feet deep, we continued digging to enlarge the deep area and slope the sides.

We ordered wildflower and tall wild grass seeds to sow all around the pond area.
We'll get a few live pond plants to put in the water and oxygenate it such as water hyacinth, cattails, lilies and duck weed.
It's a lot of hard work to dig this all by hand, and with no other help, but our ancestors did it, and we did too!
DIgging, digging, and more digging to get the pond area deeper.
You can see here that we used what we dug out to backfill at the rear of the stone edging. We made a berm all around the pond.
The rocks themselves are the actual water's edge of the pond. The berm behind them slopes gently into the landscape.
Not bad for less than one hard day's work!
___________________
THE 'NATURAL POND PROJECT'
DAY 2
Today is almost 90 degrees. We went plant shopping early this morning and got all the things we wanted for our gardens.It's an annual thing we do together on the weekend in mid-May.
For the rest of the day it was dig, dig, dig the new pond by hand---a terrible job in the heat, but we're nearly done with that part!
This was a nasty, low, muddy area that always flooded when it rained, so it inspired us to build the pond there. It also has a high water table---good for the pond!
We think it's now a thing of beauty already, and soon will look like it was always there.
We've already attracted spring peepers to it, and they serenaded us last night!
We'll have frogs and dragon flies, etc., in time too....
__________________
POND PROJECT
DAY 3
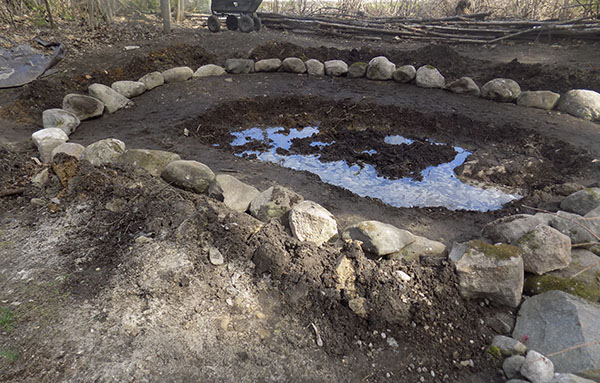
The pond is now finished, and today we graded the ground all around it. Everything we did, we did by hand.
The inspiration to create the pond:
A. It was a low spot on the property with a very high water table in that particular spot. It flooded there as a result.
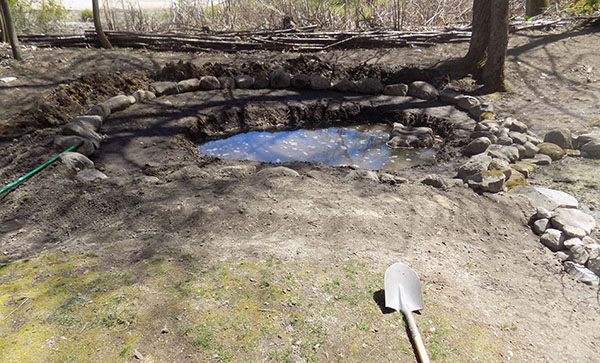
B. This pond is now filled entirely by the natural water table and rainwater only, and has no plastic liner---It's ecologically friendly!
C. We knew we could turn an unusable, unsightly area into something beautiful.
D. The BEST reason of all for this pond---
Our ducks and goose already love it.
JUST ADD RAIN...
(See more about this project and others, and a tour of our DIY home and gardens on our website.)

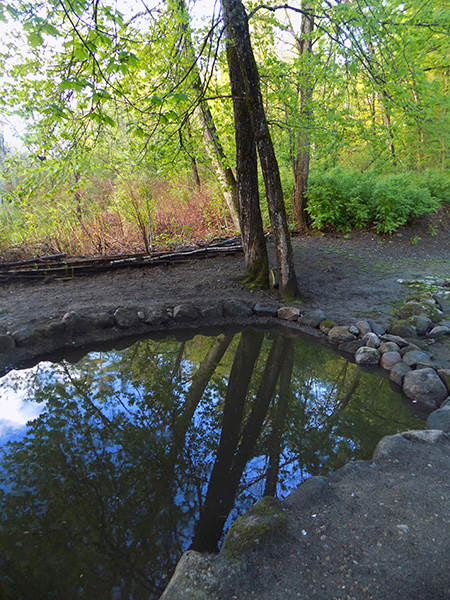
The pond is 20 feet by 16 feet and about 3 feet deep.
We wanted the water level to be able to stay high so we decided to line the pond with sodium bentonite...
Refining the dig and smoothing out the pond. Removing rocks and sloping the sides to the right degree
---not over 33 degrees.
We wanted the water level to be able to stay high so we decided to line the pond with sodium bentonite...
helpers!
We applied and mixed in the bentonite...
Rainstorms were starting to fill the pond...

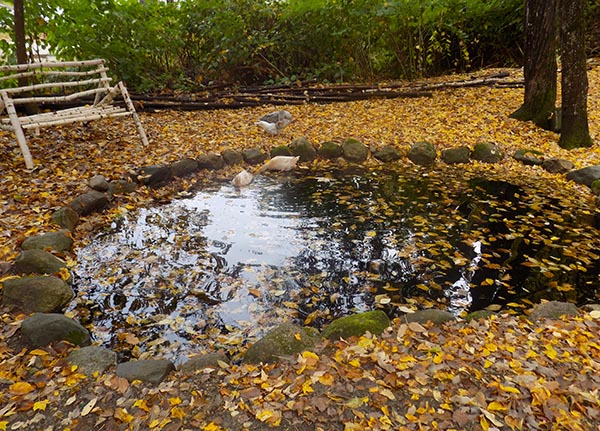
Fall arrived...

Soon it was SPRING 2023...
We have now sowed wildflower seeds and tall grasses all around the pond area. Here they are just coming up. They will get tall and come back each year like our bee meadow.
We have some floating pond plants to add for oxygenation and
keeping it clean and natural.
KEEP VISITING OUR
TOUR PAGE
TO SEE PHOTOS OF THE POND WHEN THE TALL WILDFLOWER AND GRASSES GROW AND BLOOM!
_________________________
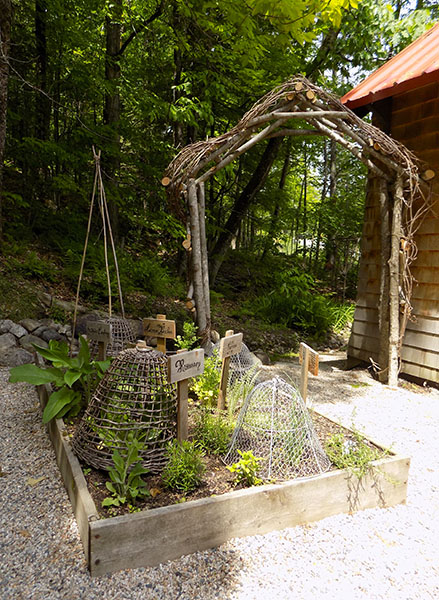
We made all of our trellises. This one is for heritage Painted Lady runner beans. We wove twigs in and out of the framework creating an open wattle for the vines to climb up.

_______________________________
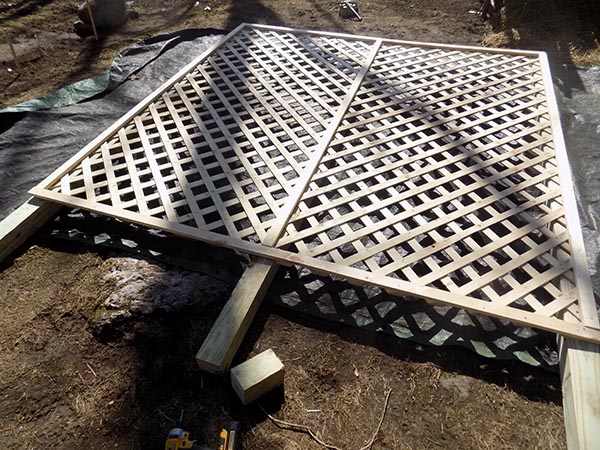
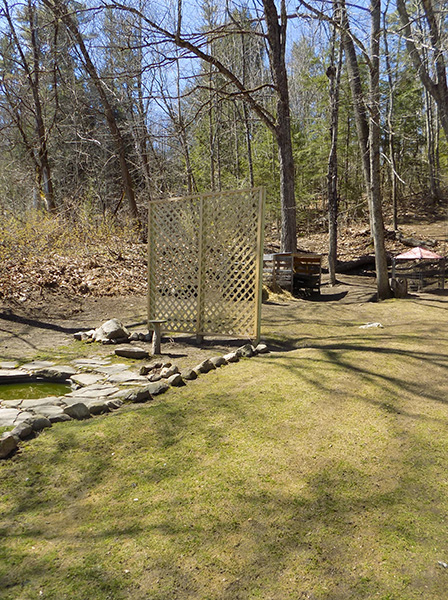
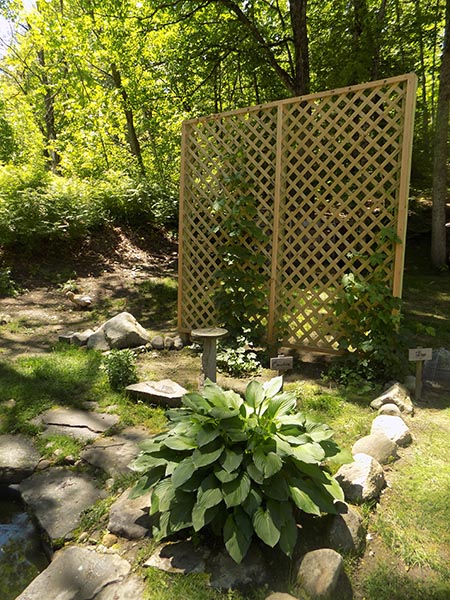
APRIL 2, 2022~
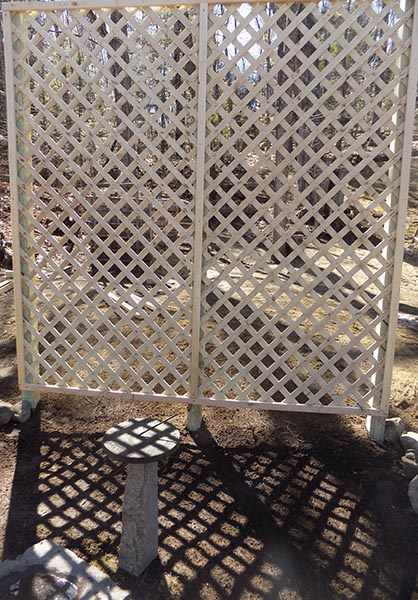
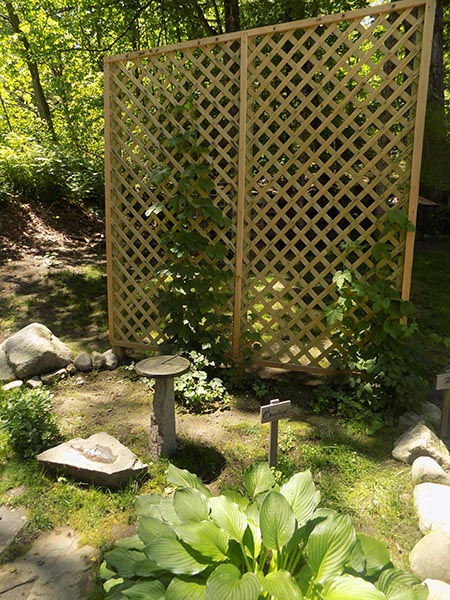
THE HOPS LATTICE TRELLIS PROJECT
About 7 years ago we built a tall hops screen from trees we cut down for the hops vines to grow on, but after all these years the hard New England winters took their toll and it fell down!
We loved the primitive look they had, but now it was time to build something stronger and more substantial, so today we built a new 'hops trellis' from 4x4 posts and 8 ft. tall pine outdoor lattice panels.
We're very happy with the way it turned out and the hops now have a firm screen to cling to.
This will look especially nice once it 'weathers' to a nice grey/brown patina.
Below are the photos we took of the project.
PHOTOS OF THE HOPS GROWING UP THE SCREEN WILL BE ON OUR TOUR PAGE IN SUMMER~
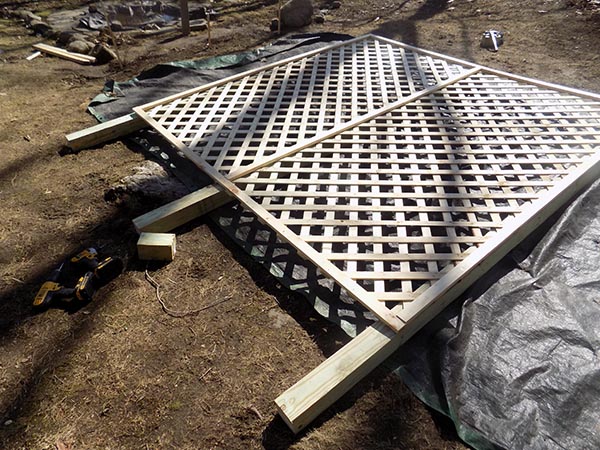
Working on the new hops climbing screen.
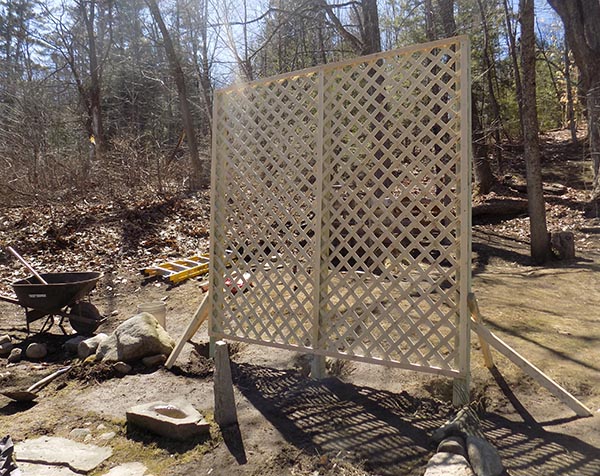
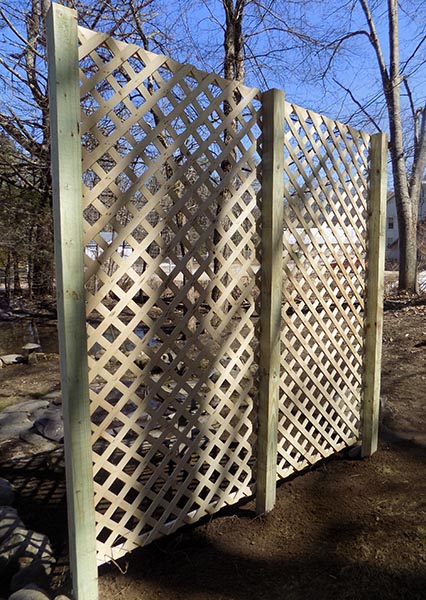
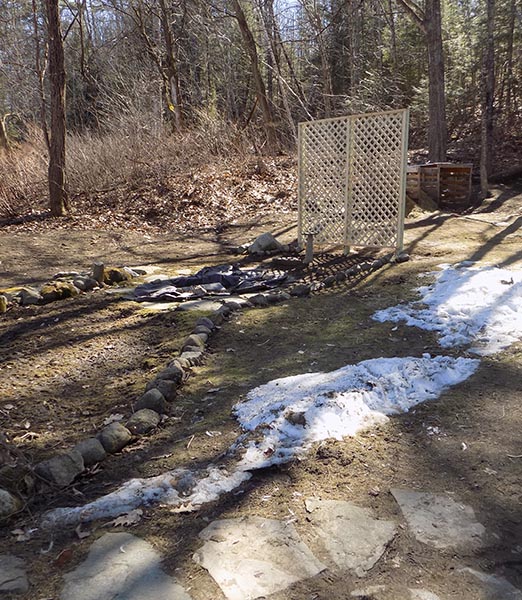

Finished.
___________________________________
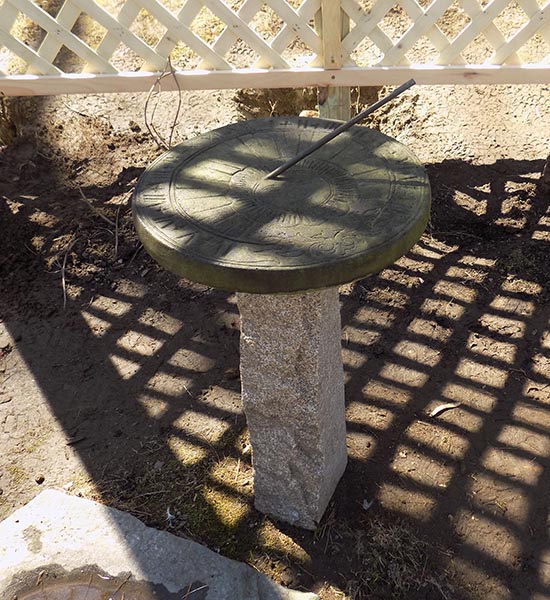
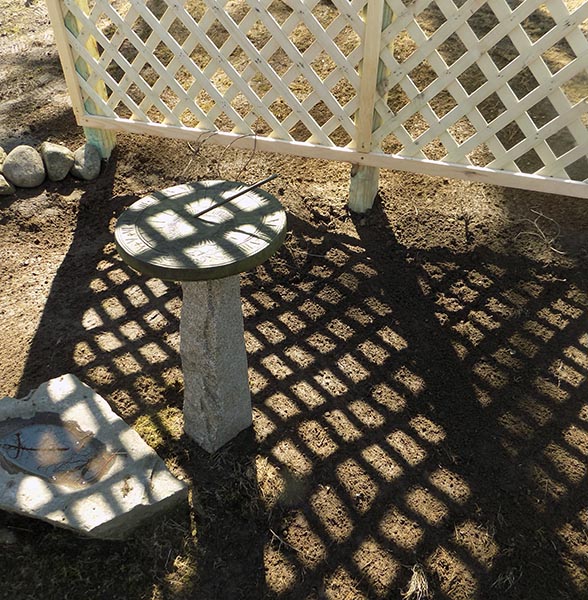
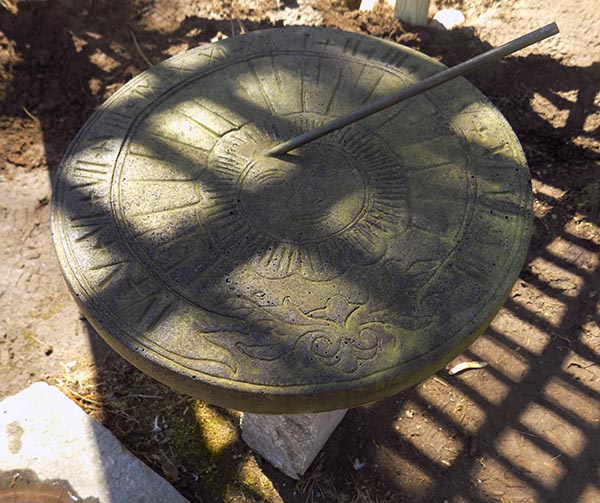
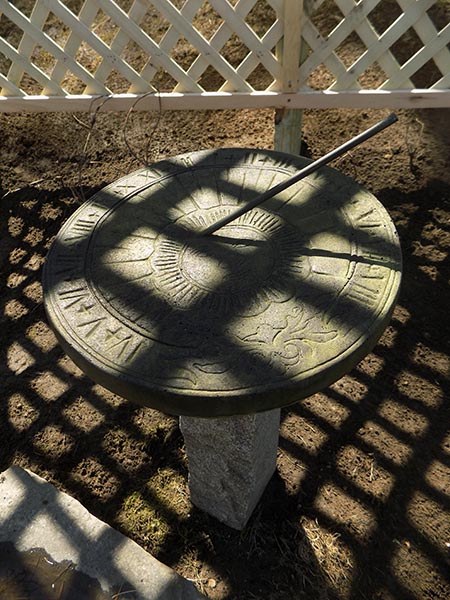
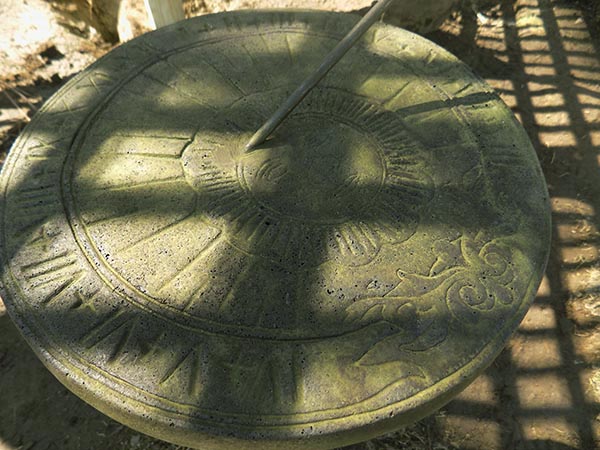
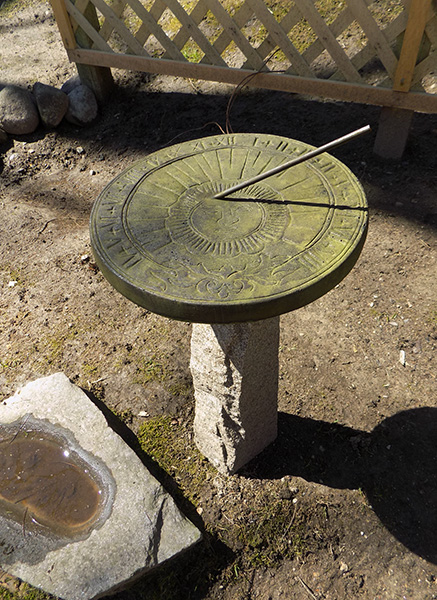
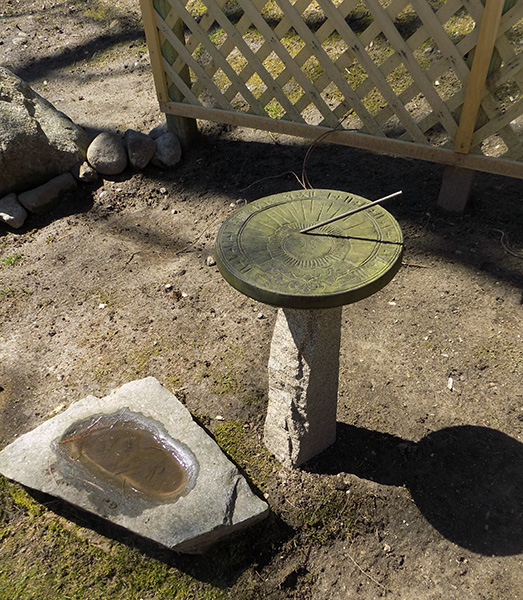
APRIL 2, 2022~
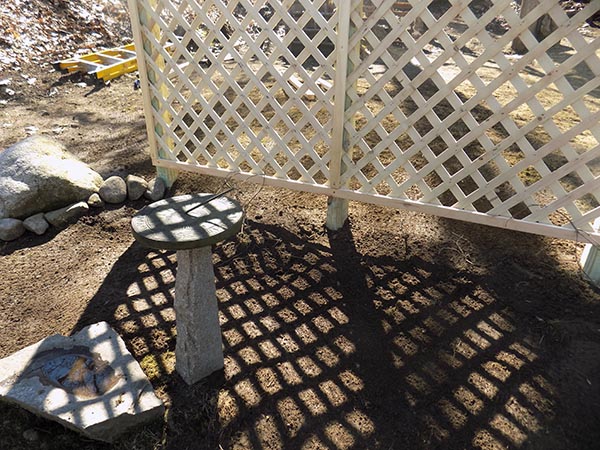
THE SUNDIAL PROJECT
Last summer we saw what appeared to be a human-worked granite stone object peeking up from the dirt in our sideyard. We had never seen it before and a bit of it had become uncovered.
We dug it up and found that it was a gorgeous hand carved granite post! Who knows how old it is, or how long it had been buried in the yard...
Today we finally got the sundial that I have had for a year installed on the lovely post using stone adhesive, and it now has place in front of the hops, and next to the little duck pond.
We just love it.
____________________________
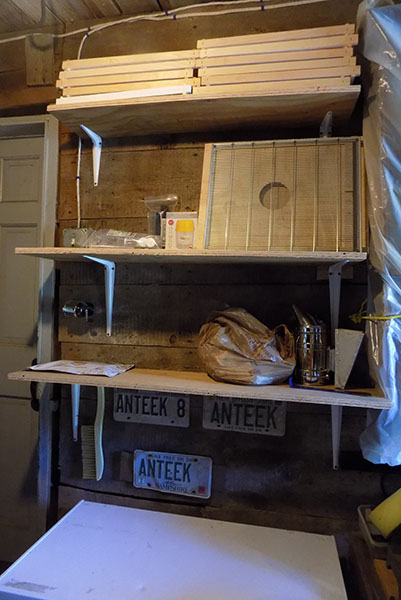
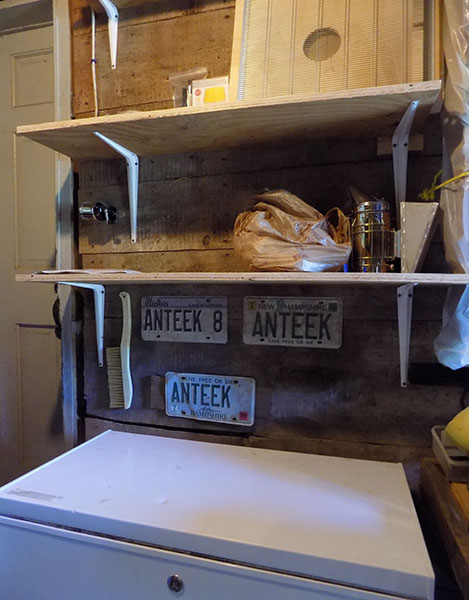
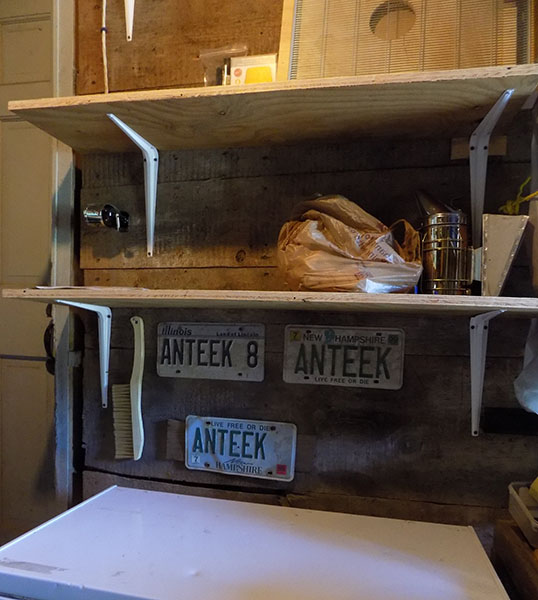
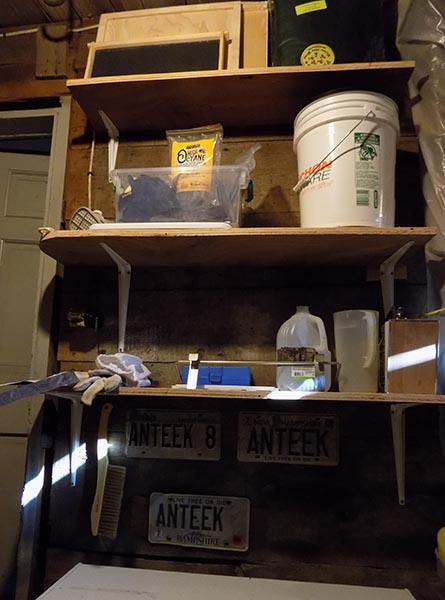
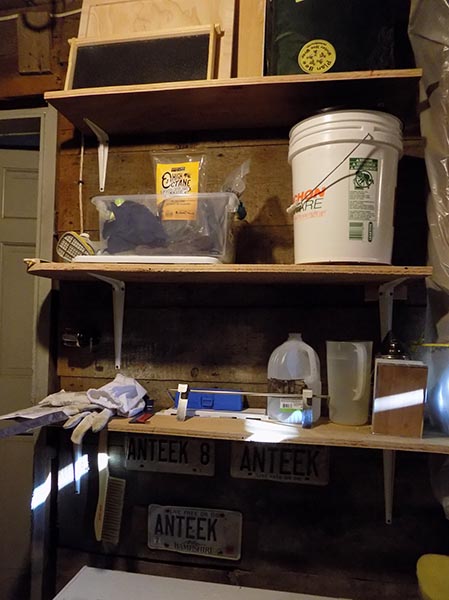
June 12, 2021~
BEE SHELVES
We built shelves above the freezer out in the attached woodshed for all our beekeeping supplies.
We used only scraps of wood we already had.
_____________________________________
April, 2021~
We built a neat arbor trellis near the raised beds in back from trees we cut down in the woods. We added a long grapevine garland.
See TOUR page. We'll be planting climbing plants on it soon~
____________________________________
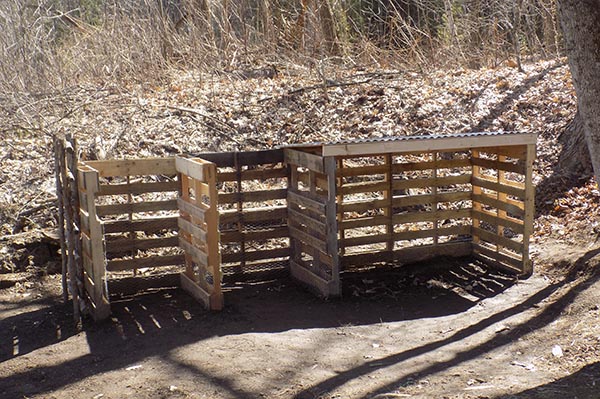
March 27, 2021
BUILDING A COMPOST AREA FROM SALVAGED PALLETS~
We're both building a 3 bay combost bin set up similar to the one in this photo. We're using all salvaged pallets to build it...

An idea...
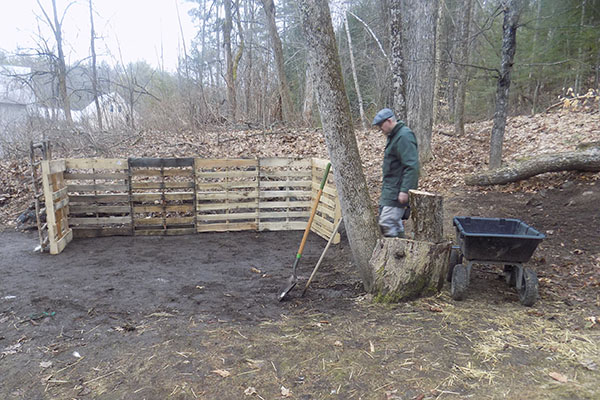
Ours has the 2 smaller uncovered bays, and half of the structure is roofed with a tin roof.
We made a branch trellis attaching it to the end facing the road and I'll be planting climbers on it.
Getting ready to put the roof on half of it.

We lined the bins inside with chicken wire.
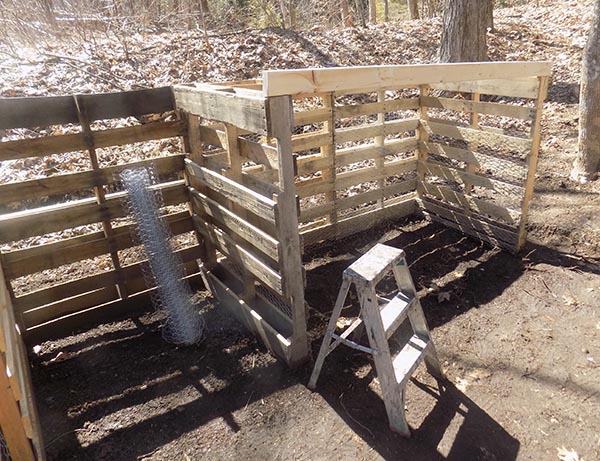
Twig trellis at one end for a climbing plant. Grass seed is going down in the area.
We love our finished budget friendly compost bins.
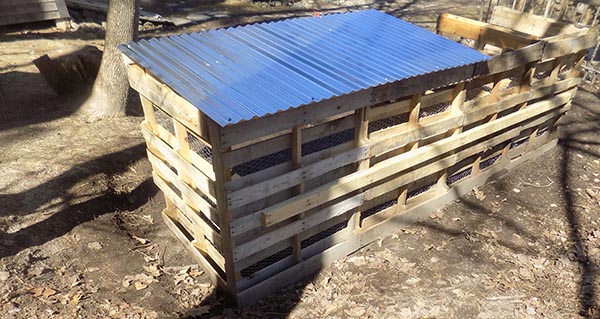
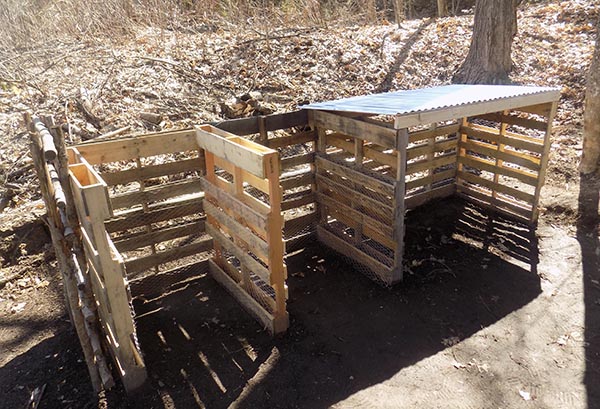
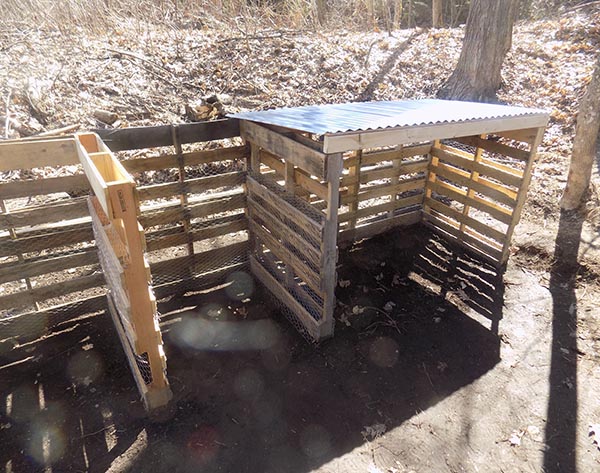
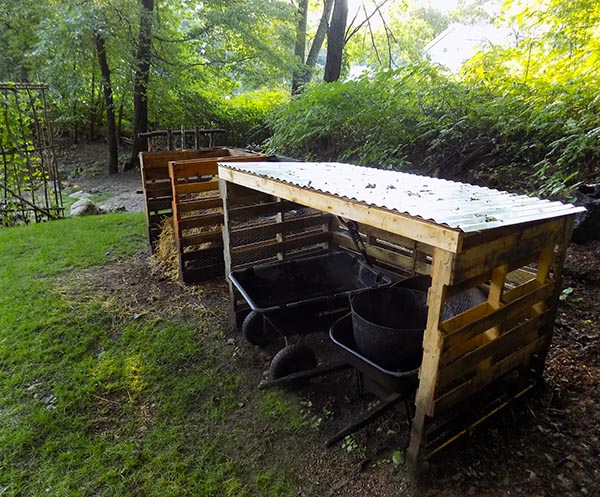
We made this compost area entirely with materials we salvaged for free or had leftover here.
Cost: 0
____________________________
March, 2021~
We found a pair of 16thc. wood shutters and they happened to fit a back leaded window perfectly. We really love them.
I was proud that I installed them on the outside of the window by myself. Adam came home and was so suprised.

Shutters had their original forged hanging pins...
I used hand forged iron screw eyes to hang them.


Spring, 2021. I used an old gate we made years ago as a feature under the window. It faces into the garden.
See the TOUR PAGE for updated photos of this finished project~
______________________________________
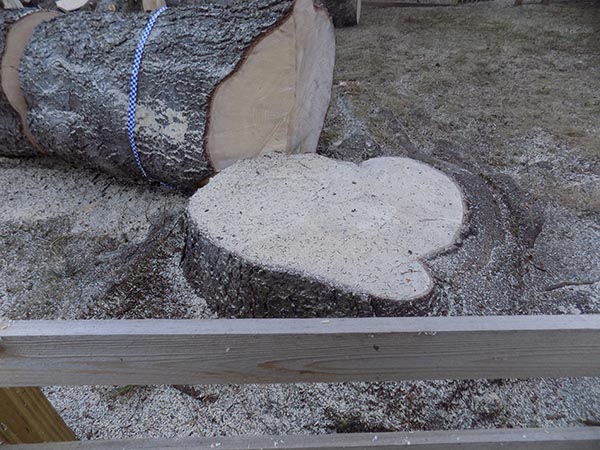
DECEMBER 14-15, 2020~
Goodbye to the huge ugly tree.
We've been trying for years to have the power company authorize and remove a HUGE ugly pine tree from our front sideyard. The electric lines ran all through it, and it was also leaning toward the lines at the street because of root upheaval over the years.
It is 75 feet tall.
It finally got approval, and the tree company removed it for free.
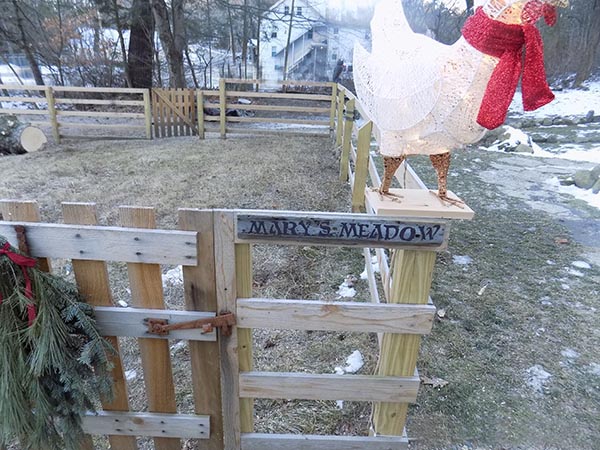
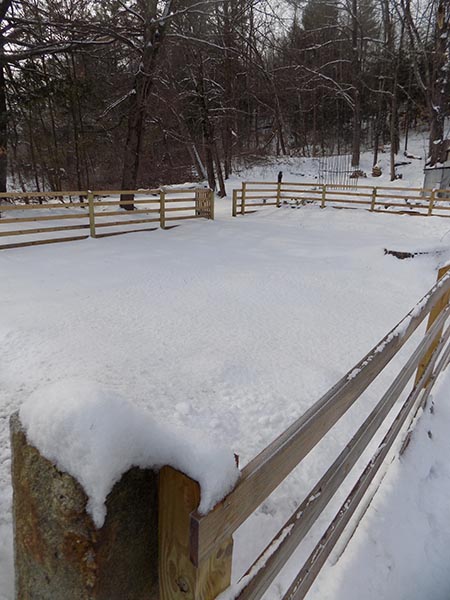
It was in 'Mary's Meadow', and was a terrible eyesore, as well as being messy and dangerous.
We plan to plant one nice October Glory maple in the fenced meadow area in spring.
Here are some photos of the tree removal in progress.

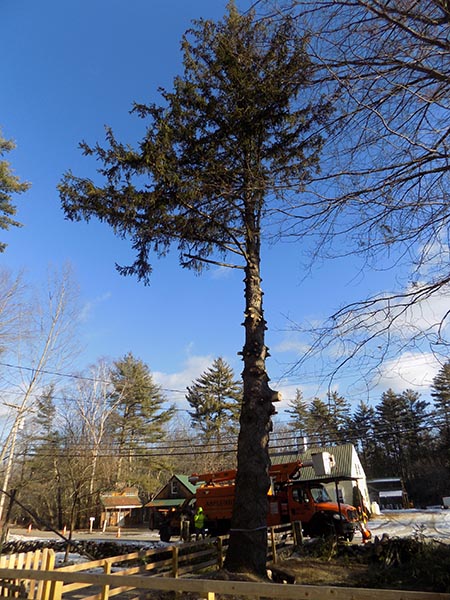
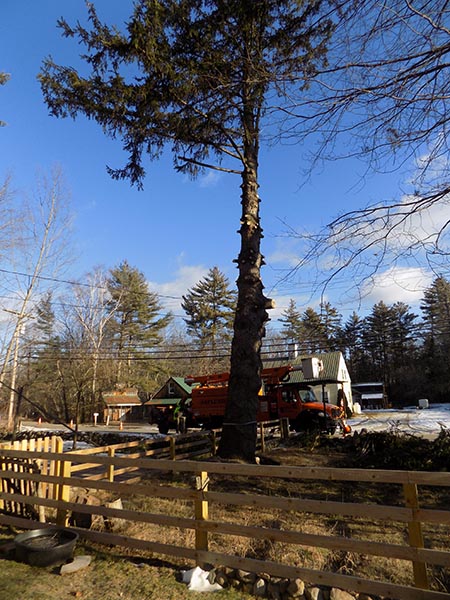

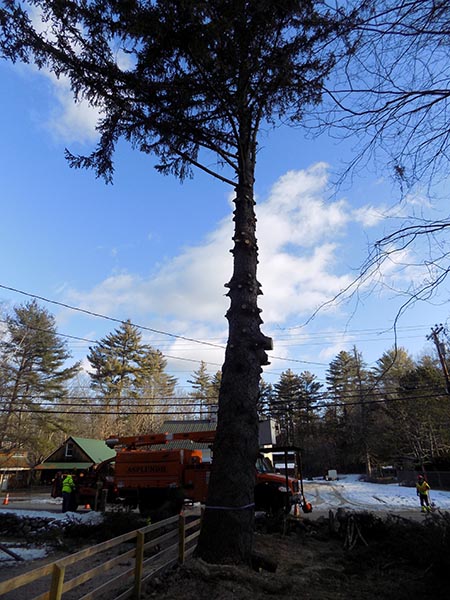
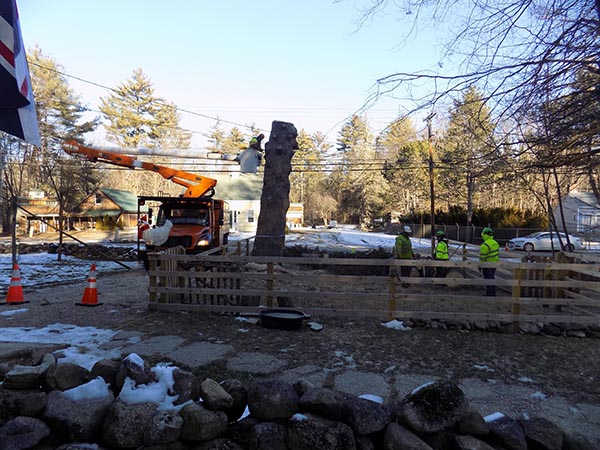
The tree was 75 feet tall and over 3 feet across at the base!
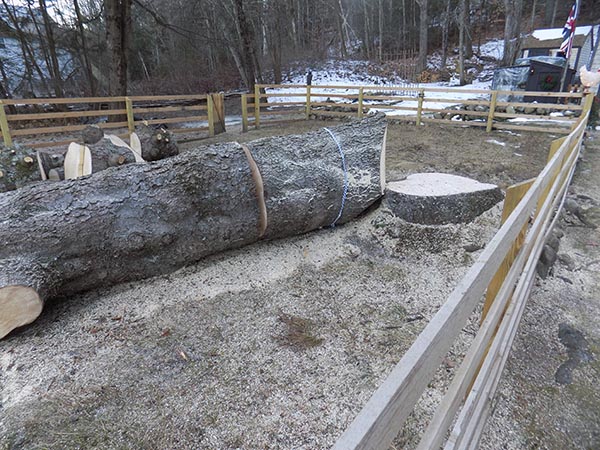

A few days later a truck and crew came and took the gigantic tree pieces away.

Mary's Meadow looks a lot nicer with the huge terrible tree gone.
*Spring 2021~ We've now planted an October Glory maple tree in the meadow and seeded with native northern meadow grasses and wildflowers. See updates on our TOUR page.
The huge stump is about 40 inches across.
Spring, 2021~ We now have our first beehive set up on this huge stump~
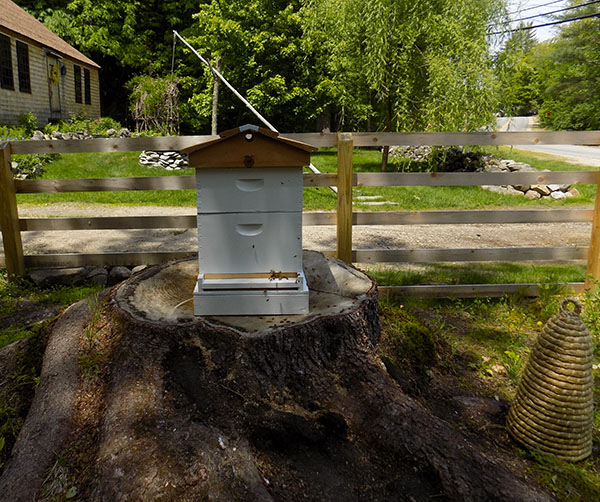
SEE OUR TOUR PAGE FOR up to date spring/summer photos.
________________________________
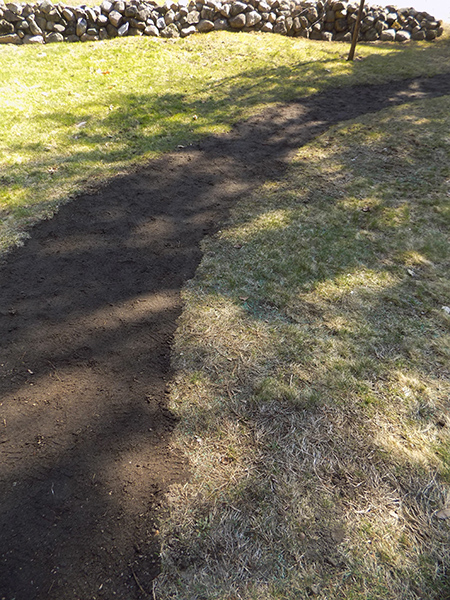
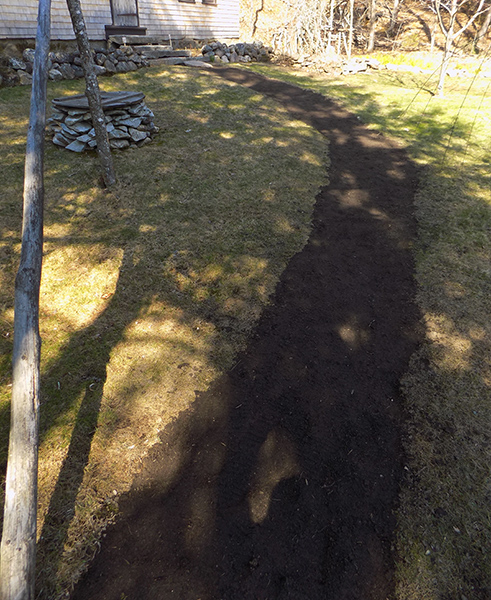
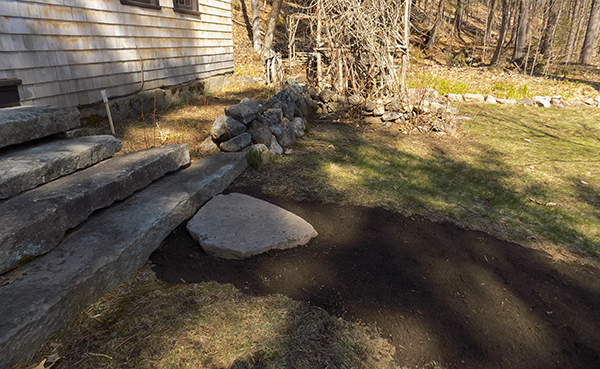
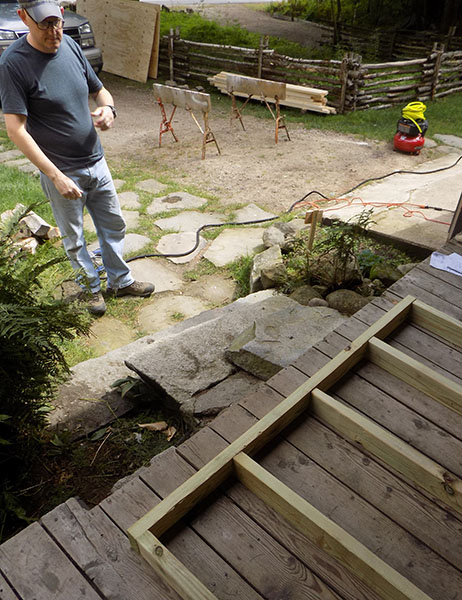
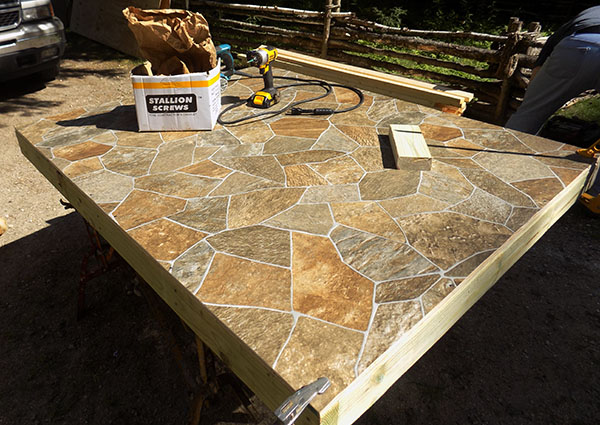
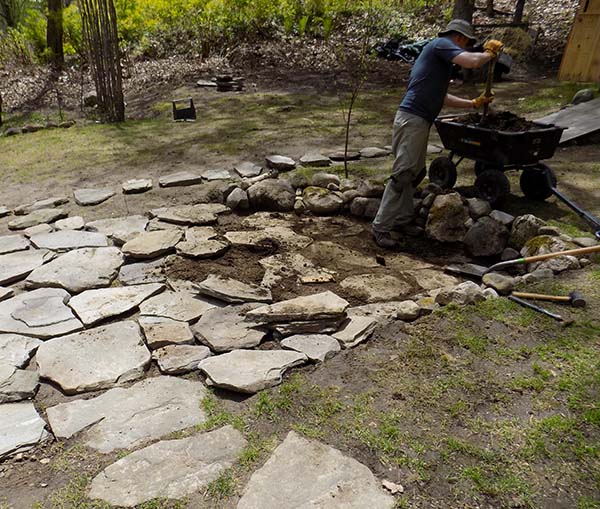
June 4, 2020~ Finishing the path in the backyard over to the kitchen raised bed area.
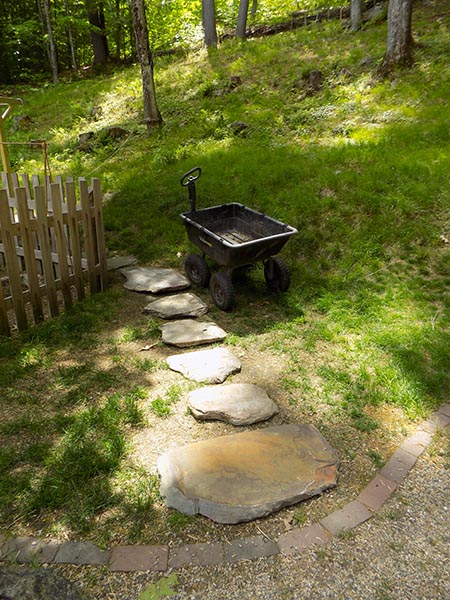
Mary placed the last 6 stones and Adam dug out and sets them in place. Grass seed to follow.
SEE UPDATED PHOTOS ON THE TOUR PAGE.
_____________________________
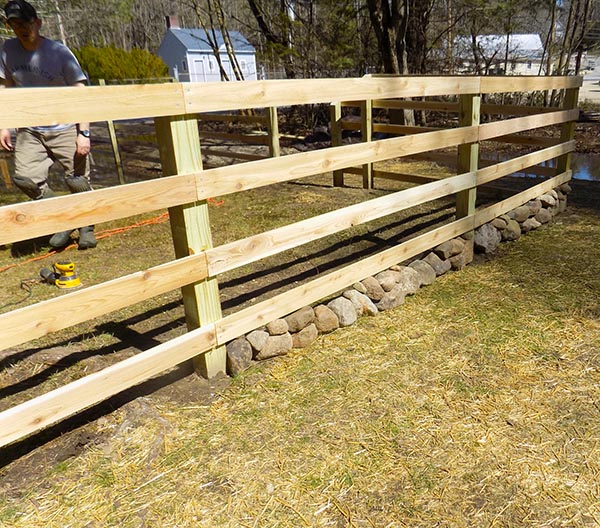
EARLY SPRING 2020
SOME PROJECTS~
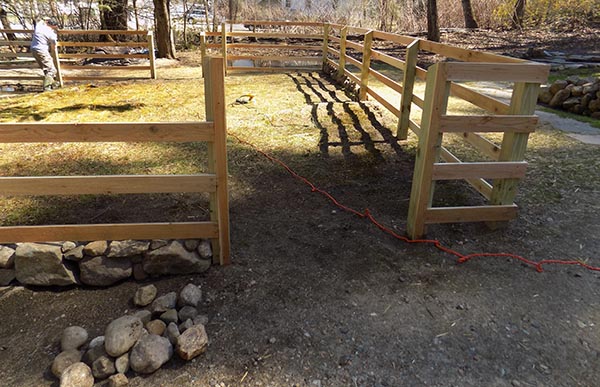
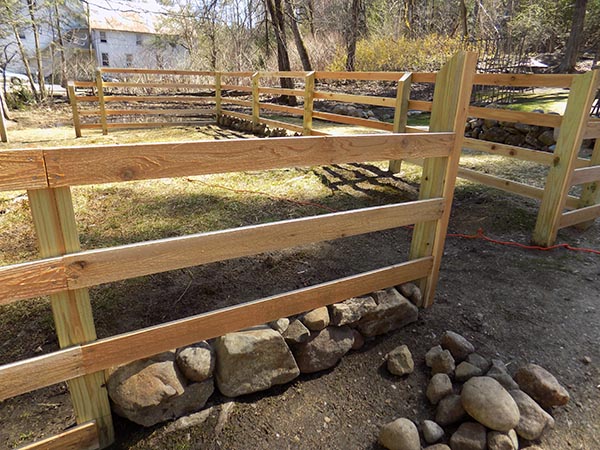
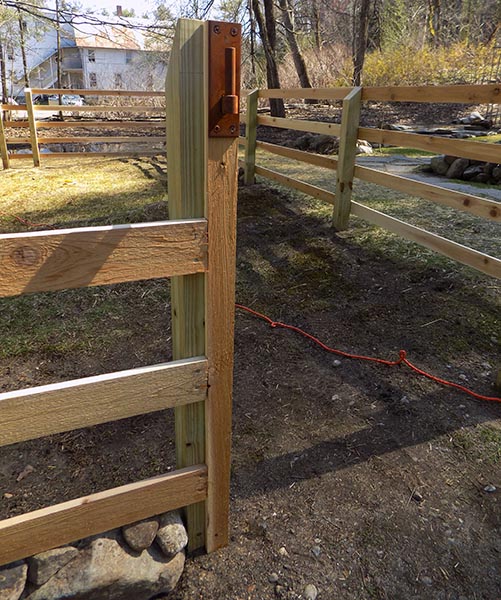
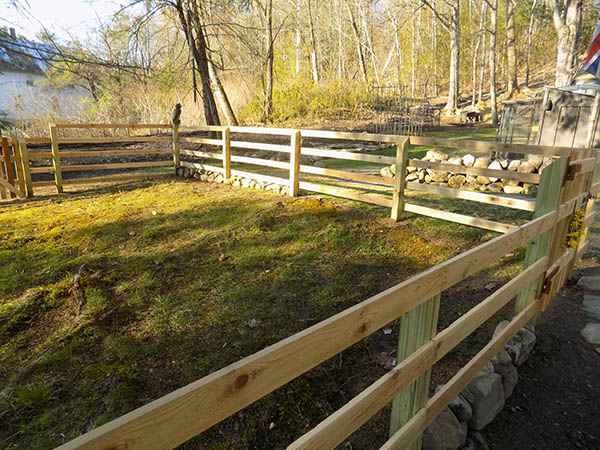
The NEW cedar fence around 'Mary's Meadow' project.
We took down the old branch fence we made years ago around "Mary's Meadow"...
We're replacing it---building a new cedar 'farm fence' on land that is not level.
It will have 2 gates with period hinges.
Taking down the old fence and gate. We've repurposed the cute branch gate we made to the back garden.
We both built this together, as we have everything we've done.
Mary framed in the first gate and we set all the fence posts in Quikcrete.
Adam digging holes and Mary leveling and setting posts. We then braced them with boards and clamps while we added the concrete.

The hardware for our 2 fence gates, etc.

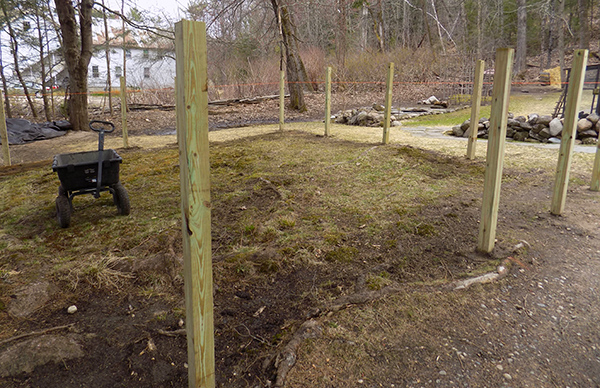
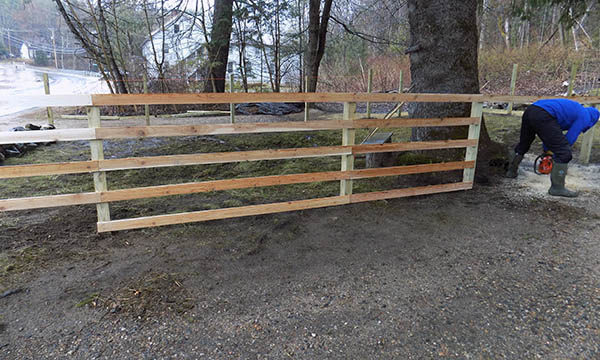
The land is not level and we taught ourselves fence building as we went along, like everything else.
Mary put rocks in low spots under fence panels...
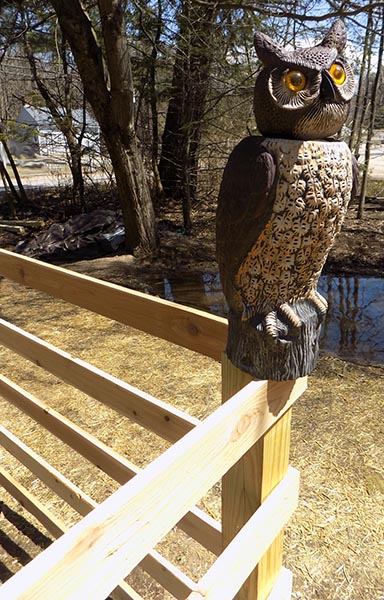
Adam installed a wood dowel in a corner post to hold our 'guard owl'.

Chuffed! It's looking very good.
We love the rough sawn, rustic cedar boards we used.

It was grueling hard work but the fence turned out so well and we love it.
Stone mason Mary built little stone walls under low sections of the uneven landscape.
She salvaged every rock from our stream. ~Wait till you see them all in place!
Mary built 2 gates, both a little different.
The driveway side gate...

VISIT THE
TOUR PAGE
FOR UPDATED PHOTOS ON THIS PROJECT AND OTHERS.
SEE ALL THE PHOTOS OF THE FINISHED FENCE AND GATES ON THE TOUR PAGE. SEE HOW PRETTY 'MARY'S MINI MEADOW' IS NOW WITH ALL THE WILDFLOWERS GROWING AND BLOOMING!
____________________________________
EARLY SPRING, 2020~
THE FRONT PATH PROJECT
When I first came years ago, the path to the front door was brick.
NOT our style at all.
We took it all up and gave the bricks away for free on Craig's List---'You come get and load them, they're your's for free'. A lovely older couple came and took them and were so delighted to have them. I helped them load them up...
We're finally working on the path we've wanted---Natural, large flat New England stepping stones just set into lawn.

We got some good black dirt and filled in the old path, compressing the soil...
Mary


We laid down large stepping stones.
Adam set them into the dirt.
Mary put down grass seed and mulch.

Finished!
We love the way it looks.
______________________
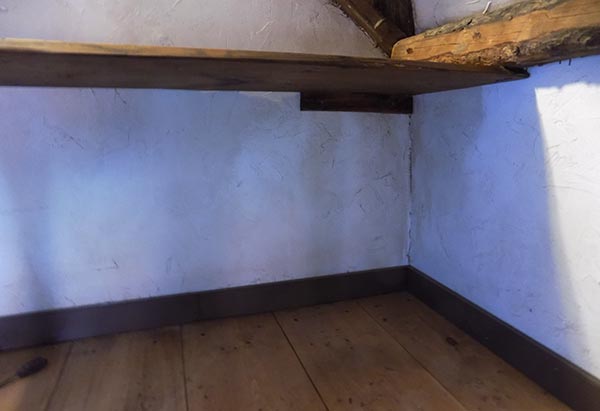
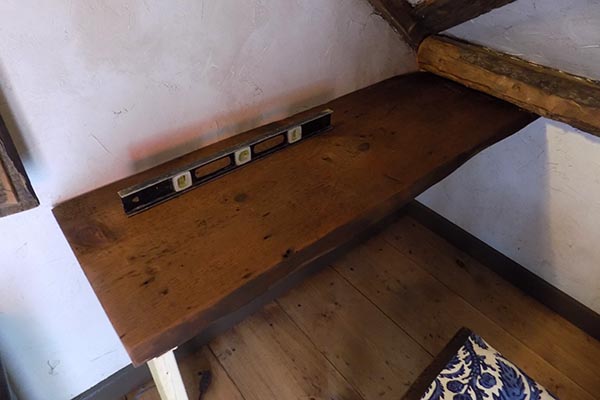
MARCH 2020
#we-don't-panic-we-don't-hoard-we-build-and-bake.
THE GUEST ROOM 'DESK PROJECT'
MAKING AN 'L' SHAPED DESK IN A CORNER OF THE ROOM~
We had an original 19 inch wide pine 18th century board.
We decided it would make a great built in, permanent desk in the corner of our sloping-ceiling upstairs guest room.
We stained it.
It felt like satin and you could see all the old character.
It had one original feather edge which we faced into the room as the front edge.
We attached the wall-end to a beam from below which was at the perfect height.
Mary used a level and propped it up with a piece of scrap wood temporarily...
We added a cleat of the same 18thc. wood to the underside at the corner, securing the desk top to it.
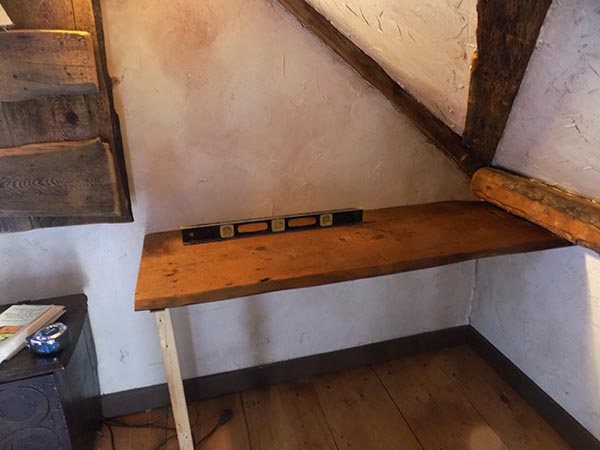
We used another piece of 18thc. wide board for the end support. We'll cut out the bottom to replicate that of a 17thc. coffer we have....
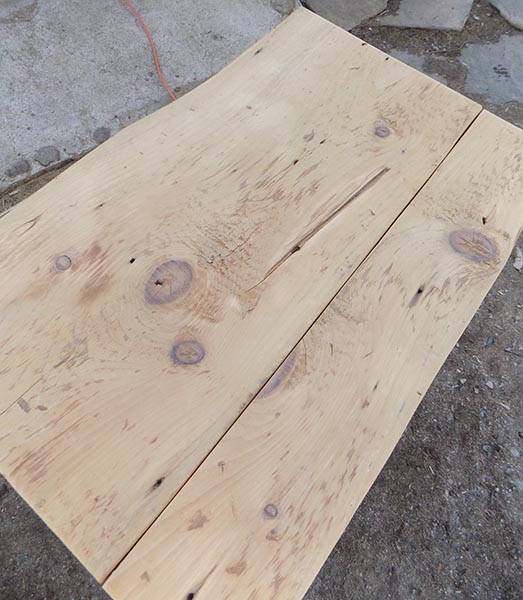
Making the end support from other 18thc. boards.
We made battens on the inside, keeping the original feather edge of the board.
Mary made her own free hand pattern and transferred it to the bottom of the end support board for cutouts...
We whittled wood pins for attaching the top to the leg support. We made a shoe foot leg for the other side.
The finished desk. Cost: 0
(THE DESKBOX~This bottomless box that we made years ago to cover our computer fits great on the desk. Adam carved out initial into the front of it in 17thc. scrip years ago...)

See more photos on our TOUR page~
_____________________________
WE HAVE CHICKEN KEEPING, DUCK AND GOOSE KEEPING HELP, ADVICE, AND INFORMATION ON THIS PAGE~
Email us anytime as well.
countryladyantiques@yahoo.com
_____________________
Jan. 2021~

__________________________________
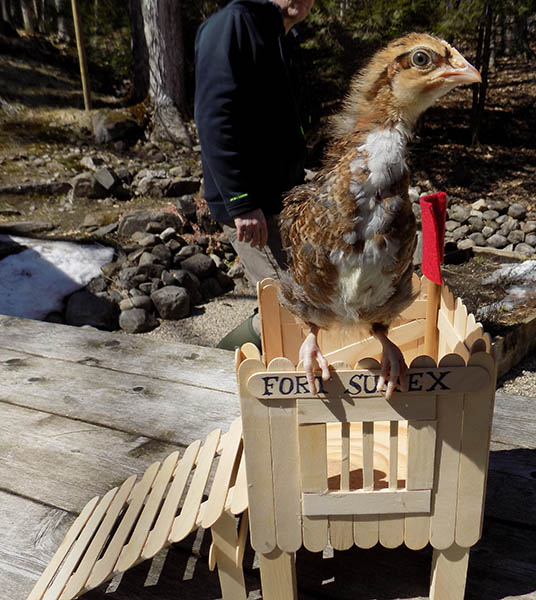
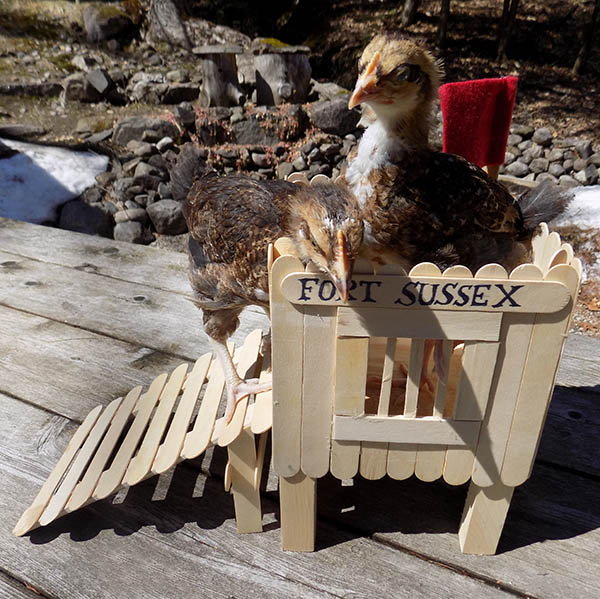
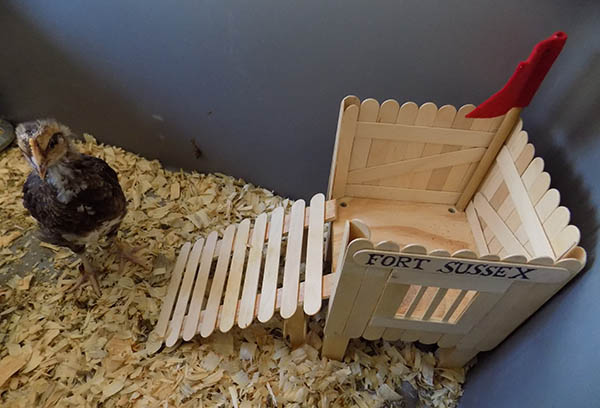
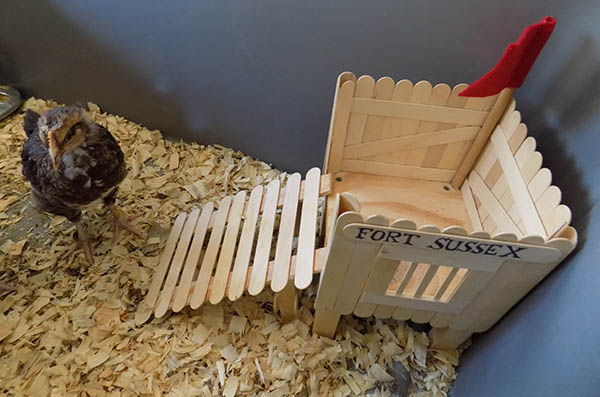
MARCH, 2020~
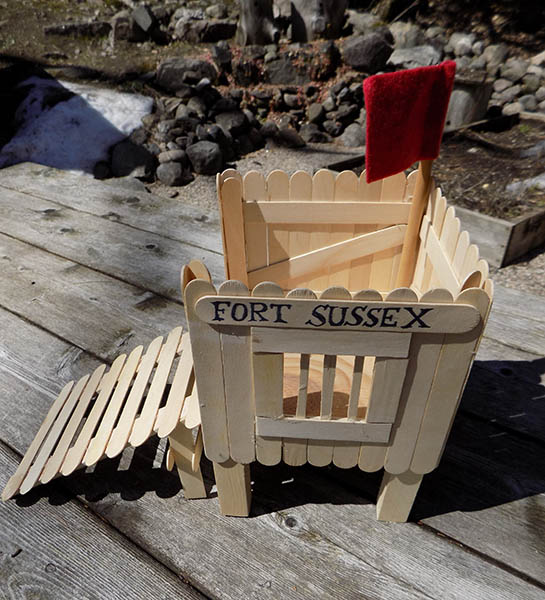
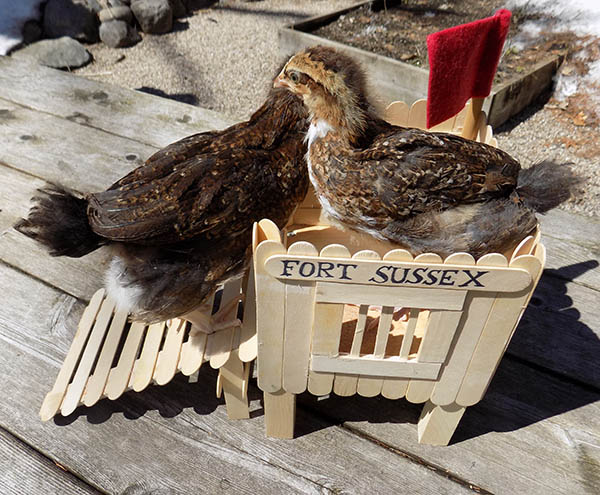
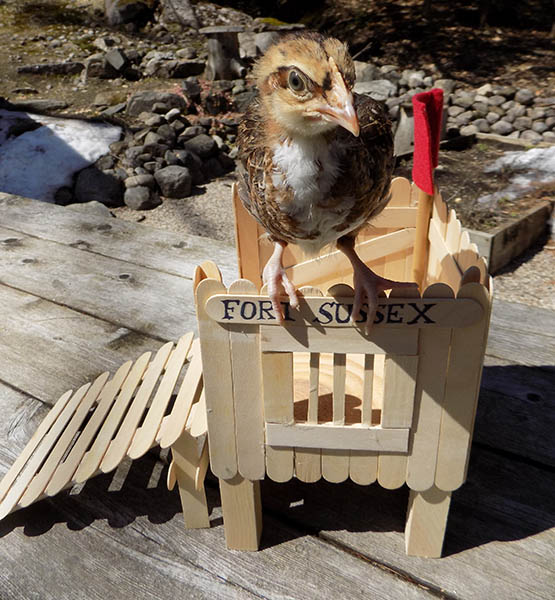
A PROJECT FOR THE 'LITTLES'
We have 2 Speckled Sussex chicks...
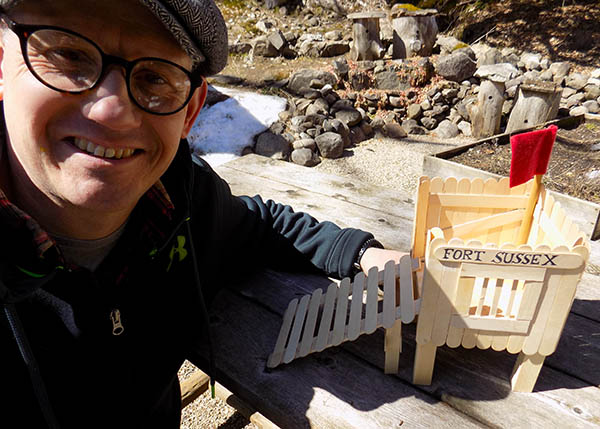
Adam built this little fort for the 'Littles' in about an hour with $2. worth of popsicle sticks!

__________________
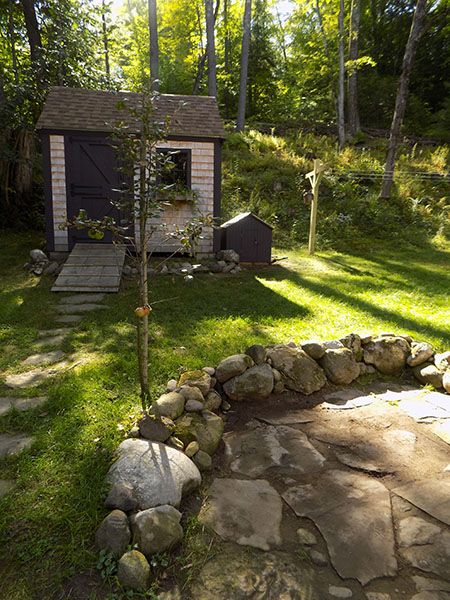
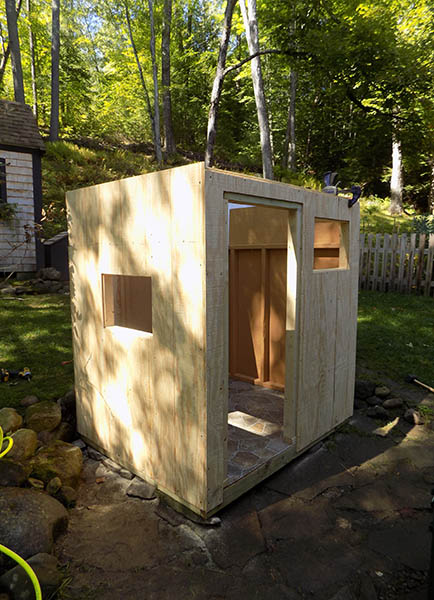
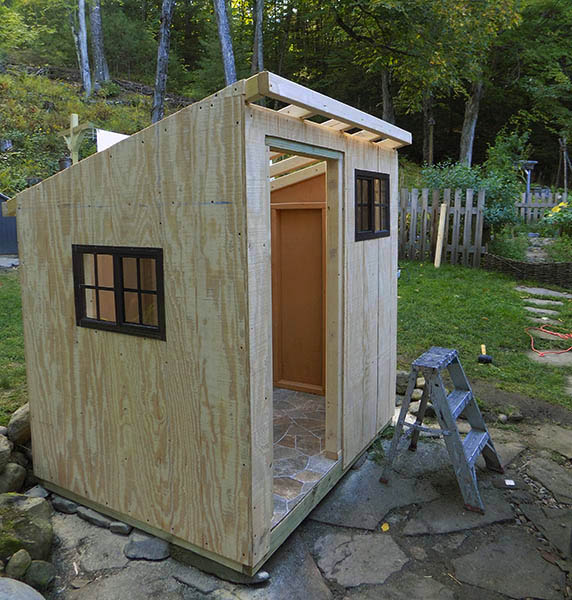
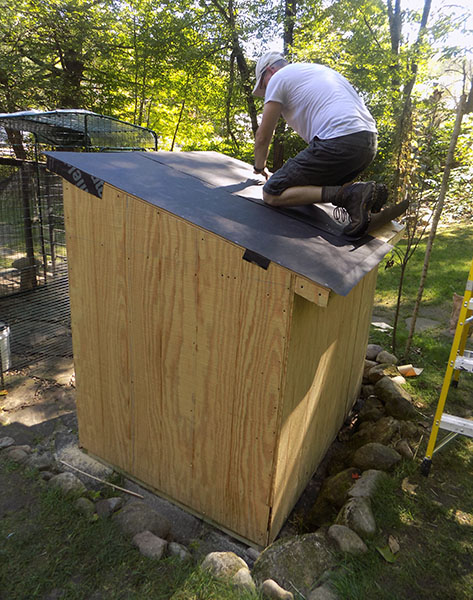
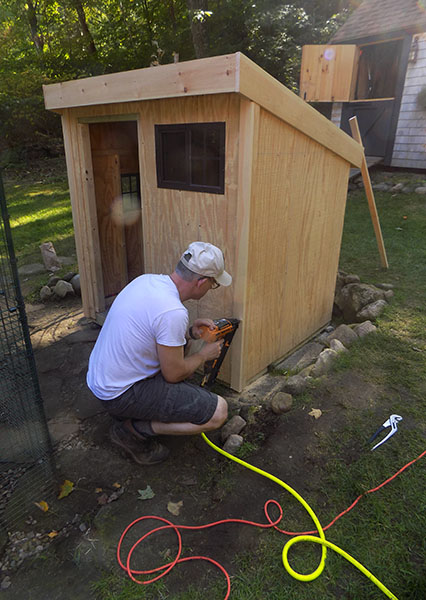
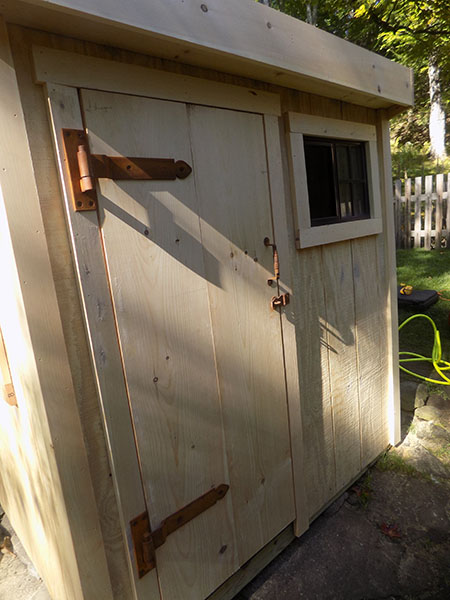
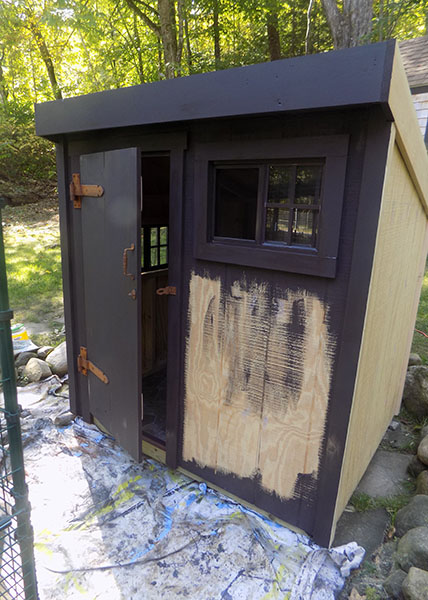
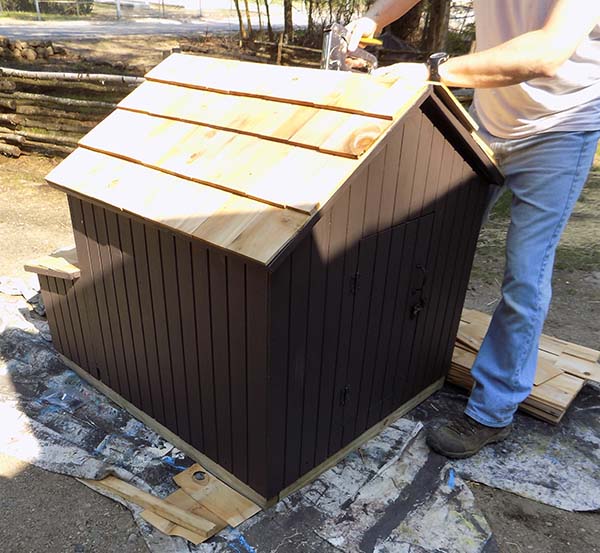
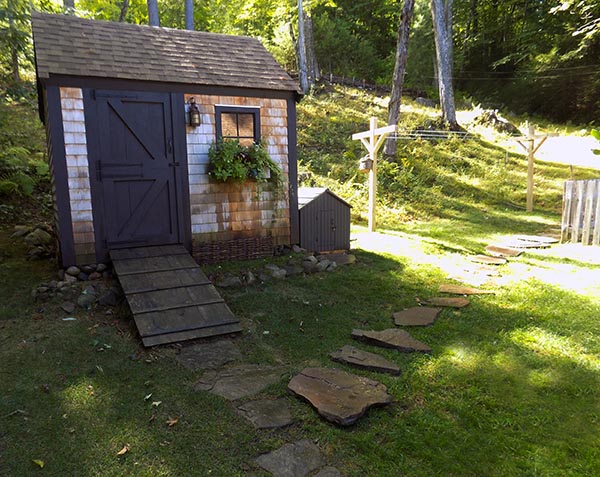
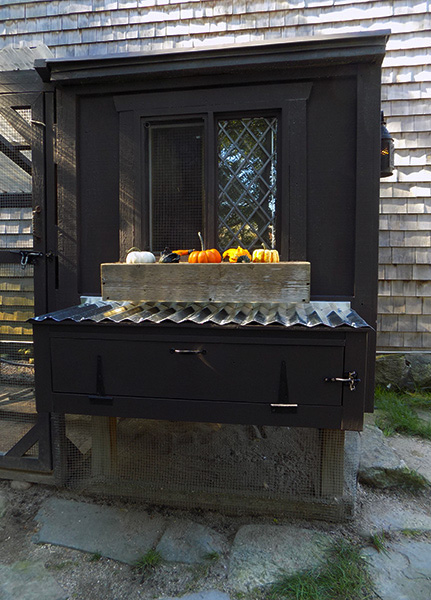
THE 'LITTLE GOOSE COOP' PROJECT.
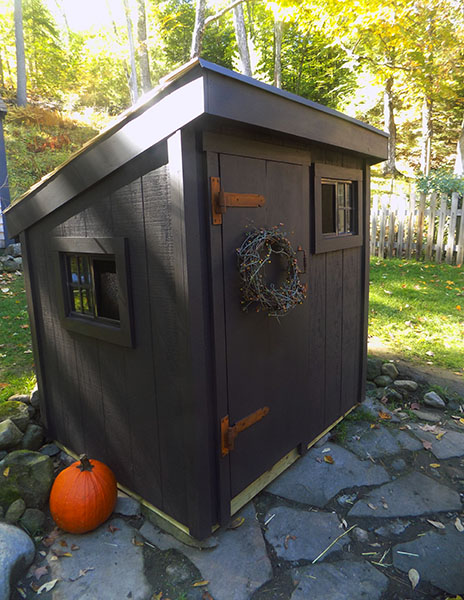
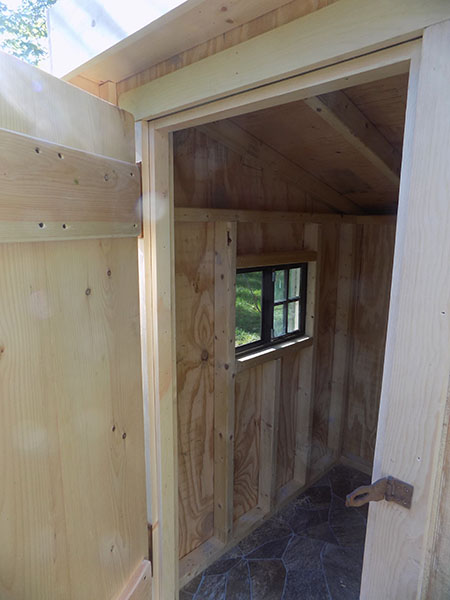
'MY LITTLE GOOSE COOP'~
SEPTEMBER, 2019
NO KITS, NO PLANS, NO HELP, AND NO 'NEW' TOOLS...
We had never done anything like this but we designed what we wanted on scrap of paper and the two of us built it, watching videos, and figuring it out using common sense as we went!
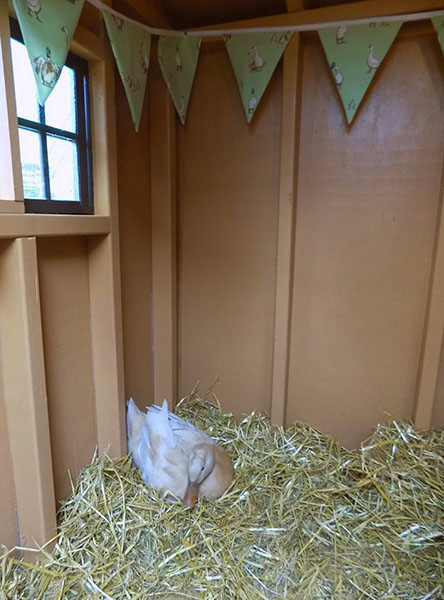
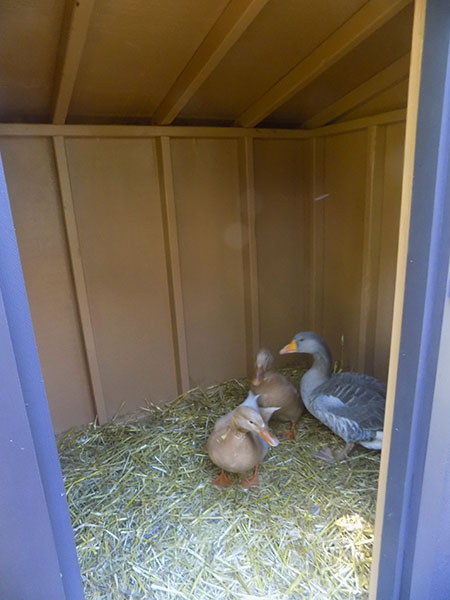
We are thrilled with our new "little goose coop" for Mayflower, and the ducks Jemima and Charlotte.
The duck/goose coop is in the area we've first paved with the flat stones...
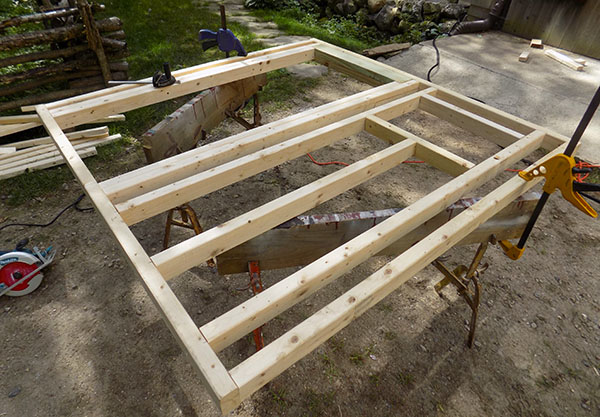
We both first constructed the base for the 4x5 coop which will have an angled roof.
Mary ran a chalk line to mark the joists so we could then install the plywood deck floor making sure the screws to attach it were lined up with each joist.
We snagged a sheet vinyl remnant at our local flooring store for $12.
This makes cleaning the coop floor easy.
We glued the flooring down, weighing it down with stuff while we ate lunch...
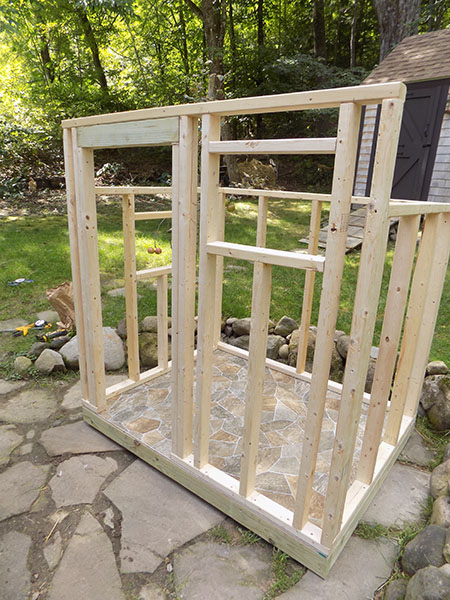
We started framing the walls one by one...
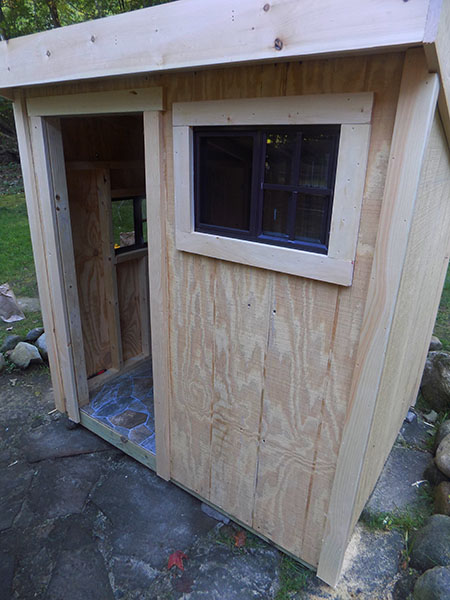
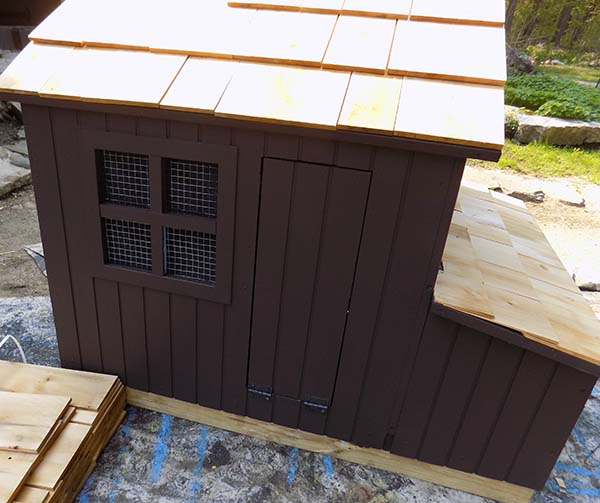
Mary framed the first of 2 windows.
We had three walls done and up by days' end.
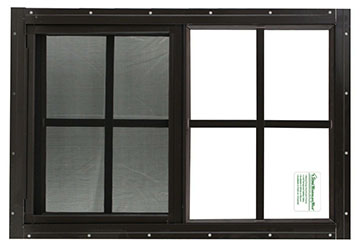
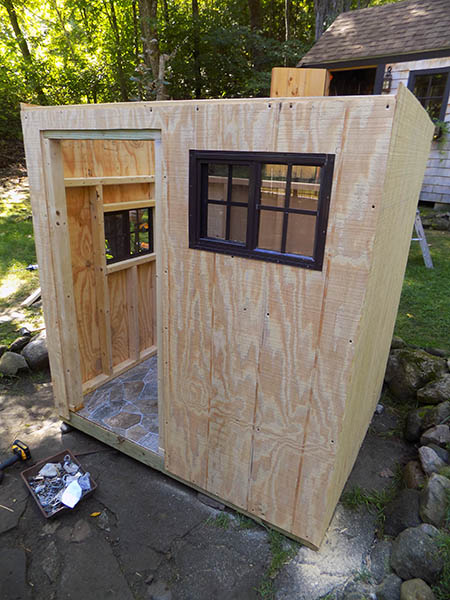
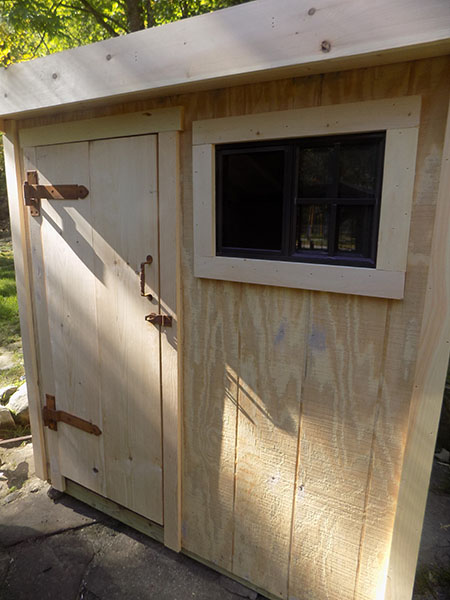
We have two 12 x 18 inch of these nice sliding windows for the coop, complete with built in screens.
We couldn't believe that the brown was the same color as our house paint.
Really nice quality windows, $24. each.
Mary framed in the front wall of the coop with a door and another window.
One of our duckies trying it out!
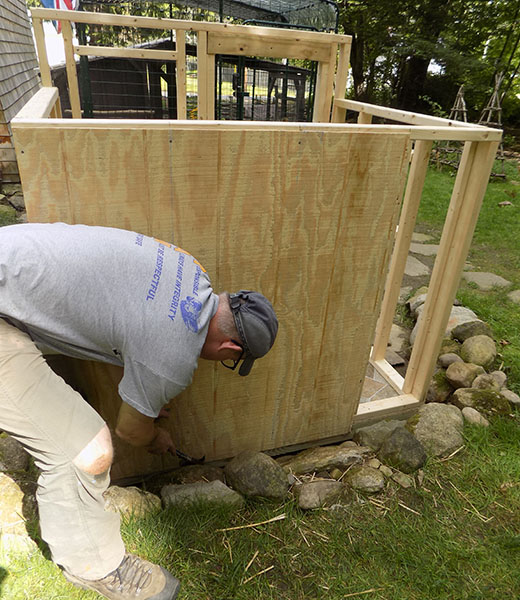
The first piece of the siding goes up.
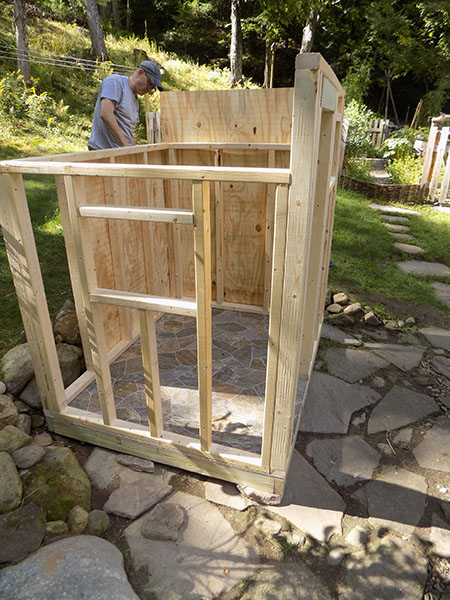
The siding on the sides will later be cut on a sloping angle after the roof rafters are on...

The interior is this nice butterscotch color, semi-gloss paint to make it highly scrubbable.
The exterior will be painted with the dark brown flat house paint.

Mary installed the windows and is chuffed!
They went in and fit perfectly.
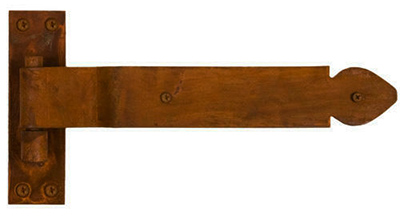
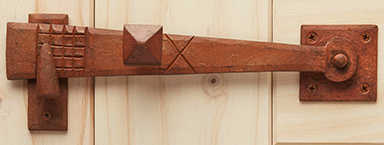
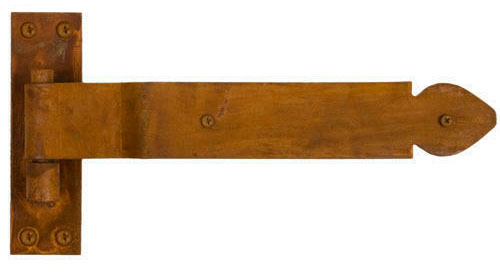
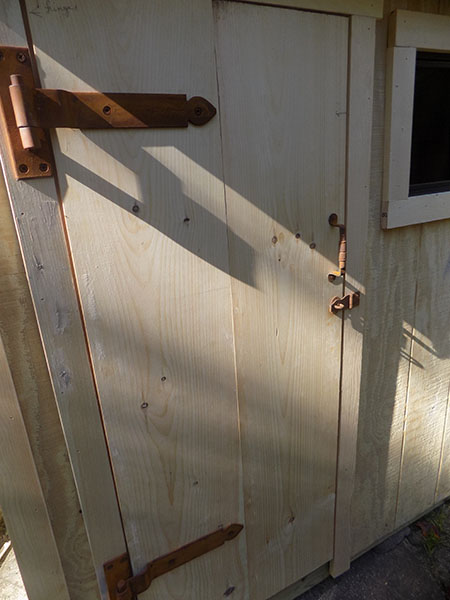
Below, the forged hardware for the coop.
The hinges...
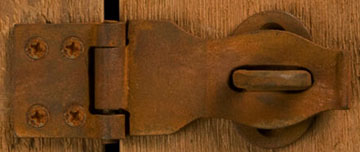
The latch for the door...
The door handle.

Mary got both windows installed...
Most of our tools are old and not 'fancy' but we did a darn good job...
A big thank you to friend Steve who loaned us his nailer and compressor.
We used screws in the construction of the coop, but nailed all the trim with finish nails in the power nailer.
Nice!
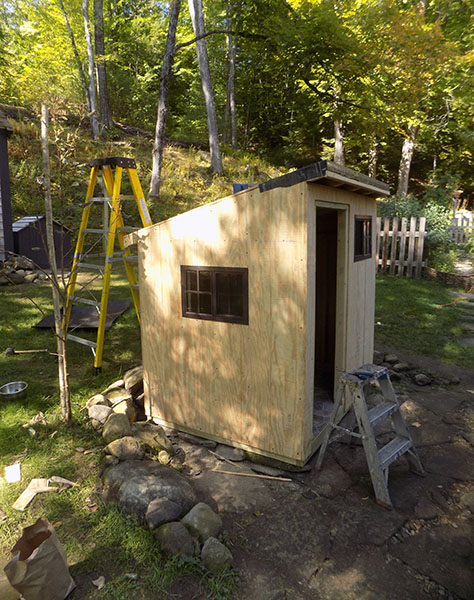

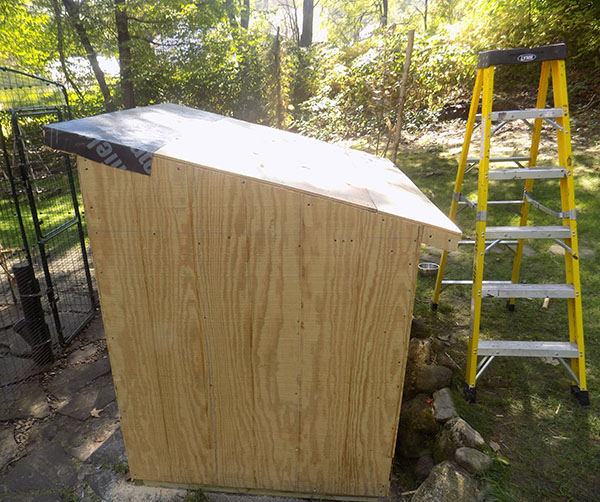
Underlayment on the roof.
Mary measured and cut trim and we both installed it.
Nice job! We never before installed a soffit.
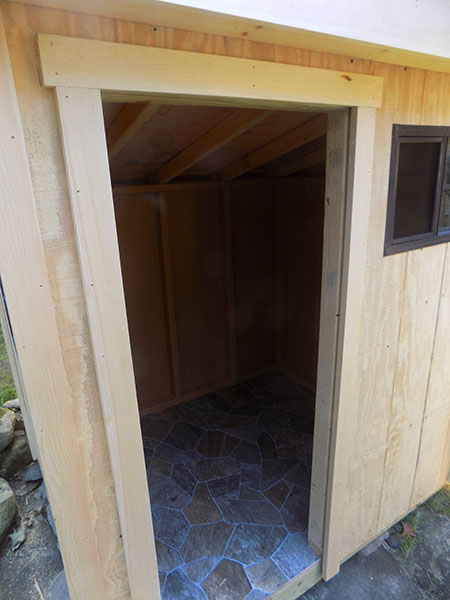
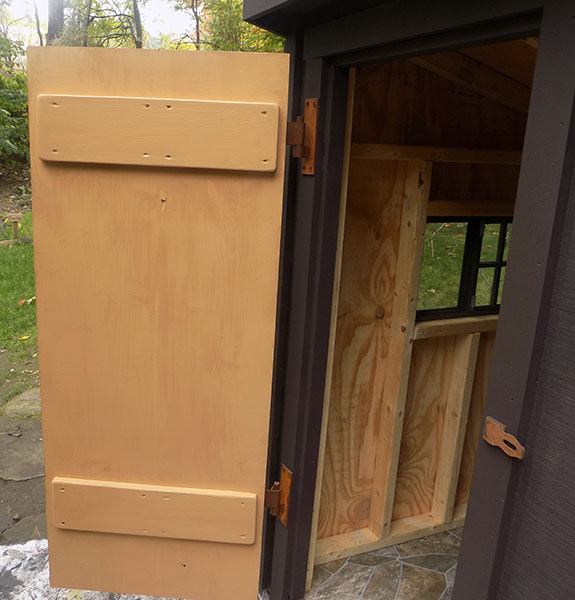
Mary trimmed out the door and windows then she made a batten, 2-board pine door!
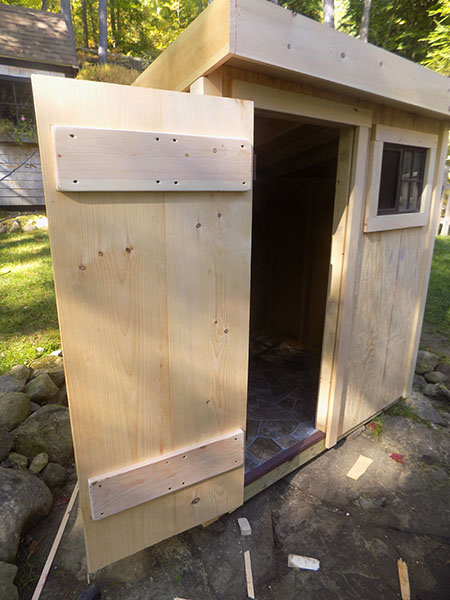
And here it is!
Mary made door-stop trim for the interior of the door frame.
We installed the door hardware, haning the door.
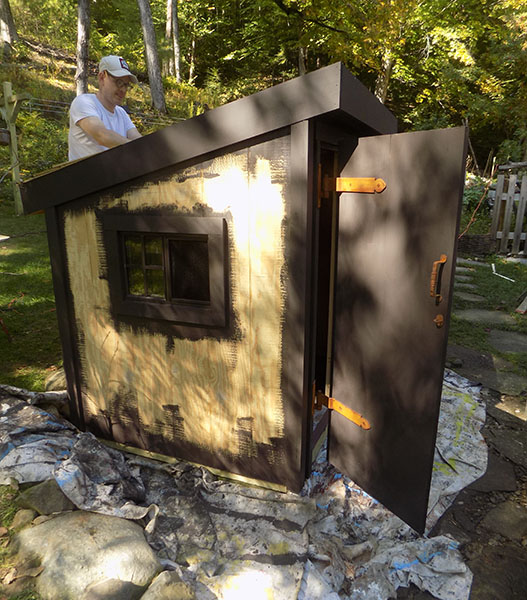
Ready for paint!
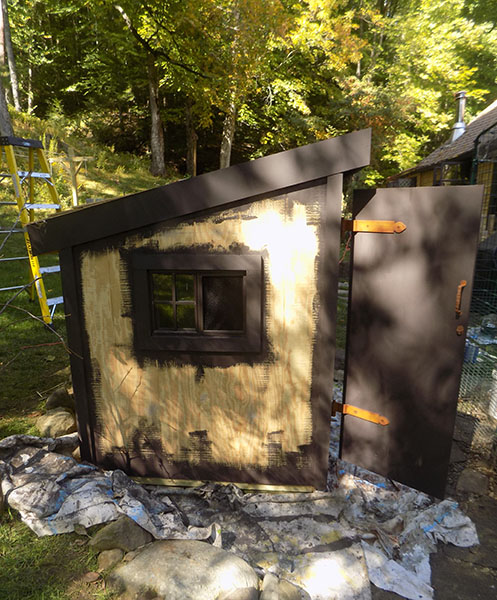
The exterior and interior colors.
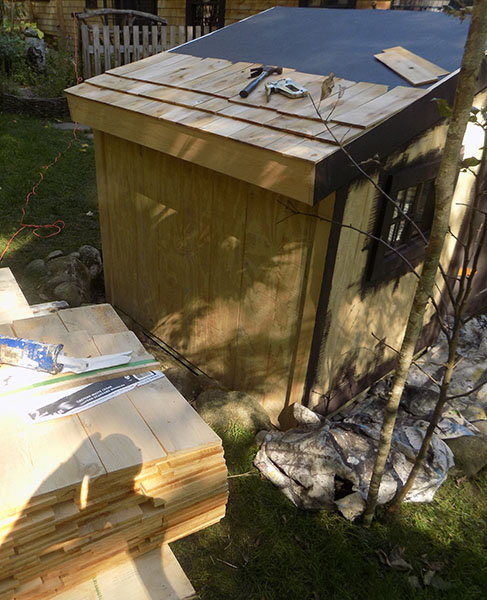
Shingling the roof with leftover cedar shakes and getting a coat of the dark brown house paint on the exterior.
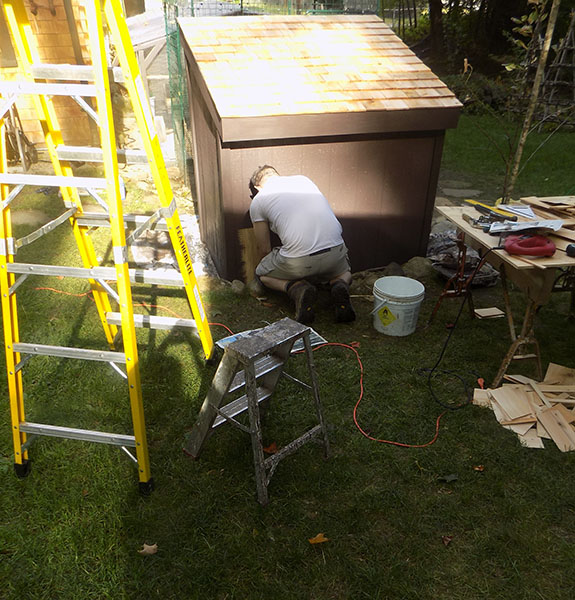
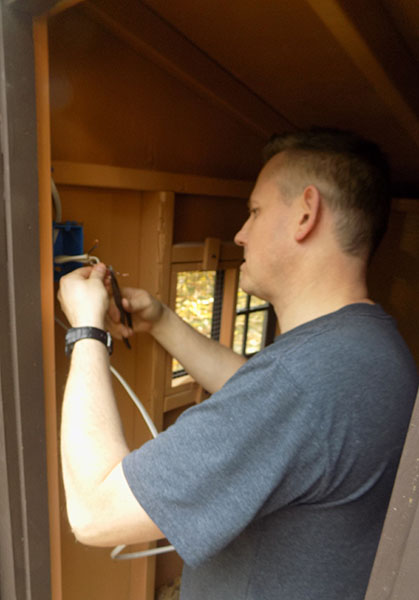
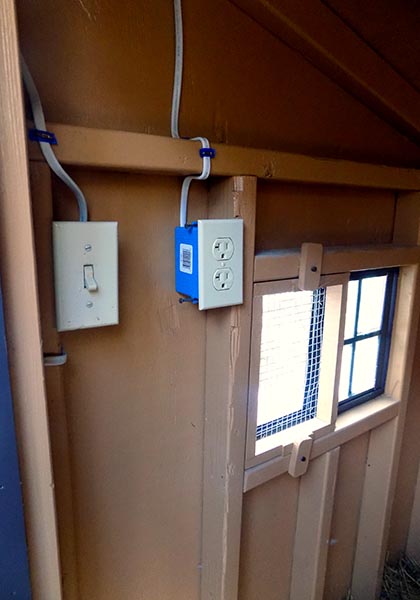
Running electricity to the goose coop and putting in a light...
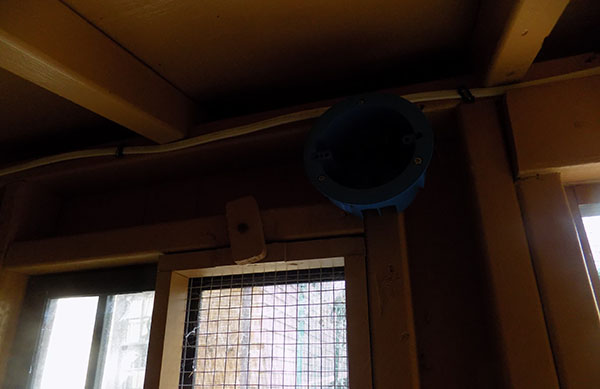


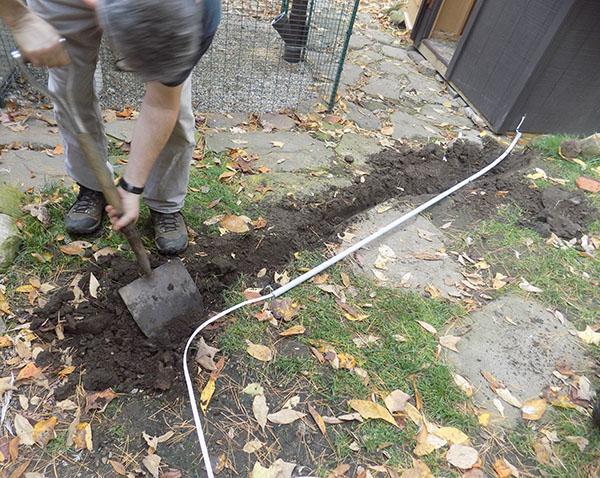
Burying electric line underground...
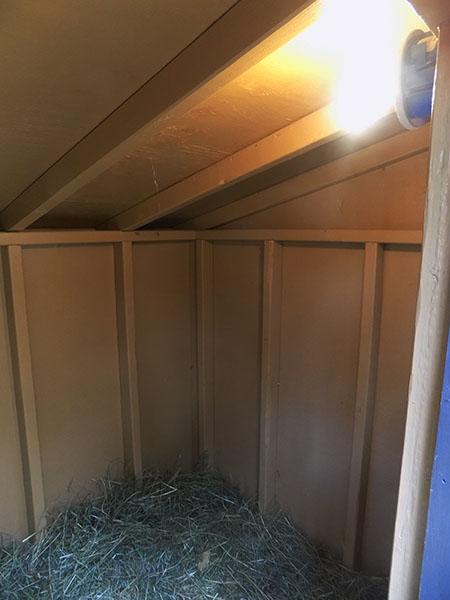
So nice to have electric light in the coop.
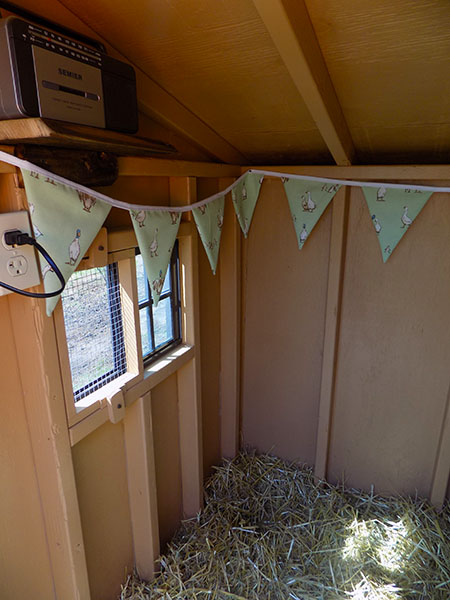
Radio/cassette player in the goose coop!
Mayflower loves to listen to Puccini opera tapes!
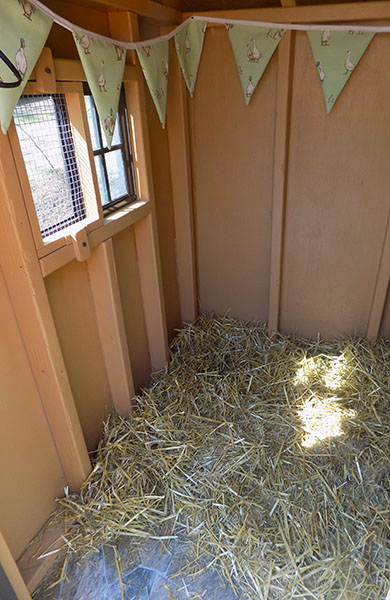
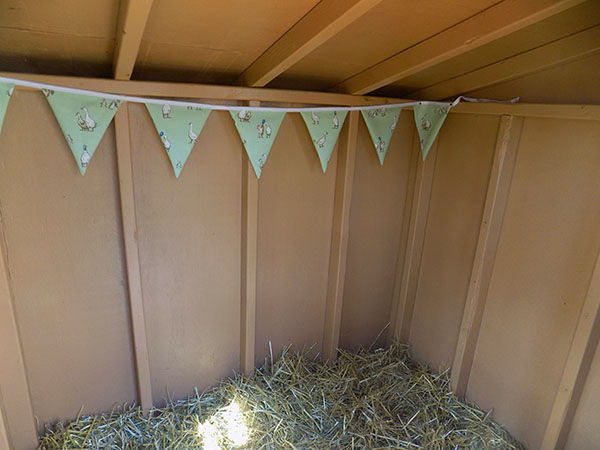
THE FINISHED COOP~
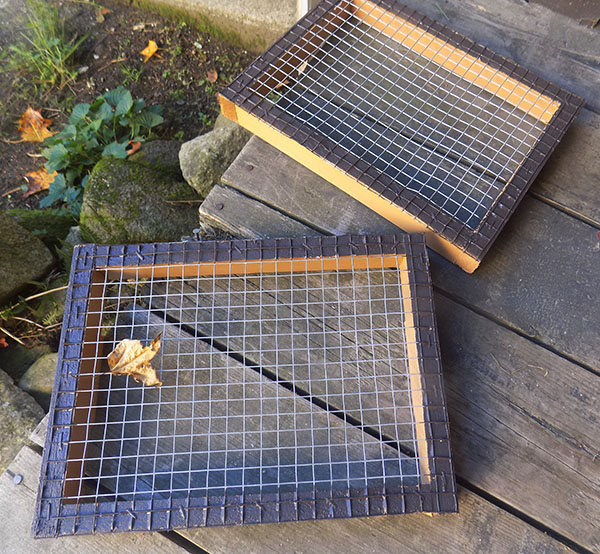
Adam making 2 custom predator screens to go over the regular screens inside the goose/duck coop.

Sept. 27, 2019~ Move in day!

Honey Crisp apple tree at back corner of goose coop. Getting another apple tree and a Black Ice plum to plant soon.
See more on our TOUR page.
________________________
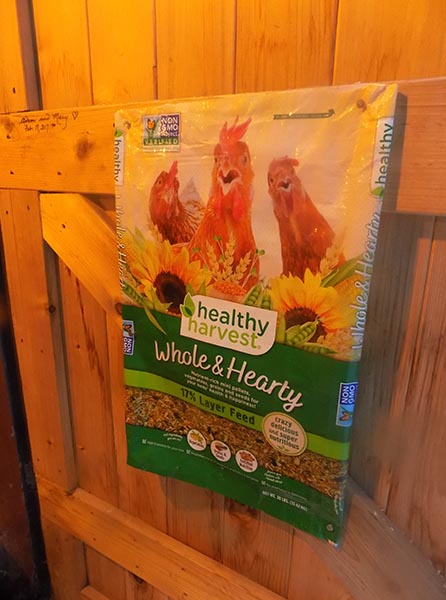
CHICKEN KEEPING~
Come into the old attached woodshed...
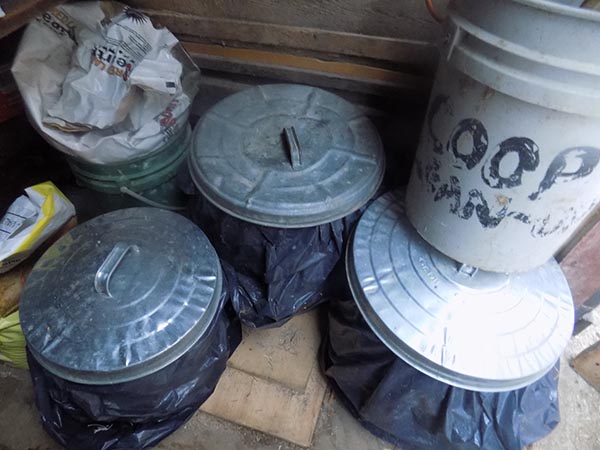
The covered bins hold duck feed, chicken feed, and scratch grain. Scoops inside. We have a coop cleaning bucket handy with all the tools we need for cleaning inside...
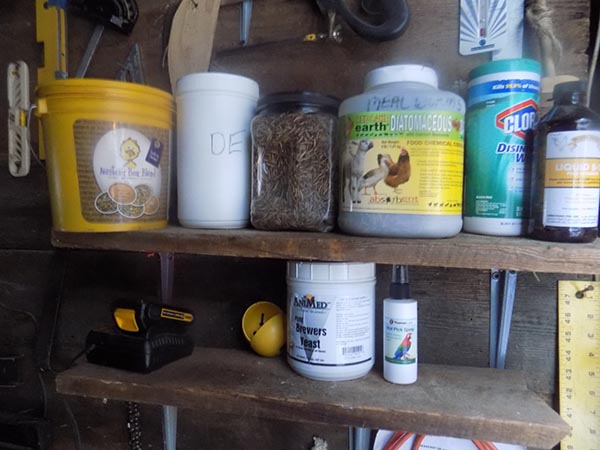
On a shelf above this we have 'chicken stuff' we use in the feed, nestboxes, etc. The medicines, and other 'chicken stuff' has a special shelf inside the house.
_____________________
SPRING 2019~
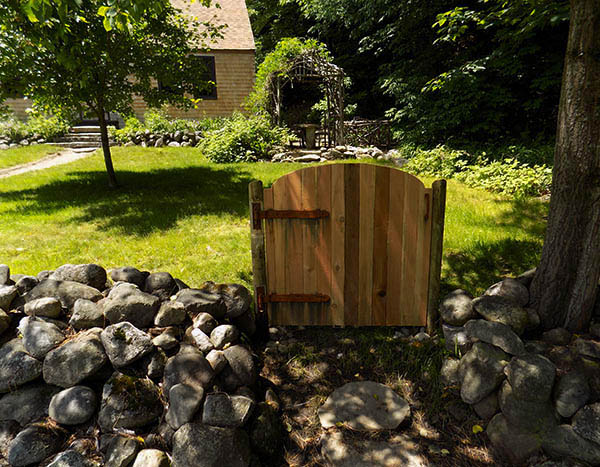
THE CEDAR 'GATE-IN-THE-STONE-WALL PROJECT'~
We made this gate in about 2 hours from all leftover materials.
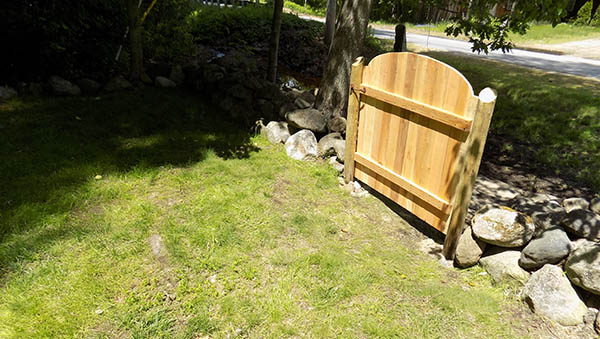
We used leftover cedar pickets from the fence we built last year.
All of the materials used were leftovers...
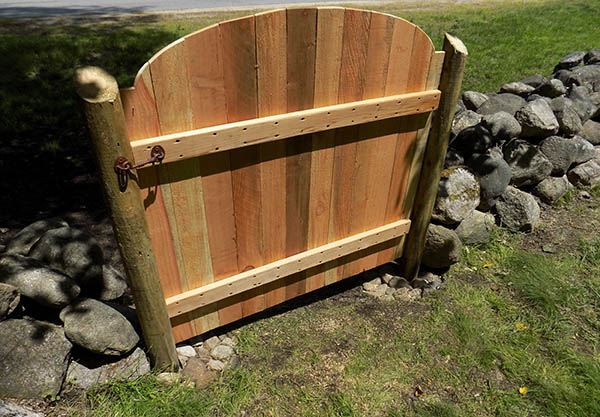
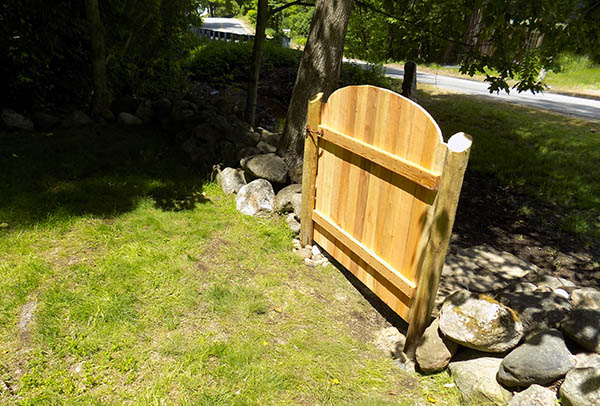
We hung the gate on heavy iron pintle hinges.
The cedar will age to a nice weathered grey/brownish in time, and so will our cedar-shingled cape.
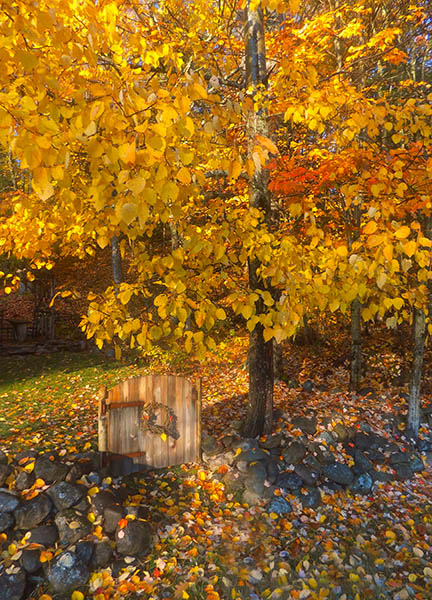
The gate in fall.
~It was a busy Saturday with projects, and a gorgeous sunny day too, so perfect for grilling on the BBQ for our dinner...
Cheddar burgers and...

...'Cape Cod grilled corn' ---olive oil, mayo, smoked paprika, lime, feta cheese...and fresh cilantro and mint from our garden...Yum!
__________________________________
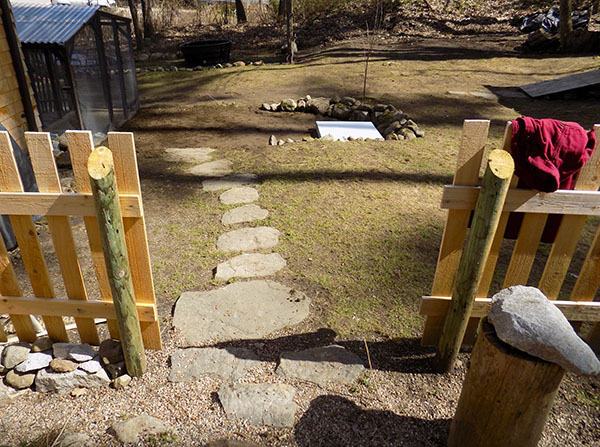
When we started work on the new duck/goose coop area...
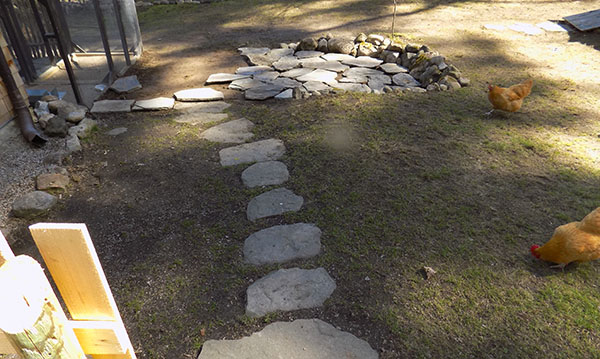
Laying New England natural stones in the new duck and goose coop area, and more stone paths.
This is right next to the chicken coop and run, so they are neighbors.
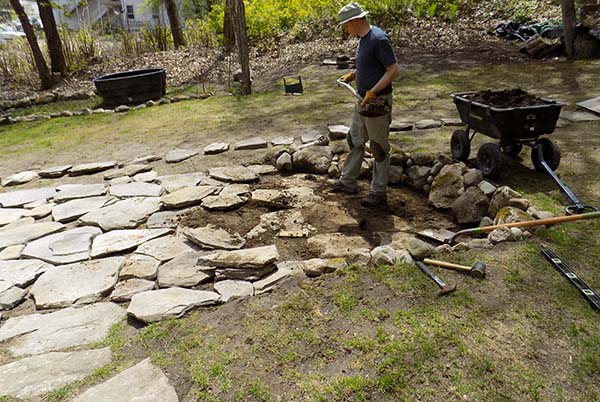
Adam laying and setting the stones in the new duck/goose coop and run area, and the path around the yard to the shed.
THE TEMPORARY DUCK/GOOSE COOP...
This was our temporary coop for the ducks and goose...
After constructing the new big coop we moved this little one to the backyard along the side of the garden shed and it's now the coop for new chickens while they are young, or for broody or sick hens.
See NEW photos on our TOUR page.
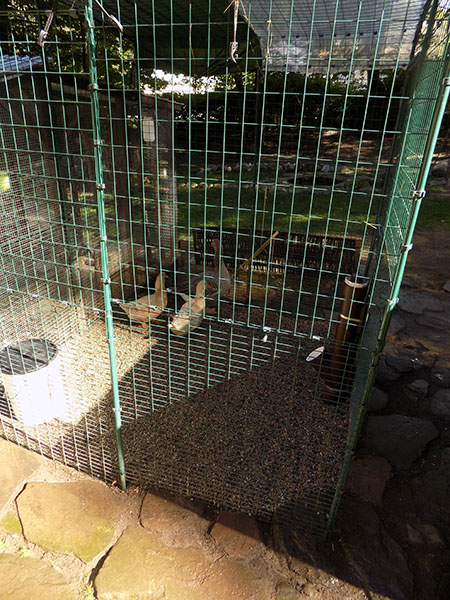
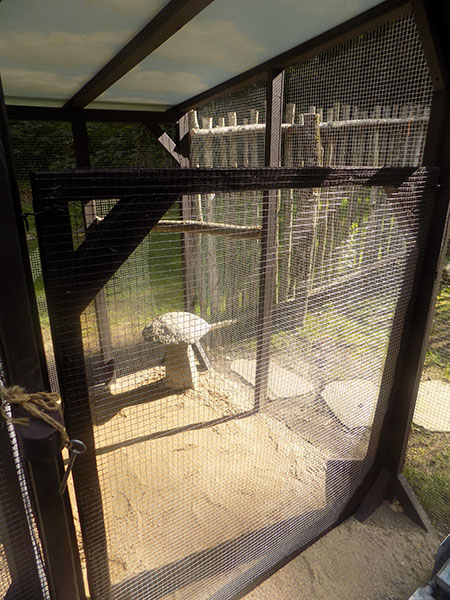
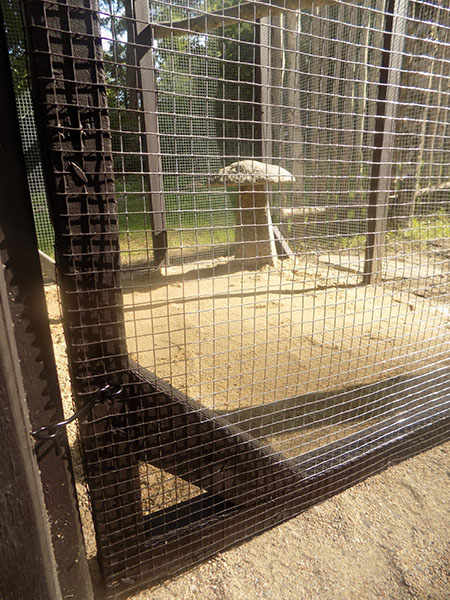
The permanant 6 x 6 x 6 ft. tall duck and goose run, directly across from their coop.
For the floor of the duck run, we dug down about 7 inches, laid down some 1/2 inch hardware cloth, and then filled in with lots of pea gravel. Easy on their feet and easier to keep clean all year.

Looking into the duck/goose run. It backs up to the chicken run so they can always see each other.
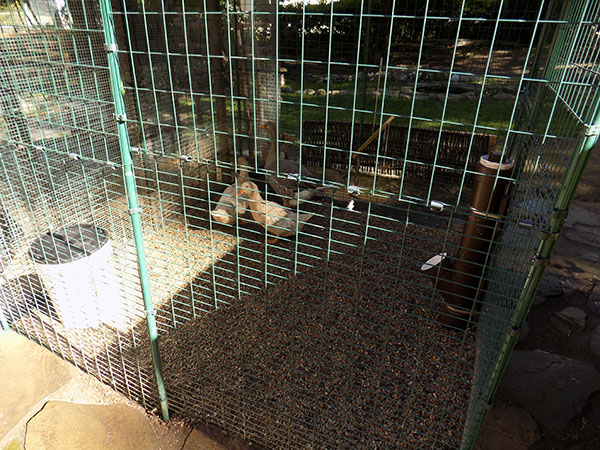
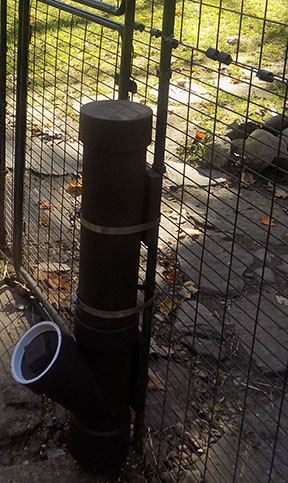
We made the gravity feeder for the ducks and goose with PVC components and it has caps to keep food dry and pest-proof, and closed at night.

We made the duck-friendly waterer from a 5 gal. plastic bucket with a lid, and it has 2 holes just the right size cut in it.
~They eat and drink with minimal mess.
_____________________
WINTERIZING THE DUCK AND CHICKEN RUNS.
We use clear plastic shower curtains and little bungee cords to wrap the chicken and duck/goose runs since we have a lot of cold and snow here in New England.
_______________________________
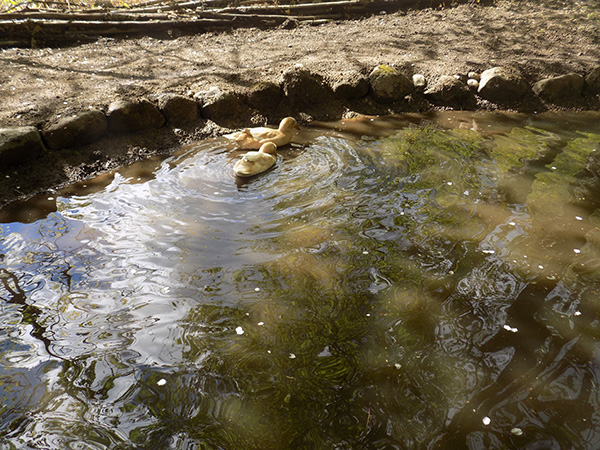
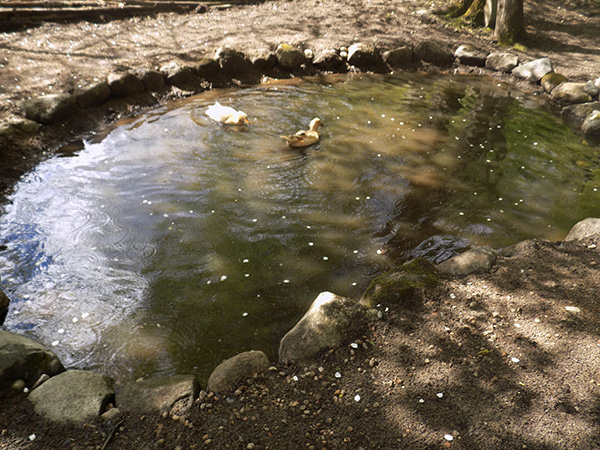
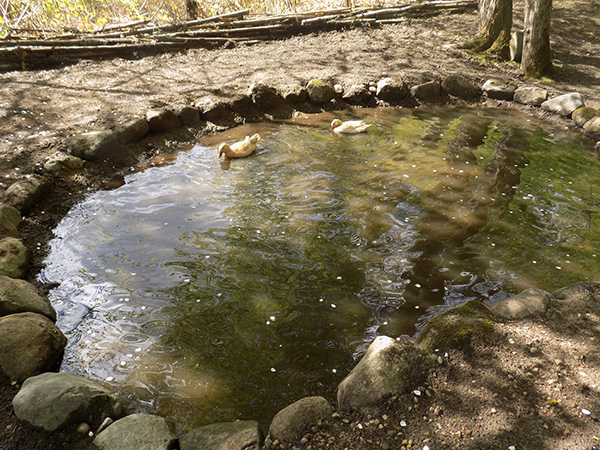
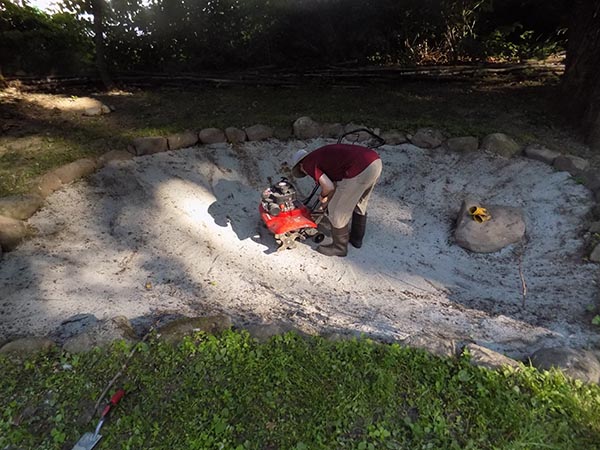
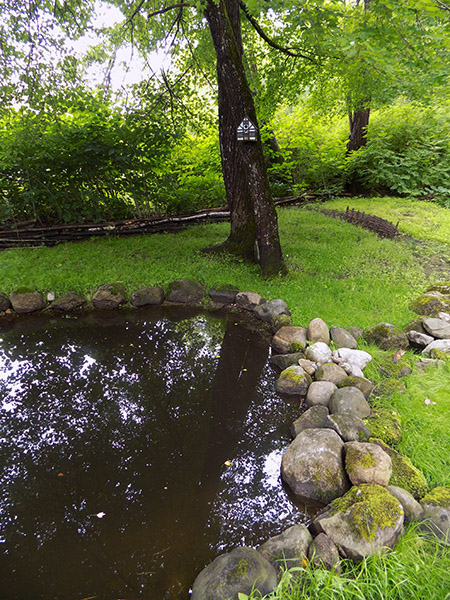
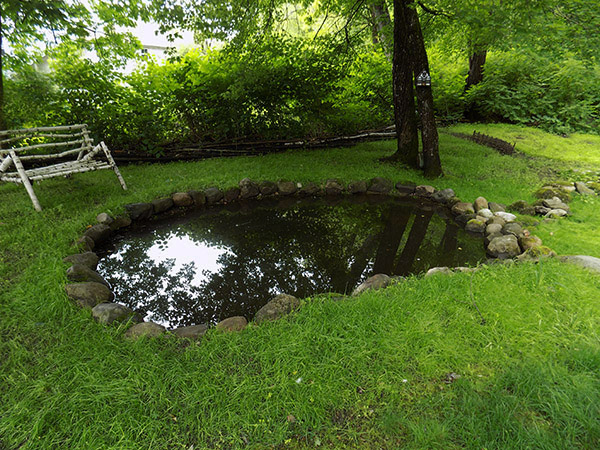
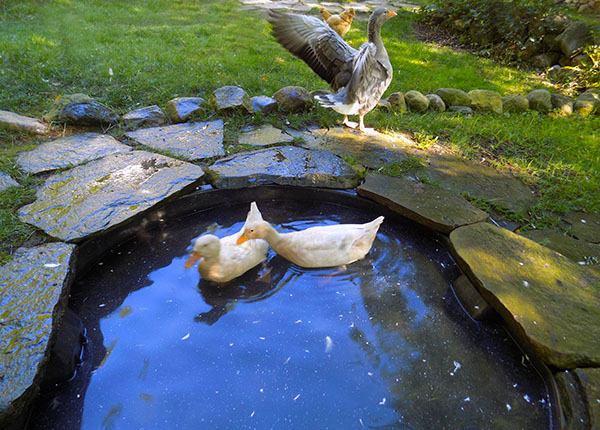
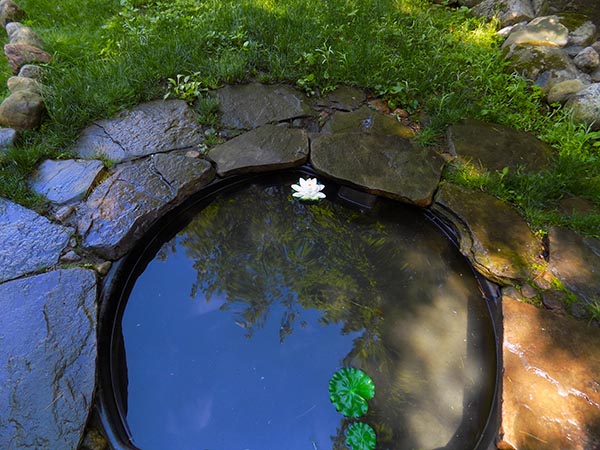
THE 'MINI' DUCK POND PROJECT~
We wanted to give our ducks and goose something much better than a flimsy 'kiddie pool'...
The 'mini' pond project...
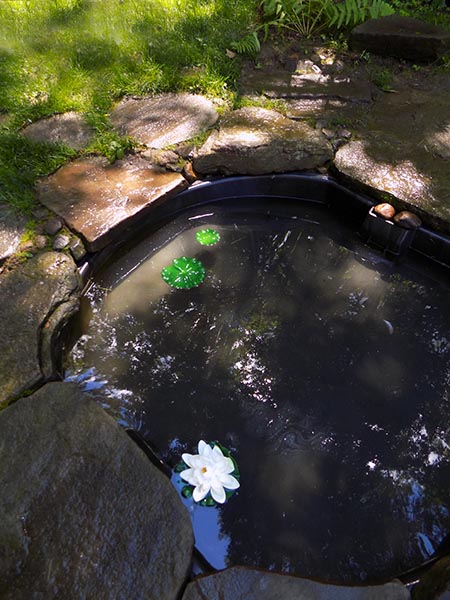
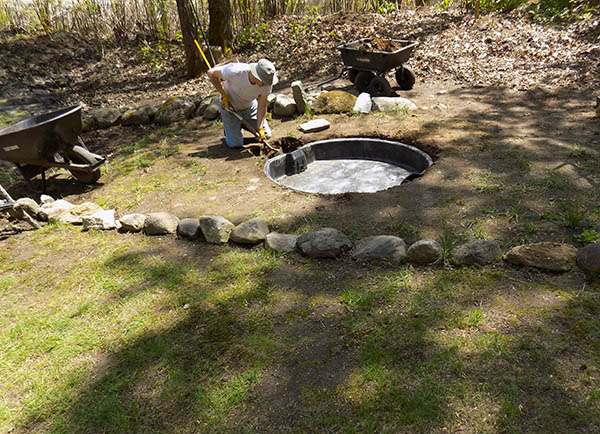
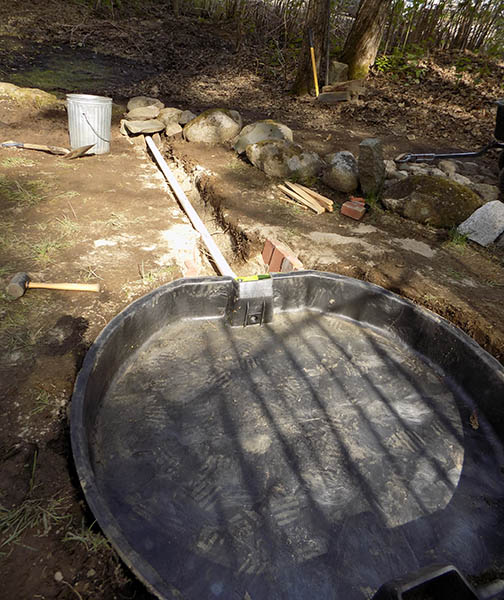
THE BEAUTIFUL, IN-GROUND, 5 ft. DIAMETER DUCK POND PROJECT---
You don't want to build a pond with a pond liner that can't be easily drained. Ducks and geese are messy, and we clean the pond and change the water once a week so we knew we wanted to build one with an easy, underground draining system...
...A lovely little pond we've built ourselves in the area of tall grass and wildflowers, right in front of the hops poles.
The pond has a drain, and we surrounded it with natural New England flat stepping stones.
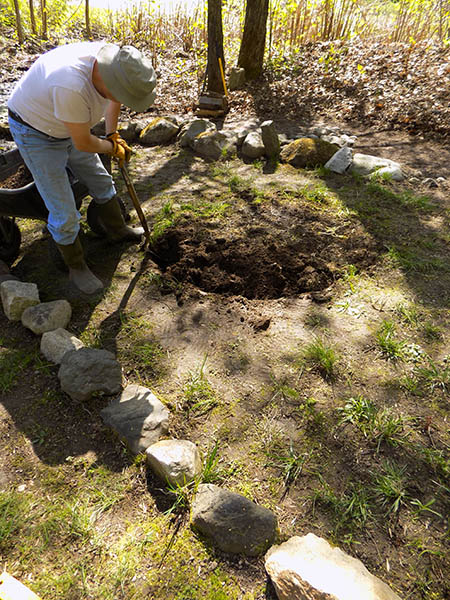
Working on the new duck pond...
We wanted one at least 5 feet across, so we started with a large, 300 gal. stock tank we bought on sale, and cut it down with a sawzall.
The depth was now much better and more manageable.
(We put the cut-off round of the tank out by the end of the drive with a 'FREE' sign, figuring someone might have an idea of how they could use it... Sure enough, a man stopped and was so happy to take it for use as a chick brooder!)
Adam dug out the spot to sink the pond into the ground and leveled it. We also located it in an area that naturally slopes down so the long underground drain pipe is at a correct angle to drain the pond...
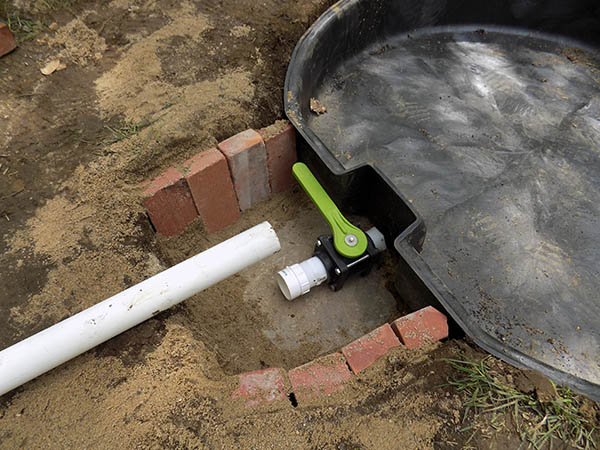

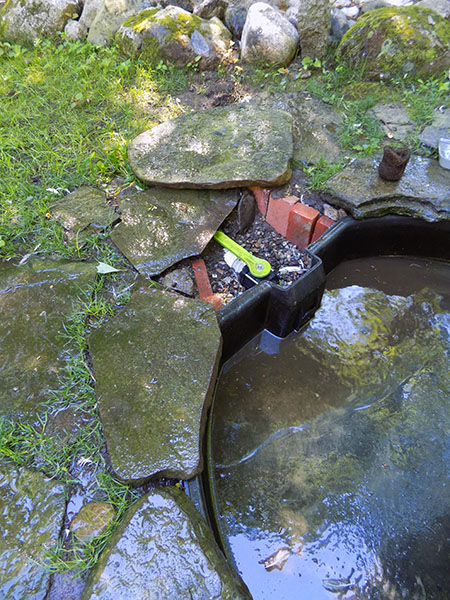
We have a special valve and handle, also underground out of sight and connected a 10 ft. long PVC pipe sloping down, for the pond to drain into an unused brush area...
We set the pond on a layer of sand to give it a soft base to sit on...
The area surrounding the pond is now covered in wildflowers and tall grasses that are lovely all summer...
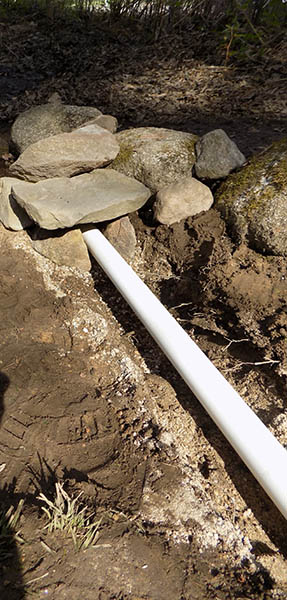
At the end of the buried drain pipe we put some pea gravel in the hole, then filled in the trench with dirt, and the underground drain spot where the pipe ends is hidden with rocks...
Here, the piping is all backfilled...
This area is now all re-seeded with tall grasses and perennial native wildflowers...
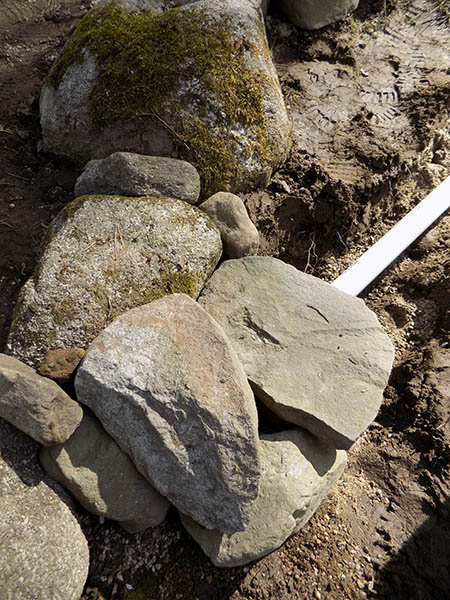
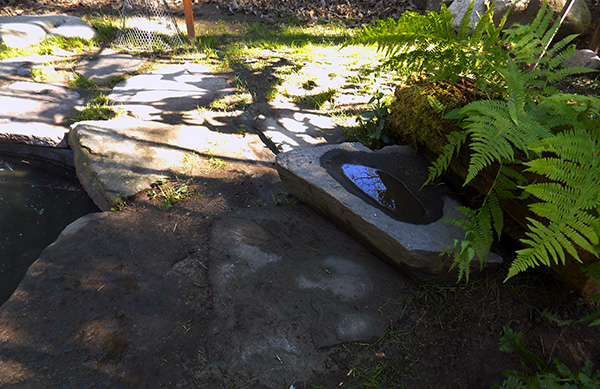
We surrounded the duck pond with large, natural flat stones.
Mary placed all the stones, and Adam dug and set them in place.
A large, flat, natural stone covers the drain valve/lever, and we easily just push it aside to drain pond, and then push it back into place...
In the process of setting the rocks around the pond.
A hose is not far.
Filling it with water...
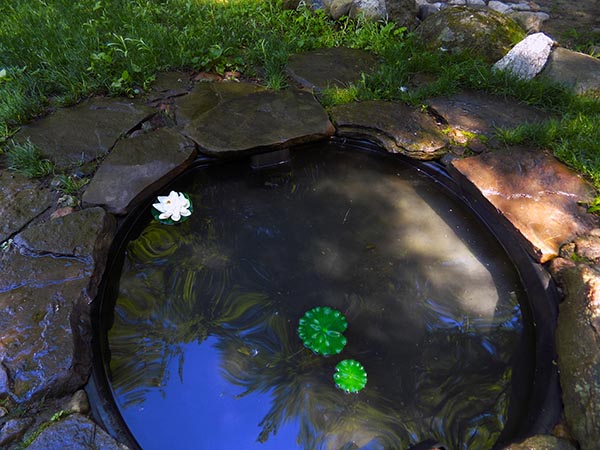
The ducks and goose checked it out...Hmmm...What's this??
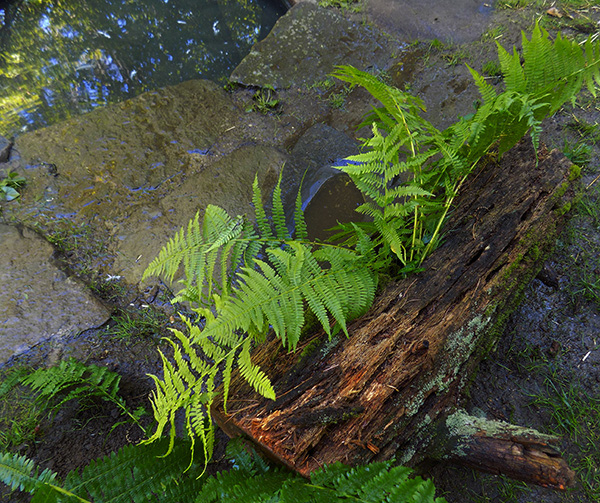
Mary dug up wild white violets that we have all over our property, as well as a few ferns and hostas, and transplanted them to the pond area. The area around the pond is a mini wildflower meadow.
UPDATE:
We now have a larger, 'natural' pond that we dug for our girls. This mini pond is now for the 'Littles'!
SEE UPDATED PHOTOS OF ALL PROJECTS ON OUR
TOUR PAGE.
_________________
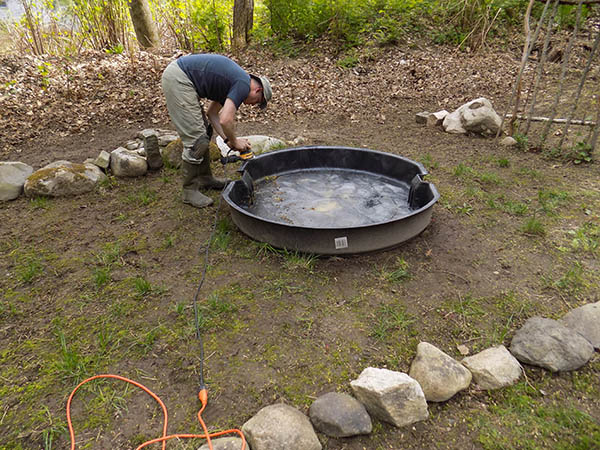
CLEANING THE POND...
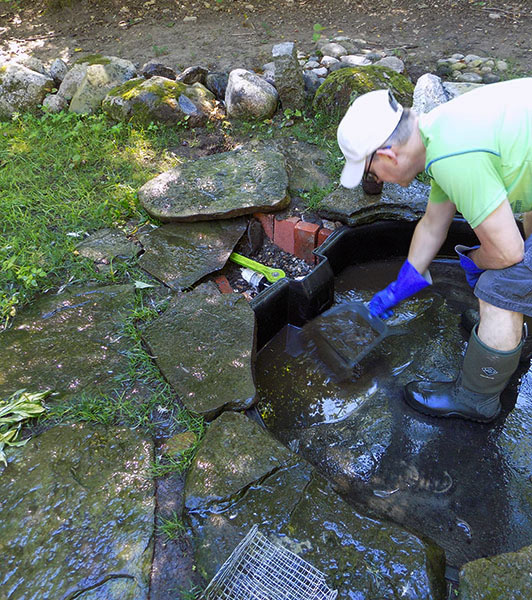
Slide big rock over and turn the green crank and the water drains through the underground pipe and out 10 feet away...
Adam wipes the pond out with rags and it's ready to refill.
Slide the flat rock back into place and no one would know the drain crank and pipe are there.
It's so easy to clean the duck pond once a week with the underground system we put in.
This is the perfect size pond for our girls. You don't want one unnecessarily big or too deep. They don't need that, and you don't want water bills to skyrocket.

OUR GIRLS JUST LOVE THEIR POND!
Girls just want to have fun!
Our Pilgrim goose, Mayflower, and ducks Jemima and Charlotte love the pond we built for them~
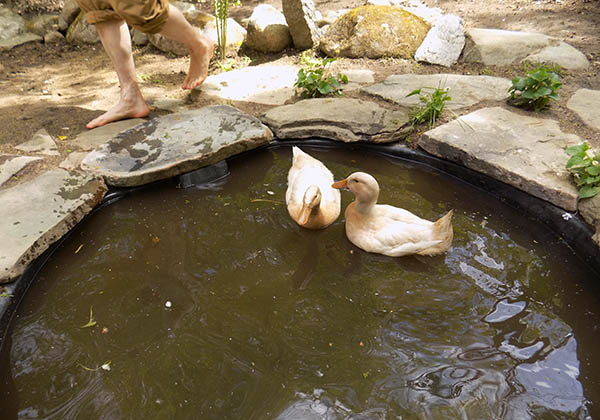
We had a lot of fun building this pond together on a nice spring day, and we love watching our girls have a ball in the new pond!
SEE MORE PHOTOS ON OUR
TOUR PAGE.
_______________________
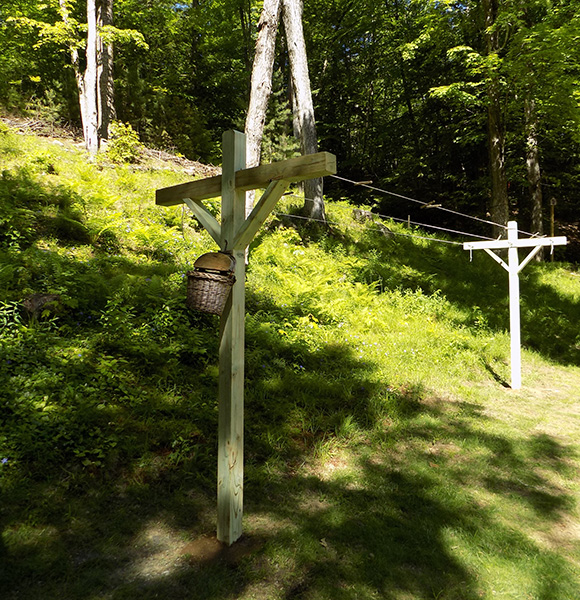
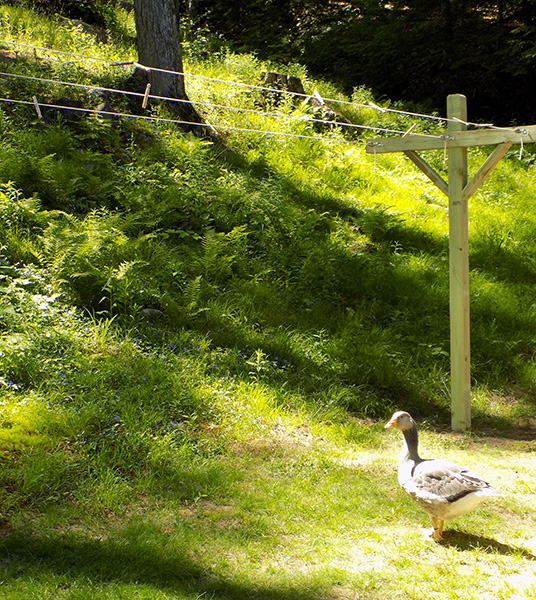
SUMMER PROJECTS
JUNE, 2019
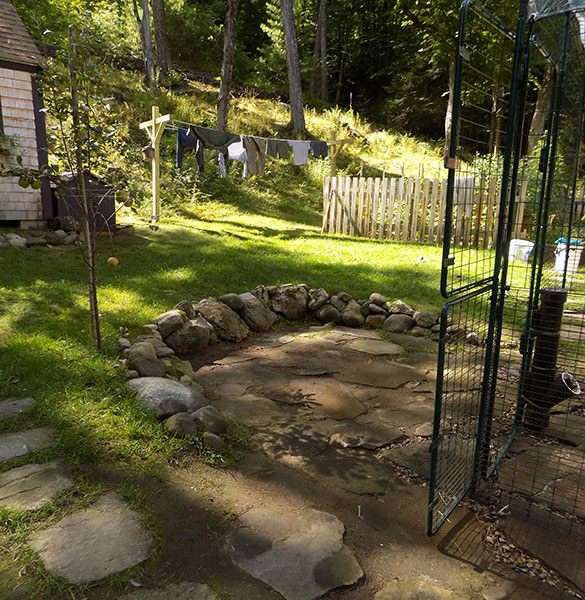
THE OLD FASHIONED CLOTHESLINE
Today we're in the process of building an old fashioned clothesline. Ours has 3 lines.
Mary used a level to get it level both ways while Adam supported it in place...
We set it in place with concrete.
Moving on to the other one...

Mary leveled before Adam poured in the cement. A string between the 2 posts made sure they were in line.
Adam made the primitive basket for clothespins and we used an old iron hook to hang it on the side of one post...

When the cement dried we strung up the 3 lines and put up tighteners at the end.

Finished clothesline. I just love it and it's so handy. I love drying things outside in summer and listening to all the birds.
See new photos on our TOUR page.
____________________________________
SEE A FEW MORE OF OUR PROJECTS BELOW~
___________
2018~

Adam hand made and painted over 50 herb signs for the garden in period script on cedar boards...
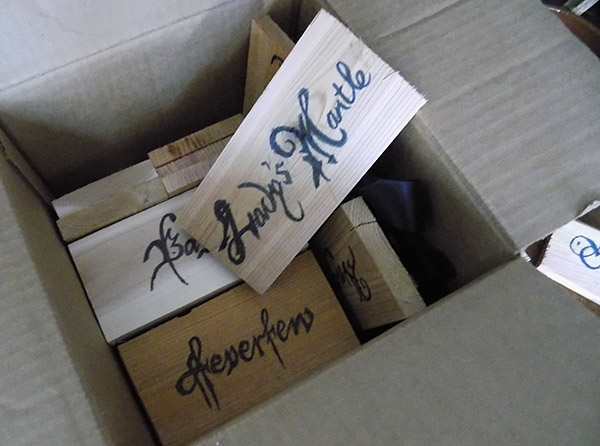
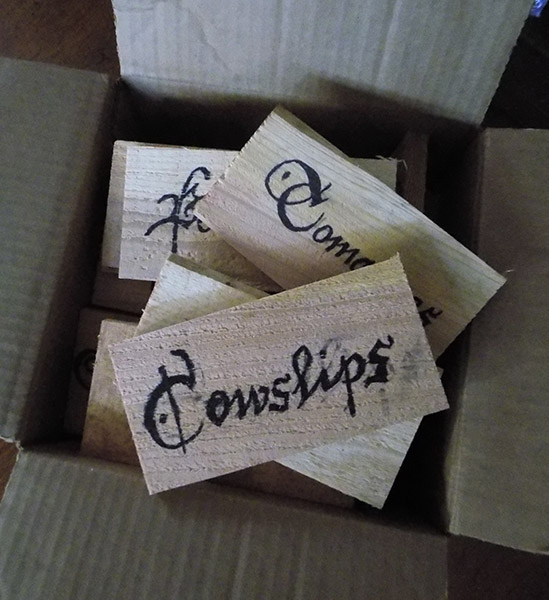
He's attached them to cedar pickets.
See photos of the signs all made and now in the gardens on our TOUR page.
_________________________________
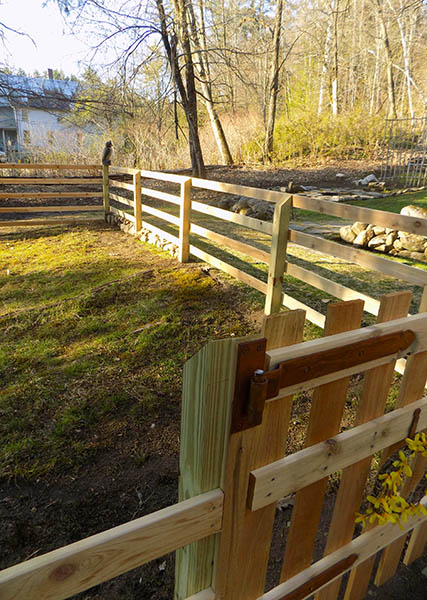
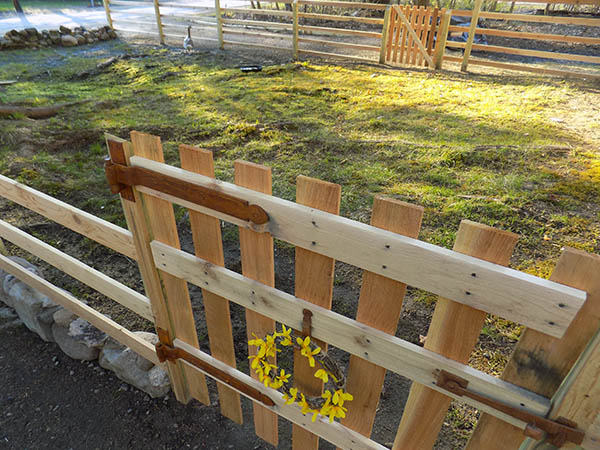
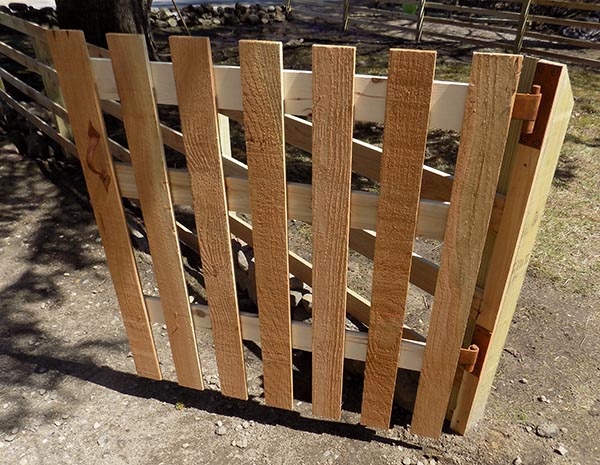
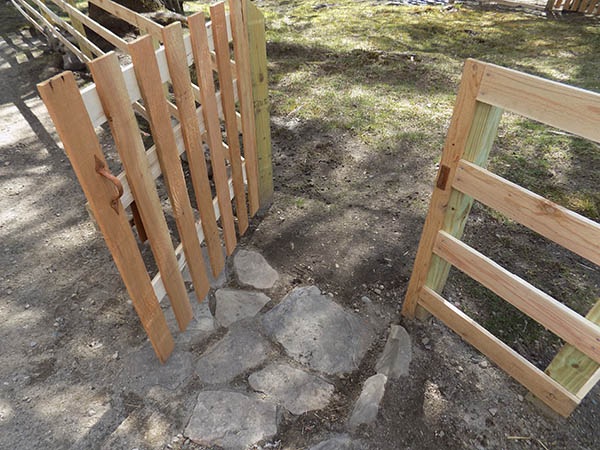
2018
TIME FOR A NEW FENCE AROUND THE GARDEN...
Sept. 1~ We put the old fence out at the end of the drive for free...It was gone in less than an hour.
NO pre-fabs, NO kits, NO fencing panels---We built the new cedar fence with rails and attached each picket one at a time.
Where the land was lower, Mary built the stone wall under the fence panel, keeping everything level and straight.

SEE NEW UP TO DATE photos on the TOUR page.
_________________________________
2018
Mary's whimsical artwork for the ceiling in the run extension we built for our hens.
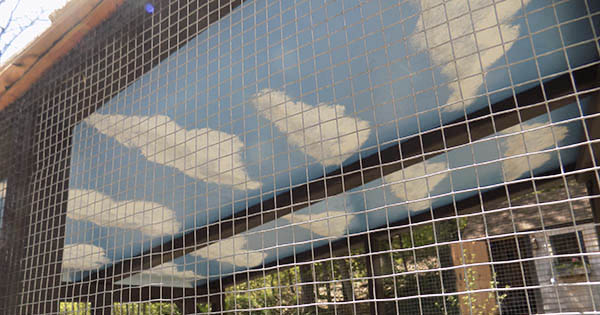
I am so chuffed at how my 'cloud' ceiling turned out.
We're finishing up with fixing the landscaping, moving an old granite step we have to the back of the addition and eventually putting a pot on it with a honeysuckle climber in it that will grow up the entire back side, come back each year, and provide some leafy green shade for the chickens.
We added a maple branch as a diagonal perch...
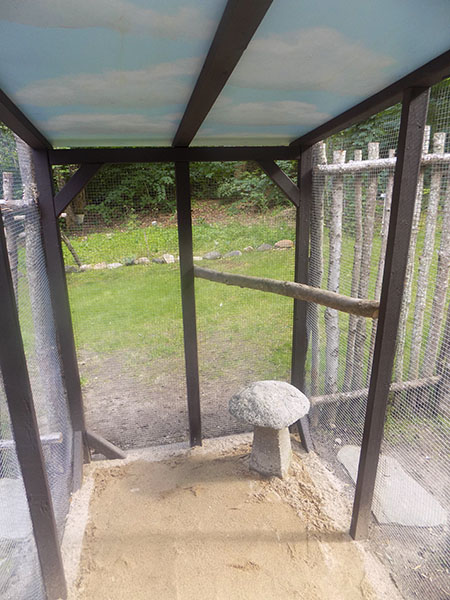
Inside the addition...
We wanted to be able to partition off the addition easily so that when we had new chicks to add to our flock they could have their own space until they were old enough to be put in with the grown hens...

We built this removable, 3/4 height wire and frame partition...
We attached it top and bottom with black screw hook and eyes...
Now it is securely in place, but is easily removed to once again open the whole run to the entire flock.

See NEW photos on TOUR page.
_________________________________
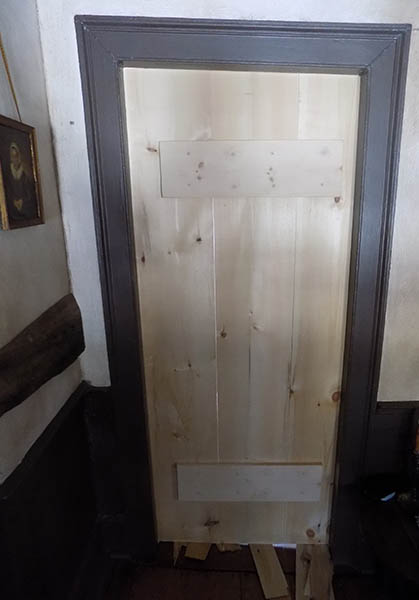
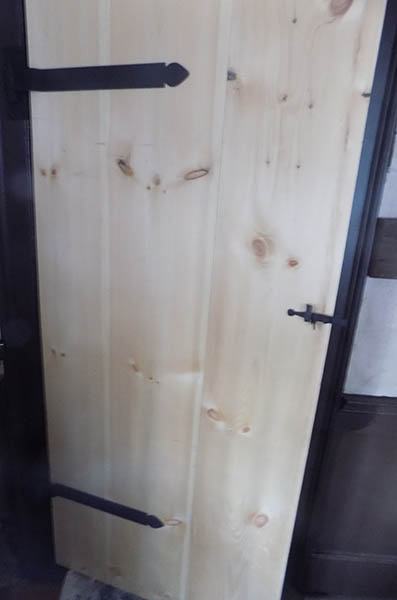
2017
THE INTERIOR BATTEN DOOR PROJECT
Building the last 2 period batten doors for the interior of the house.
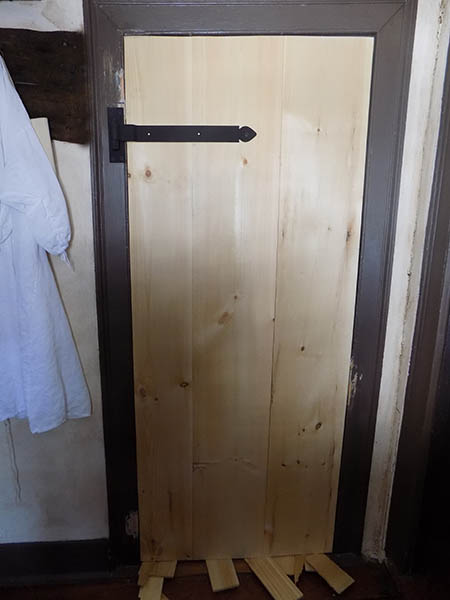
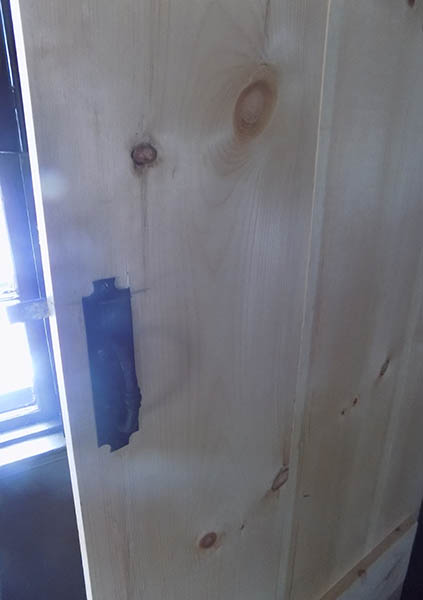
Antique 'Norfolk latch'.


Part of the antique 'Norfolk latch'.
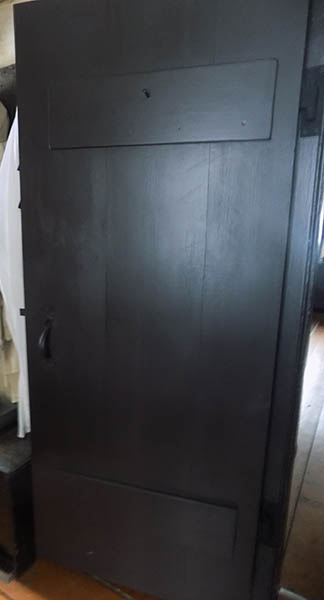
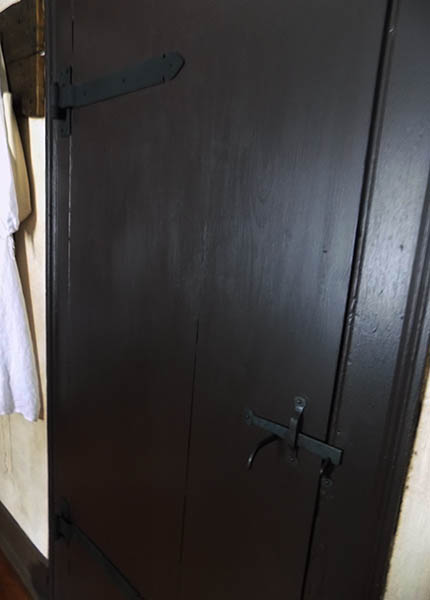
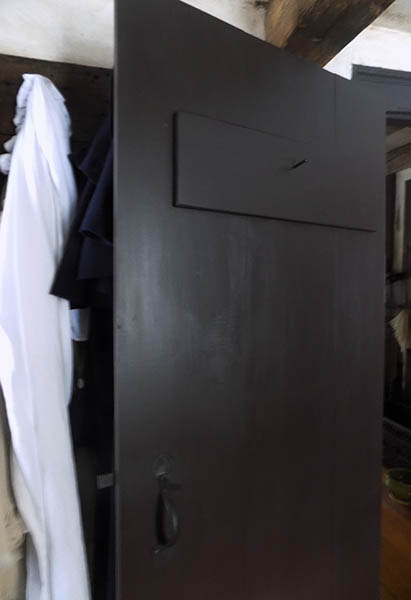
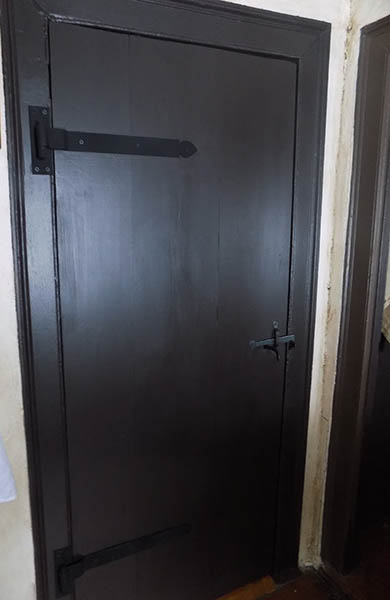
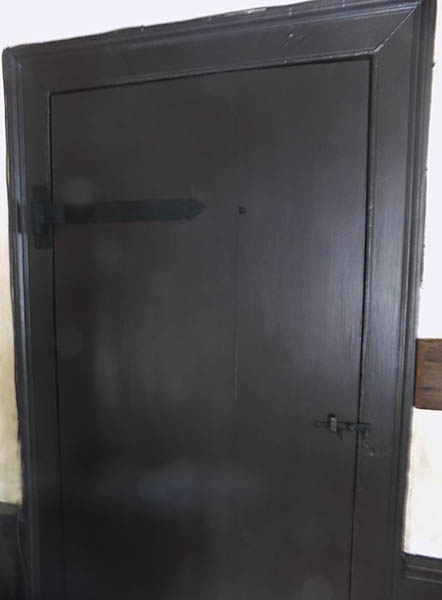
Both of these last doors are in our bedroom; One leading into the front hall, one into the den.
_________________________________
2017
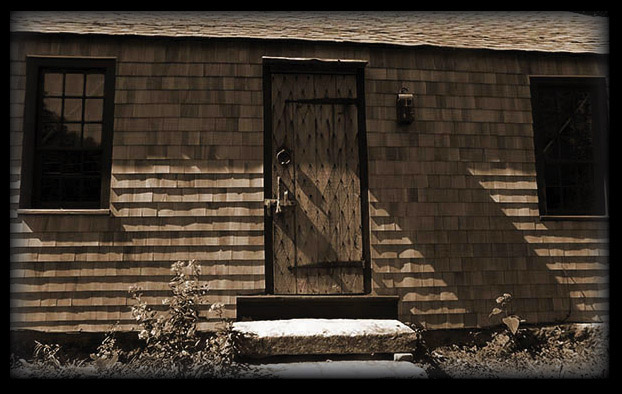
Just a few photos of the massive house re-siding job.
The clapboards were all in bad shape. We decided to shingle the house. No more housepainting.
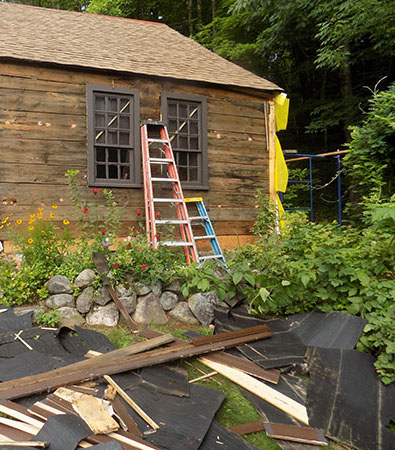
It was a grueling job, but we 2 alone stripped off all the old clapboards and did all the repairs to sheathing, trim, etc. We then had to borrow a neighbor's truck, load old clapboard and debris, and then haul several trips to the dump. Huge job.
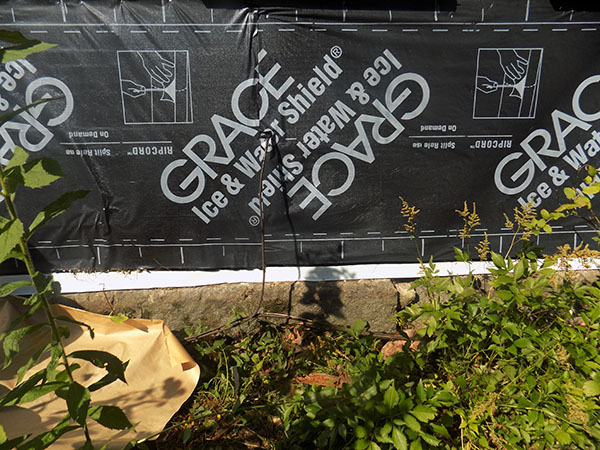
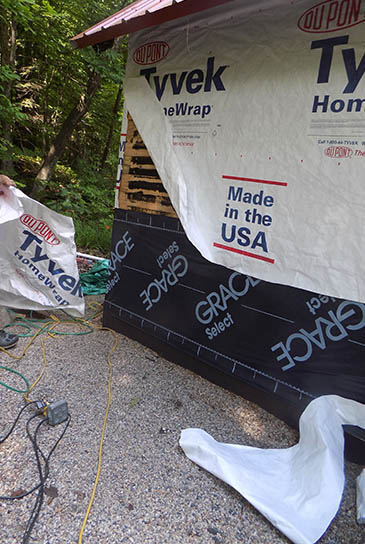
Grace water shield and Tyvek...
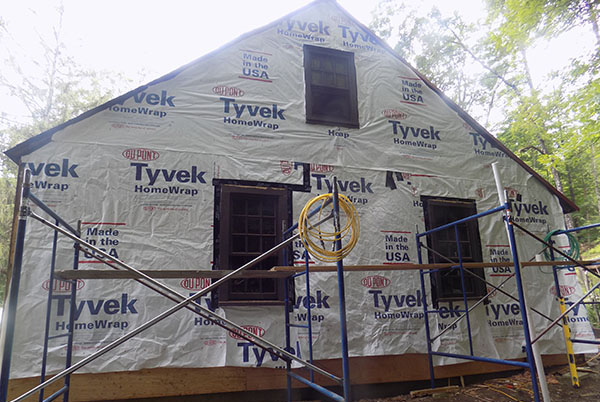
Grace watershield, Tyvek, and CedarBreathe went up before shingles. House is dry, protected, and insulated.
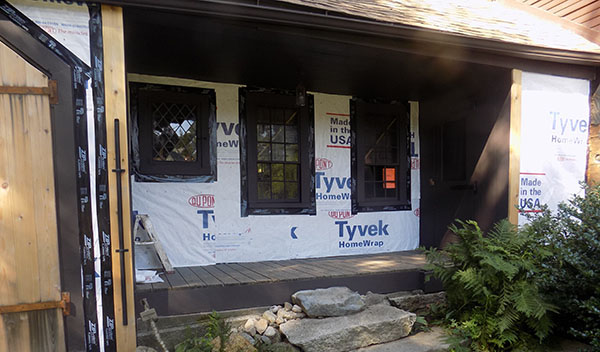
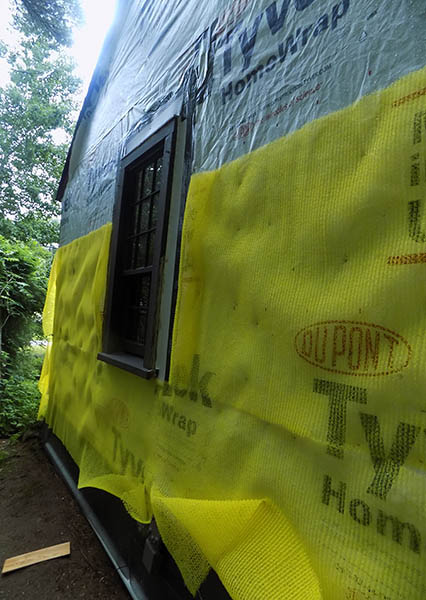

'Cedar Breathe' over the Tyvek.
We love the dark, blackish-brown new exterior flat trim paint we chose.
We also designed and built all wood frame custom window screens.
The shingles will weather and darken in time.
__________________________________
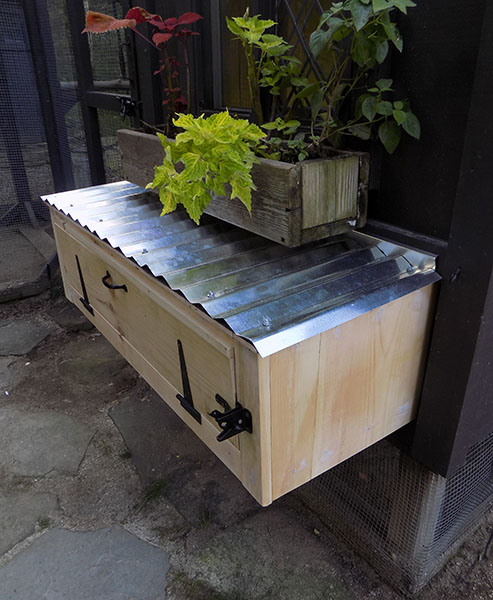
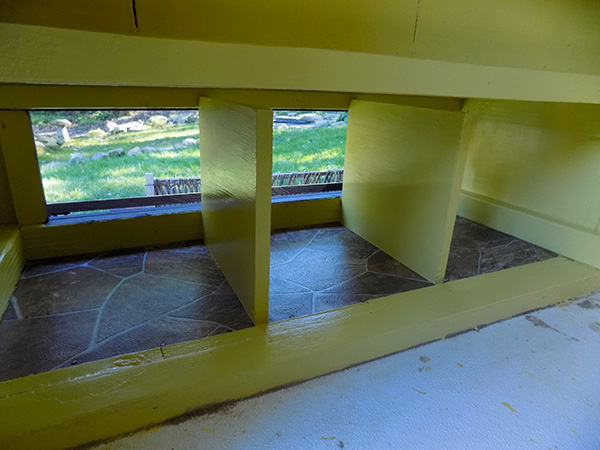
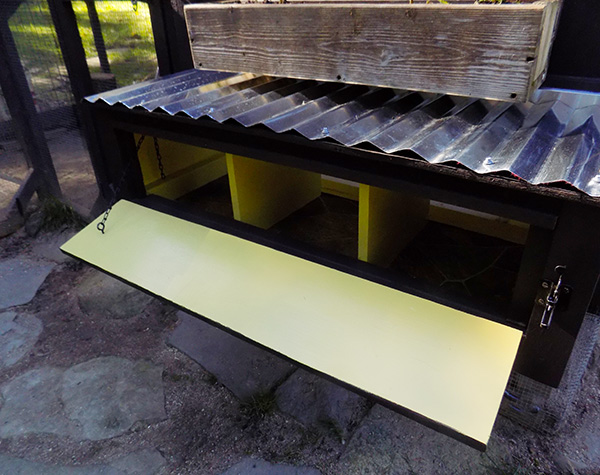
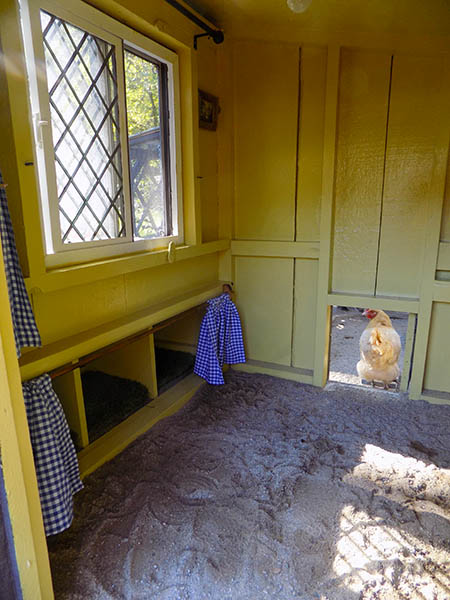
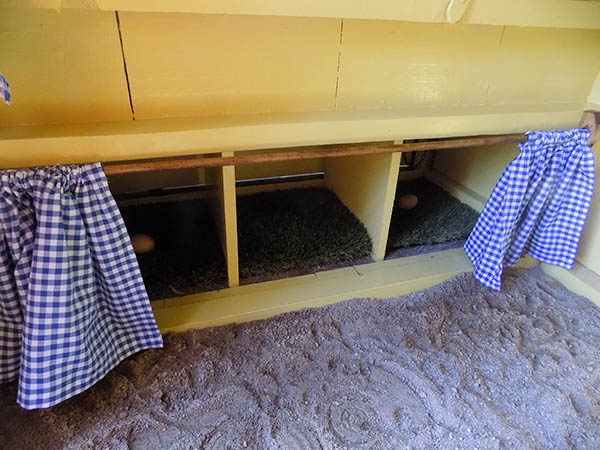
Sept. 2021~
DIY chicken coop upgrade project. We removed the nest boxes inside the coop to give the hens more room and are building EXTERIOR nest boxes with leftover lumber from past projects.

_____________________________________
Remembering~
REST IN PEACE JEMIMA~

MARCH 26, 2023~
You were taken from us today. You went very peacefully and are now with our other loved pets who have gone before. We are heartbroken, but were so blessed to have had 4 years with you.
We love you and will always remember you.
______________


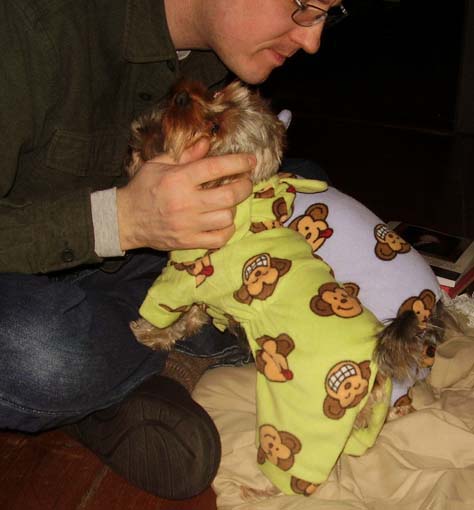
Our yorkie girls, Sasha and Deladis in happy days.
IN MEMORY
OCTOBER 3, 2016~
We lost our darling Sasha.
We are both griefstricken, and trying to hold on to the wonderful, sweet memories we have. She quickly became quite sick. She passed away at home in her little bed. She was 12.
SASHA WOULD GO WITH US TO SCHOOL PROGRAMS WE DID WEARING HER OWN 'COLONIAL COSTUME'.
WE INTRODUCED HER AS

We are so grateful that we adopted her when she was not wanted by a breeder because she wasn't " a money maker" anymore, and gave her the best life we could. She gave us even more. We thank God for the years we had with her.

You will always be the dearest little thing and a 'wise owl' in our memories.
We'll always love you , Sasha.
_______________________________

A terribly sad day.
Nov. 10, 2019~
Our dear yorkie, Deladis passed away early this morning. We know she is in heaven with her best pal, our Sasha. We love you both.
We are broken hearted. You will be in our hearts forever.

Del in puppy days.


Happy times with Sasha and Deladis.


Our dear 'Del'.
March 27, 2010~November 10, 2019
Gone way too soon.
_________________________________
WE LOVE HEARING FROM YOU~

CONTACT US~
countryladyantiques@yahoo.com
Take a tour of our home and gardens on the TOUR page.